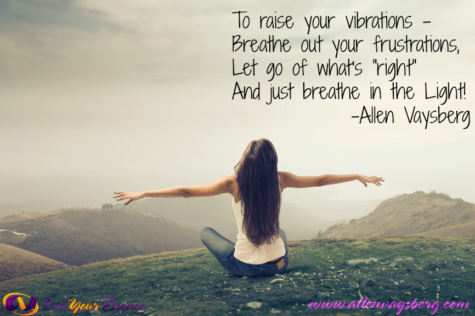
Morning Routines
Morning Memories
One of the reasons I believe in the importance of a good morning routine comes from my childhood. My parents got up every morning at 5:30 am. My mom would light a candle and make coffee. They would chat, plan the day, my mom would write a list or two… or three. They would read the bible and pray.
Every morning this could be counted on. My mom loved sitting by the window, watching the sun come up, and birds at the feeders or in the trees. My dad was more active and pretty soon he’d be outside… This routine gave their lives a consistency, a deep thread of continuity, and a certain integrity. Things I have longed for and fought against for most of my life.
What about you? What morning routines did you grow up with? What examples did you see modeled in your formative years? Are there pieces of things that you remember that you’d like to include today? Pieces that have somehow wormed their way into your mornings that you’d like to throw away? Is there some way to take the unwanted parts of your current routine and turn them into something different? Something better?
Before You Get Out Of Bed
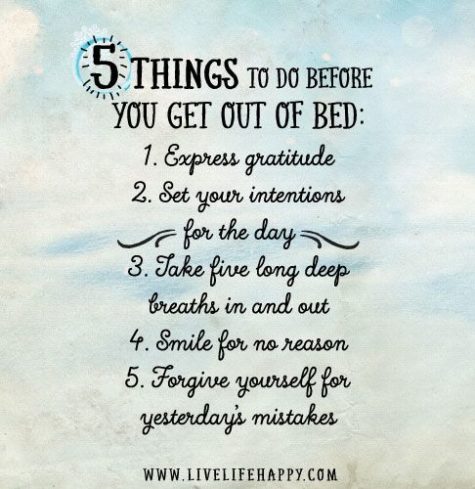
5 Things to do before you get out of bed:
- Express gratitude
- Set your intentions for the day
- Take five long deep breaths in and out
- Smile for no reason
- Forgive yourself for yesterday’s mistakes
Give Yourself Permission
Here is a nifty little creative project that I think would make a great addition to any morning routine. I found it in the book Living Out Loud, and it looks pretty easy. The premise is to live your life on purpose daily. Here’s what she has to say about it: “Permission Cards take the frenzy out of your hectic existence and give you permission to do what you REALLY want.”
The book has a tear out page with lots of little “permission slips,” but I thought it would be really fun to make our own. You can use 3 x 5 cards and cut them into quarters, thirds, or whatever shape you like. On one side write an activity that appeals to you.
Here is a list of the permission slips from the book. Feel free to make up a bunch more of your own:
Meditate * Nap * Heal * Vent * Forgive * Play * Change * Try * Recharge * Inspire * Begin * Embrace * Simplify * Create * Receive * Trust * Dream * Invent * Smile * Wish * Bloom * Grow * Love * Transform * Dance * Choose * Express * Empower * Contribute * Investigate * Let Go * Accept * Laugh
You don’t have to stick to one word permissions. Here are some other ideas:
Hurry slowly * Make mistakes * Go back to bed * Be outrageous
Make a mess * Whine and Complain * Say what I think * Play all day
Leave them plain and simple, or decorate each one with markers or stickers. If you enjoy creative projects, you can go all out with these, but if you just want something and utilitarian, it doesn’t have to be fancy at all.
Directions:
- Make the cards
- Place the cards in a bowl
- Close your eyes and pick one. (The one that you need will stick to your fingers.)
- Say out loud, “I now have permission to _____________.”
Easy peasy… be a fun way to start the day, don’t you think?
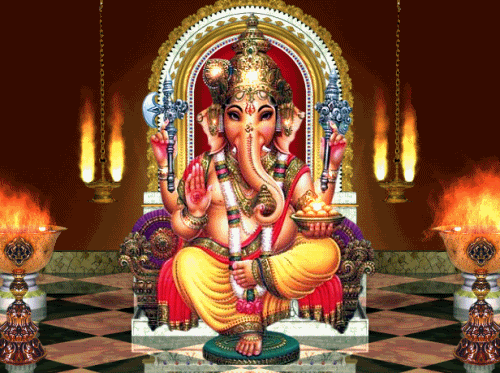
Awaken Shakti With The Ganesh Mantra
Back in 2007, we did a project Invoking Ganesh with the Ganesh Mantra. I am in the process of (very slowly) migrating it from the old Blogger Blog to it’s new home here at shirleytwofeathers.com. I could sure use some help from the Remover of Obstacles, and I thought it might be worth incorporating into a morning routine.
Here’s some info from Mind Body Green:
This is my favorite mantra to awaken Shakti, or the manifesting energy of the Universe, to stoke the fire of transformation within. I teach this mantra in classes, I sing it while driving in Los Angeles traffic and I have shared with with friends, family and students around the world because it’s easy and uplifting with the potential for great results.
According to the Buddhist Handbook, mantras are “highly compressed, power-packed formulas, usually of Sanskrit origin, which are charged with deep meaning and magical potency.” A mantra can be a word, sound or phrase which elevates or modifies consciousness through its meaning, sound, rhythm, tone and reflexology of the tongue against the palate of the mouth.
This particular mantra is “Om Gam Ganapataye Namaha,” which can be loosely translated to “Yo! Wake up Root Chakra energy of transformation so I can move through any obstacles in my life. Hooray!” Most importantly, we are calling upon the powerful energy of Ganesh, the elephant headed deity, who is widely revered as the Remover of Obstacles and the Lord of Beginnings.
According to Kundalini yoga, Ganesh, also referred to as Ganapataye, resides in the first chakra, called Muladhara (muladhara). Mula means “original,” and adhara means “foundation.” The muladhara chakra is the principal origin from which the manifesting energy of Shakti resides within each of us. When we awaken that energy, it helps us move through the Chakras with ease to activate a strong sense of self, express Divine love, communicate clearly and connect with our intuition.
This particular mantra is important because not only is it fun and catchy, but it also represents a willingness to release and move past the perceived obstacles in our lives. We can all make excuses for ourselves about why we cannot achieve our dreams, but you will have an easier time succeeding when you choose to focus on your goals rather than your challenges. So when you make the choice to chant this mantra, you are aligning yourself with your desired outcome and moving towards it with conviction.
I suggest you use this mantra when you want to clear the Chitta Vritti, or the anxious chatter of the mind. You can repeat this Mantra 108 times on your Mala beads or follow along with a video for a minute of chanting. You’ll find a bunch of them on YouTube. Most importantly, make it your own, find your voice and have fun. Remember, this is your life. Don’t let anything hold you back because you deserve the best.
Digging Through The Projects
As I was exploring ideas for daily routines, it occurred to me that we have already explored a number of quick and easy life enhancing activities that might make a great addition to a morning routine. So… I compiled a list.
- Prosperity in a Cup – from our Gypsy Magick project
- Here’s a Life Changing Action – from our Random Acts of Kindness project
- 27 Fling Boogie – from our Clearing Our Clutter project
- Five Minute Room Rescue – from our Clearing Our Clutter project
- Hot Spot Fire Drill – from our Clearing Our Clutter project
- Feel The Energy – from our Violet Flame project
- Getting Things Done – from our Violet Flame project
- Just Do It – from our Little Engine That Could project
- Art Therapy – from our Little Engine That Could project
- Abundance Formula Audio Playlist – from our Abundance Formula project
- A Few Simple Tips – from our What You Focus On Grows project
- Let’s Burn Some Bay Leaves – from our What You Focus On Grows project
- How About A Little Hypnotherapy– from our What You Focus On Grows project
- Finding Beauty In Every Freakin’ Moment – from our What You Focus On Grows project
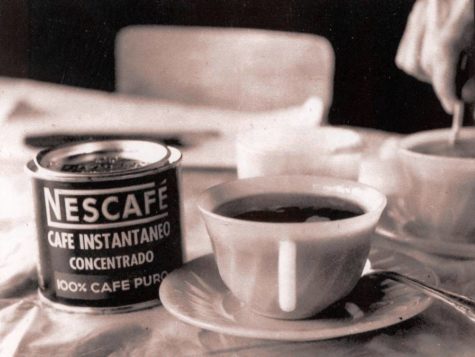
- Morning Coffee Magick – from our Living As If project
- Clean and Clear – from our Living As If project
- Rise and Shine – from our Rise and Shine project
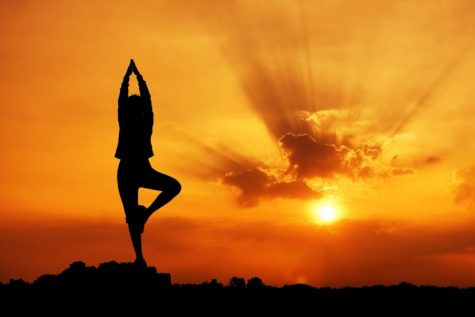
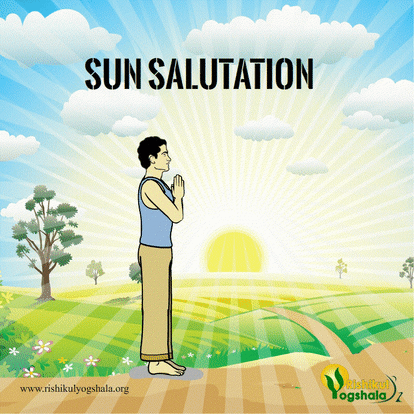
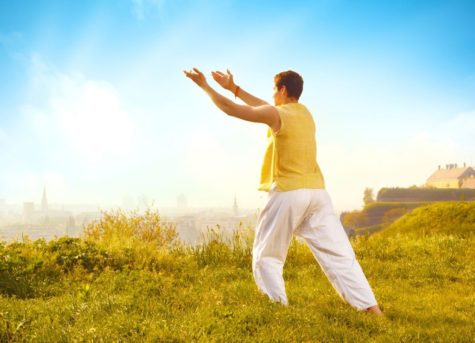
Good Morning To The Sun
This 5 Minute Morning Exercise Will Revitalize Your Life.
Making exercise a priority in the morning can be challenging. I think most people would agree that exercising in the morning is a good thing, but the reality is time always seems to get in the way. There are many benefits that come from a morning exercise routine such as; increased blood flow, more energy and fewer aches and pains.
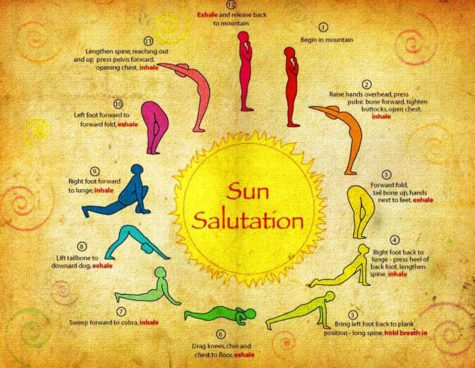
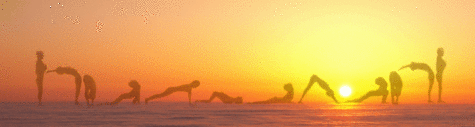
So what’s the solution to realize these benefits and many more? It’s a yoga sequence call Sun Salutation (Surya Namaskara). The Sun Salutation is a 5-minute morning exercise that will revitalize your life and send you off to tackle your day with a sense of calm and purpose.
The Sun Salutation is a sequence of postures, each with its meaning and function. It is a daily practice intended for dawn and/or sunset and done in the direction of the sun. Ideally, you would practice Sun Salutation outside to be in nature when honoring the sun and sharing your gratitude for its energy, but it isn’t a requirement.
The Benefits:
A regular and faithful practice of the Sun Salutation in the mornings can benefit you in the following ways:
- Strengthens the entire digestive system.
- Invigorates and restores the nervous system.
- Energizes the heart and regulates blood pressure and heart palpitations.
- Promotes healthy lungs and breath.
- Stimulates glandular activity.
- Strengthens the muscles in your upper and lower body including your abdomen and back.
- Reduces excess fat on the body.
- Improves kidney function.
- Encourages proper posture.
- Brings clarity to your mind.
Basically, a morning ritual that includes the Sun Salutation will benefit all your vital organs, muscles, your mind and it will provide shape and muscle to your body in a healthy, natural way.
Doing The Sun Salutation
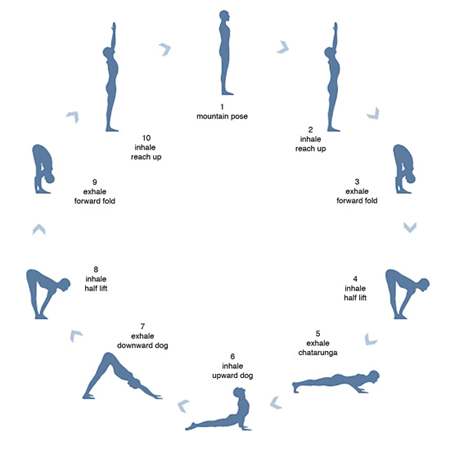
The good thing about the Sun Salutation is it is perfect for all levels. The series is made up of eight beginning yoga poses that take you through twelve stations. It can take you anywhere from 5 minutes to longer, depending on how many sequences you choose to do.
The Sun Salutation can be performed at various speeds. A slow rhythmic practice is recommended as it has greater effect on the mind. The Sun Salutation helps to attain a meditative mood when performed slowly, with attention on the breath and chanting the specific mantra. When performed with speed, it has more effect on the body, energizing it and burning extra calories.
No matter what the speed is, it is important to pay attention to the breathing.
- Contraindications and Cautions
The Sun Salutation should not be practiced by those suffering from high blood pressure, coronary diseases and strokes. Also those with hernia should avoid this. Women should generally not practice it during pregnancy. People with spondylitis and sciatica should consult a doctor before practicing the Sun Salutation.
Depending on your preferred style of yoga, you may be familiar with one of the many versions of sun salutes. The Vinyasa-style salutations, for example, incorporate chaturangas (low plank), and focus more on upper-body strength. The below postures are the most traditional version of the Sun Salute and actively engage all parts of the body.
Each Sun Salutation round consists of two sets, and the 12 yoga poses complete one set of Sun Salutations (Surya Namaskar). In order to complete the second half of one round, repeat the same sequence of postures, only moving the left leg instead of the right (steps 4 and 9). Sun Salutations, as the name suggests, are best done early morning on an empty stomach.
Let’s Get Started
Make sure you are in comfortable clothing and barefoot is best.
- Prayer pose – Pranamasana
Stand at the edge of your mat, keep your feet together and balance your weight equally on both the feet. Expand your chest and relax your shoulders.
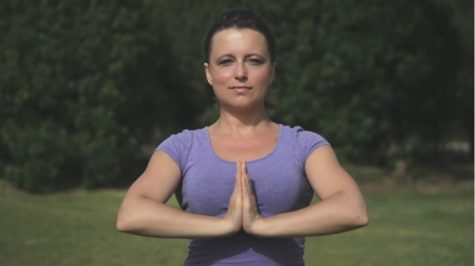
As you breathe in, lift both arms up from the sides and as you exhale, bring your palms together in front of the chest in prayer position.
Relax and breathe normally.
- Raised Arms Pose – Hastauttanasana
Breathing in, lift the arms up and back, keeping the biceps close to the ears. In this pose, the effort is to stretch the whole body up from the heels to the tips of the fingers
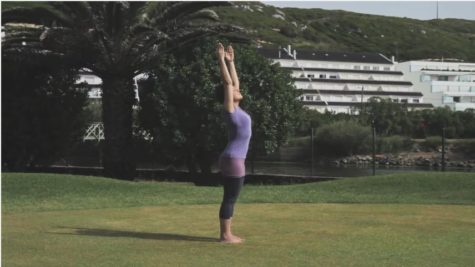
To deepen the stretch, push the pelvis forward a little bit. Ensure that you are reaching up with the fingers rather than trying to bend backwards.
Also called the Upward Salute, Urdhva Hastasana,Talasana, or the Palm Tree Pose.
- Hand to Foot Pose – Hasta Padasana
Breathing out, bend forward from the waist, keeping the spine erect. As you exhale completely, bring the hands down to the floor beside the feet.
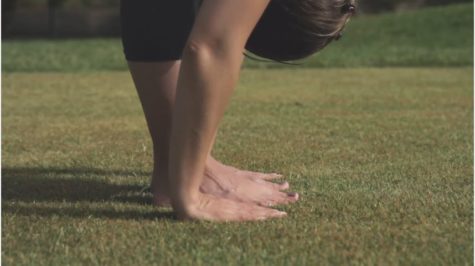
You may bend the knees, if necessary, to bring the palms down to the floor. If it doesn’t touch, go as far as possible without straining. Try to touch the knees with the forehead. To deepen the stretch, straighten the knees.
This position is also called the Standing Forward Bend or Uttanasana.
- Equestrian Pose – Ashwa Sanchalanasana
Breathing in, push your right leg back as far as possible. Bring the right knee to the floor and look up.
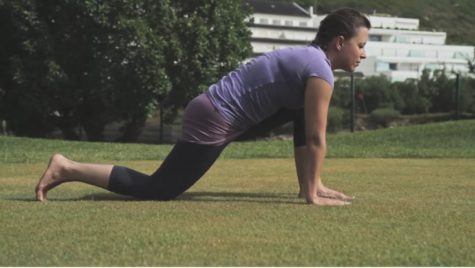
The left foot is in between the palms. Be extra careful to avoid pressure on the back knee, especially if it is on the floor. If the neck is feeling sensitive then look down at the floor in front of you instead of lifting the head up.
- Stick Pose – Dandasana
As you breathe in, take the left leg back and bring the whole body in a straight line.
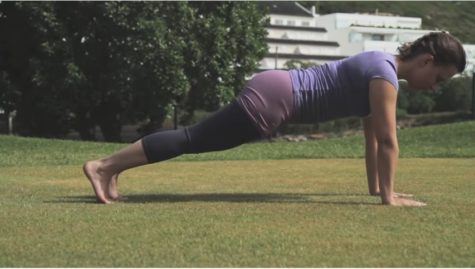
Keep your arms perpendicular to the floor.
This is similar to the Four-Limbed Staff Pose or Chaturanga Dandasana.
- Eight Points Salute – Ashtanga Namaskara
Gently bring your knees down to the floor and exhale. Take the hips back slightly, slide forward, and rest your chest and chin on the floor. Raise your posterior slightly.
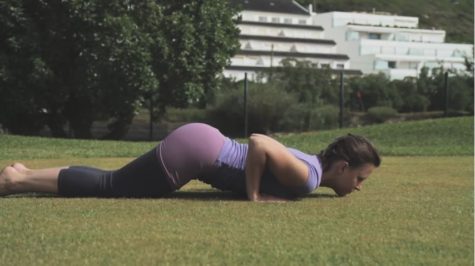
Lower the body to the ground in such a way that it touches the floor in eight locations. The two hands, two feet, two knees, and chest and chin should touch the floor.
- Cobra Pose – Bhujangasana
Slide forward and raise the chest up into the Cobra Pose. You may keep your elbows bent in this pose with the shoulders away from the ears. Look up.
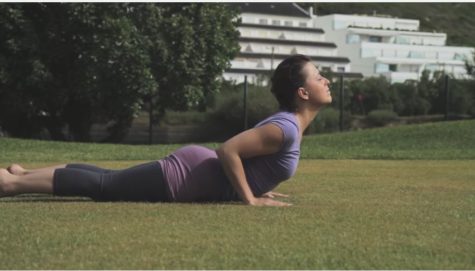
As you inhale, make a gentle effort to push the chest forward. As you exhale, make a gentle effort to push the navel down. Tuck the toes under.
This position looks like the cobra which has raised its hood.
- Mountain Pose – Parvatasana
While exhaling, take the right leg backward and place it along the left leg. Raise the buttocks. Let the hands be straight supporting the weight of the body. The head should be placed between the hands.
The pose looks like a mountain from the side. If possible, try and keep the heels on the ground and make a gentle effort to lift the tailbone up, going deeper into the stretch.
The Tadasana Pose is also called the Mountain Pose. The one described here is probably the exact same pose as the Downward Facing Dog or Adho Mukha Svanasana.
- Equestrian pose – Ashwa Sanchalanasana
Breathing in, bring the right foot forward in between the two hands, left knee down to the floor, press the hips down and look up. (This is the same position as before but with the right foot forward instead of the left foot forward.)
To deepen this yoga stretch, place the right foot exactly between the two hands and the right calf perpendicular to the floor. In this position, make a gentle effort to push the hips down towards the floor.
- Hand to Foot Pose – Hasta Padasana
Breathing out, bring the left foot forward. Keep the palms on the floor. You may bend the knees, if necessary. This is a repetition of the same pose earlier in the sequence.
To deepen this yoga stretch, gently straighten the knees and if you can, try and touch your nose to the knees. Keep breathing.
- Raised Arms Pose – Hastauttanasana
Breathing in, roll the spine up, hands go up and bend backwards a little bit, pushing the hips slightly outward.
To deepen this yoga stretch, ensure that your biceps are beside your ears. The idea is to stretch up more rather than stretching backwards.
- Standing Pose – Tadasana
As you exhale, first straighten the body, then bring the arms down. Relax in this position, observe the sensations in your body. You can also end your session with the Prayer Pose.
Confusingly, in some yoga traditions, Tadasana is also referred to as the Mountain Pose. It should not be confused with the Parvatasana (Mountain Pose) described above.
This completes one round of Sun Salutations. Start with one round when you are learning the practice and then increase it up to 10 rounds if you have the time and the desire.
An Important Point
I did the Sun Salutations for years, and really enjoyed them. I did not try very hard to do them exactly right, nor did I get caught up in proper form. I just did the best I could, and I didn’t care if it was sloppy or lazy or not very well done. And yet, it felt really good, and I got a lot of benefit from it.
If you enjoy yoga, and want to learn the correct techniques and get the most from the exercises, you can check out the information on each of the individual poses explained below. If you just want to get your body stretching and moving, watch the animation a few times and give it a go.
The Vinyasa-style Sun Salutations
The below detailed instructions come courtesy of The Yoga Journal.
- To begin, stand in Mountain Pose. Distribute your weight evenly over both feet. Establish a slow, steady rhythm for your breath. Find your center.
- Next, inhale and stretch your arms out to the side and overhead into Upward Salute.
- Reach your heart and arms to the heavens, sending your greeting to the sun.
- As you exhale, hollow out your belly and fold into Standing Forward Bend, connecting down into the earth. Keep your legs firmly engaged.
- Inhale and lengthen your spine forward into Standing Half Forward Bend. In this pose, the gaze is lifted, the spine is extended, and the fingertips can stay on the floor or rise to the shins.
- Exhale and step or lightly hop your feet back behind you into Plank Pose. Your wrists should be flat on the floor, shoulder-distance apart, and your feet should be at hip distance. Take a full breath in as you lengthen through your spine.
- Exhale and lower into Four-Limbed Staff Pose, keeping your legs straight and pushing back into your heels or bringing your knees to the floor. Build heat in the center of your body as you hold this challenging posture.
- Inhale and carve your chest forward into Upward-Facing Dog, directing that energy out from your heart. Pull your shoulders back and open your collarbones. Engage your legs but relax your gluteal muscles.
- Exhale and roll over the toes, coming into Downward-Facing Dog Pose. Ground down through your hands and feet as you lengthen your spine. Remain here for five breaths.
- On your fifth exhale, bend your knees and look between your hands. Then inhale and step or lightly hop your feet between your hands, returning to Standing Half Forward Bend.
- Exhale back to Standing Forward Bend, surrendering into the fold.
- Inhale, reaching your arms out wide to your sides and coming to stand through a flat back. Feel a renewed sense of energy as you draw your arms overhead into Upward Salute.
- Exhale and return to Mountain Pose, your home base. Remain here for a few breaths, feeling the movement of energy through your body, or continue on to your next salute.
The Individual Poses:
Prayer Pose – Pranamasana
The Prayer Pose is a common gesture used in India and many eastern countries to show respect and a popular way to greet others especially elders, seniors, gurus and guests.
In India, the word for greeting is “Namaste” which means that – I bow down to the Self in you. The Self or the Jiva is said to be located at the heart center.
Hence the palms are brought together touching one’s own heart when bowing down and greeting others. This gesture with the hands is called Pranamasana.
- Step 1
Stand erect with the feet held together.
- Step 2
Bring the two hands together and the palms touching each other at the chest level. Look straight ahead. Breathe in normally. This will give a sense of relaxation.
This pose is done in the beginning and end of the Sun Salutation. Pranamasana gives a sense of relaxation and inner peace when done with feeling.
Mountain Pose – Tadasana
The foundation of all standing poses, Mountain Pose makes a great a starting position, resting pose, or tool to improve posture.
- Note
The Mountain Pose – Tadasana shares its common name with Mountain Pose – Parvatasana which appears to be the same as Downward Facing Dog, descriptions of both can be found below.
- Step 1
Stand with the bases of your big toes touching, heels slightly apart (so that your second toes are parallel). Lift and spread your toes and the balls of your feet, then lay them softly down on the floor. Rock back and forth and side to side. Gradually reduce this swaying to a standstill, with your weight balanced evenly on the feet.
- Step 2
Firm your thigh muscles and lift the knee caps, without hardening your lower belly. Lift the inner ankles to strengthen the inner arches, then imagine a line of energy all the way up along your inner thighs to your groins, and from there through the core of your torso, neck, and head, and out through the crown of your head. Turn the upper thighs slightly inward. Lengthen your tailbone toward the floor and lift the pubis toward the navel.
- Step 3
Press your shoulder blades into your back, then widen them across and release them down your back. Without pushing your lower front ribs forward, lift the top of your sternum straight toward the ceiling. Widen your collarbones. Hang your arms beside the torso.
- Step 4
Balance the crown of your head directly over the center of your pelvis, with the underside of your chin parallel to the floor, throat soft, and the tongue wide and flat on the floor of your mouth. Soften your eyes.
Mountain Pose is usually the starting position for all the standing poses. But it’s useful to practice Mountain Pose as a pose in itself. Stay in the pose for 30 seconds to 1 minute, breathing easily.
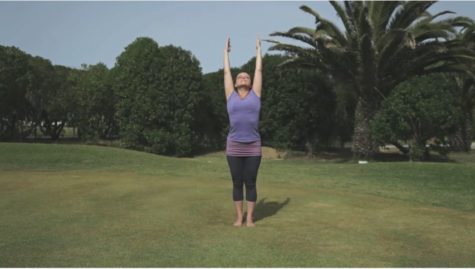
Upward Salute – Urdhva Hastasana
Urdhva Hastasana literally translates to “Raised Hands Pose,” but it is also sometimes called Talasana, the Palm Tree Pose.
- Step 1
Stand in Mountain Pose. Turn your arms outward (or laterally) so your palms face away from your torso and thumbs point backward. With an inhale, sweep your arms out to the sides and up toward the ceiling.
- Step 2
If you’re tighter in the shoulders, stop when your arms are approximately parallel to each other. But if possible without hunching your shoulders forward, press your palms firmly together by, touching the bases of your palms first, then the palms themselves, and finally the fingers.
- Step 3
Extend your elbows fully and reach up through your pinkies so your thumbs turn slightly down toward the crown of your head. Making sure not to compress the back of your neck, tip your head back slightly and gaze at your thumbs.
- Step 4
Don’t let your lower front ribs protrude forward. Bring your front ribs down (toward your pelvis) and in (toward your spine), and lengthen your tail bone toward the floor. Then lift your rib cage evenly away from your pelvis to stretch the circumference of your belly. Hold for a few breaths.
- Step 5
Exhale and, as you sweep your arms out to the sides, tip your torso forward from the hip joints to fold into Standing Forward Bend.
This pose stretches the belly, improves digestion, stretches the shoulders and armpits, and helps relieve mild anxiety. It’s good for fatigue, asthma, indigestion and back ache.
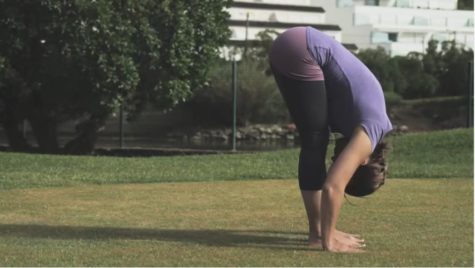
Standing Forward Bend – Uttanasana
Standing Forward Bend will wake up your hamstrings and soothe your mind. If you have had a back injury, do this pose with bent knees.
- Step 1
Stand in Mountain Pose, hands on hips. Exhale and bend forward from the hip joints, not from the waist. As you descend draw the front torso out of the groins and open the space between the pubis and top sternum. As in all the forward bends, the emphasis is on lengthening the front torso as you move more fully into the position.
- Step 2
If possible, with your knees straight, bring your palms or finger tips to the floor slightly in front of or beside your feet, or bring your palms to the backs of your ankles. If this isn’t possible, cross your forearms and hold your elbows. Press the heels firmly into the floor and lift the sitting bones toward the ceiling. Turn the top thighs slightly inward.
- Step 3
With each inhalation in the pose, lift and lengthen the front torso just slightly; with each exhalation release a little more fully into the forward bend. In this way the torso oscillates almost imperceptibly with the breath. Let your head hang from the root of the neck, which is deep in the upper back, between the shoulder blades.
- Step 4
Standing Forward Bend can be used as a resting position between the standing poses. Stay in the pose for 30 seconds to 1 minute. It can also be practiced as a pose in itself.
- Step 5
Don’t roll the spine to come up. Instead bring your hands back onto your hips and reaffirm the length of the front torso. Then press your tailbone down and into the pelvis and come up on an inhalation with a long front torso.
- Beginner’s Tip
To increase the stretch in the backs of your legs, bend your knees slightly. Imagine that the sacrum is sinking deeper into the back of your pelvis and bring the tailbone closer to the pubis. Then against this resistance, push the top thighs back and the heels down and straighten the knees again. Be careful not to straighten the knees by locking them back (you can press your hands against the back of each knee to provide some resistance); instead let them straighten as the two ends of each leg move farther apart.
This pose calms the brain and helps relieve stress and mild depression. It also stimulates the liver and kidneys; stretches the hamstrings, calves, and hips; strengthens the thighs and knees; improves digestion; helps relieve the symptoms of menopause; and reduces fatigue and anxiety. It also relieves headache and insomnia. Standing Forward Bend is therapeutic for asthma, high blood pressure, infertility, osteoporosis, and sinusitis.
Standing Half Forward Bend – Ardha Uttanasana
With any neck injury, don’t lift the head to look forward.
- Step 1
From Standing Forward Bend, press your palms or fingertips into the floor (or blocks on the floor) beside your feet. With an inhale, straighten your elbows and arch your torso away from your thighs, finding as much length between your pubic bone and navel as possible.
- Step 2
With your palms (or fingertips) push down and back against the floor, and lift the top of your sternum up (away from the floor) and forward. You might bend your knees slightly to help get this movement, which will arch the back.
- Step 3
Look forward, but be careful not to compress the back of your neck. Hold the arched-back position for a few breaths. Then, with an exhale, release your torso into full Standing Forward Bend or, if you are doing the Sun Salutations, lower yourself into the plank position.
The Standing Half Forward Bend stretches the front torso, strengthens the back and improves posture. This position also stimulates the belly
Plank Pose
Plank Pose is one of the positions in the traditional Sun Salutation sequence. You can also perform this pose by itself and stay anywhere from 30 seconds to 1 minute. If you have carpal tunnel syndrome, it is not recommended that you hold this pose for any length of time.
- Step 1
If you are coming into this pose from the Standing Half Forward Bend, exhale and step or lightly hop your feet back behind you into Plank Pose.
When practicing this pose by itself, start in Downward Facing Dog. Then inhale and draw your torso forward until the arms are perpendicular to the floor and the shoulders directly over the wrists, torso parallel to the floor.
- Step 2
Press your outer arms inward and firm the bases of your index fingers into the floor. Firm your shoulder blades against your back, then spread them away from the spine. Also spread your collarbones away from the sternum.
- Step 3
Press your front thighs up toward the ceiling, but resist your tailbone toward the floor as you lengthen it toward the heels. Lift the base of the skull away from the back of the neck and look straight down at the floor, keeping the throat and eyes soft. Exhale and lower into Four-Limbed Staff Pose (if you are practicing the Sun Salutations).
A beginner’s best friend, this pose is the perfect precursor to more challenging arm balances. It strengthens the arms, wrists, and spine, and also tones the abdomen.
Four-Limbed Staff Pose – Chaturanga Dandasana
Four-Limbed Staff Pose is one of the positions in the Sun Salutation sequence. You can also practice this pose individually for anywhere from 10 to 30 seconds. Release with an exhalation. Either lay yourself lightly down onto the floor or push strongly back to Downward Facing Dog, lifting through the top thighs and the tailbone.
- Step 1
At this point, you are in the Plank Pose. Firm your shoulder blades against your back ribs and press your tailbone toward your pubis.
- Step 2
With an exhalation slowly lower your torso and legs to a few inches above and parallel to the floor. There’s a tendency in this pose for the lower back to sway toward the floor and the tailbone to poke up toward the ceiling. Throughout your stay in this position, keep the tailbone firmly in place and the legs very active and turned slightly inward. Draw the pubis toward the navel.
- Step 3
Keep the space between the shoulder blades broad. Don’t let the elbows splay out to the sides; hold them in by the sides of the torso and push them back toward the heels. Press the bases of the index fingers firmly to the floor. Lift the top of the sternum and your head to look forward.
- Contraindications and Cautions
It is not recommended that you hold this pose for any length of time if you are pregnant, or if you have carpal tunnel syndrome.
Even experienced students have difficulty with Four-Limbed Staff Pose. Lay a thickly rolled blanket on the floor below your Plank Pose, parallel to your spine. Lower yourself lightly onto this support. Use it minimally, just enough to keep yourself afloat.
You can get a feel for this challenging position by practicing it standing upright. Stand and face a wall, a few inches away from the wall. Press your hands against the wall, slightly lower than the level of your shoulders. Imagine that you are trying to push yourself away from the wall, but the firmness of your shoulder blades against the back prevents any movement. Lengthen your tailbone into your heels and lift the top of your sternum toward the ceiling.
The completed form of Four-Limbed Staff Pose is quite difficult to perform at first, until your arms, back, and legs are strong enough to support you. From Plank Pose, begin by lowering your knees to the floor and then, with an exhalation, lower your sternum to within an inch or two above the floor.
Upward Facing Dog – Urdhva Mukha Svanasana
Upward-Facing Dog will challenge you to lift and open your chest. Upward Facing Dog is one of the positions in the traditional Sun Salutation sequence. You can also practice this pose individually, holding it anywhere from 15 to 30 seconds, breathing easily. Release back to the floor or lift into Downward Facing Dog with an exhalation.
- Step 1
Lie prone on the floor. Stretch your legs back, with the tops of your feet on the floor. Bend your elbows and spread your palms on the floor beside your waist so that your forearms are relatively perpendicular to the floor.
- Step 2
Inhale and press your inner hands firmly into the floor and slightly back, as if you were trying to push yourself forward along the floor. Then straighten your arms and simultaneously lift your torso up and your legs a few inches off the floor on an inhalation. Keep the thighs firm and slightly turned inward, the arms firm and turned out so the elbow creases face forward.
- Step 3
Press the tailbone toward the pubis and lift the pubis toward the navel. Narrow the hip points. Firm but don’t harden the buttocks.
- Step 4
Firm the shoulder blades against the back and puff the side ribs forward. Lift through the top of the sternum but avoid pushing the front ribs forward, which only hardens the lower back. Look straight ahead or tip the head back slightly, but take care not to compress the back of the neck and harden the throat.
- Contraindications and Cautions
It is not recommended that you hold this position for any length of time if you have the following – back injury, Carpal tunnel syndrome, headache, or pregnancy.
Often it’s difficult to keep the legs strongly suspended above the floor. Before you move into the pose, position a thick blanket roll below your top thighs. When you are in the pose, lightly rest your thighs on this roll as you press the tailbone closer to the roll.
There’s a tendency in this pose to “hang” on the shoulders, which lifts them up toward the ears and “turtles” the neck. Actively draw the shoulders away from the ears by lengthening down along the back armpits, pulling the shoulder blades toward the tailbone, and puffing the side ribs forward. If you need help learning this, lift each hand on a block.
Upward Facing Dog improves posture; strengthens the spine, arms, wrists; stretches chest and lungs, shoulders, and abdomen; firms the buttocks; and stimulates abdominal organs. This position also helps relieve mild depression, fatigue, and sciatica, and is therapeutic for asthma.
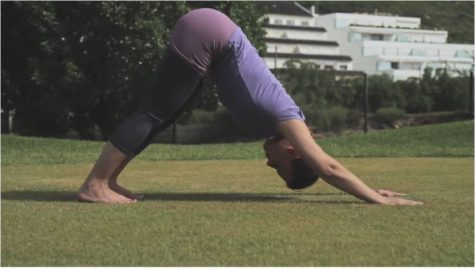
Downward Facing Dog – Adho Mukha Svanasana
Deservedly one of yoga’s most widely recognized yoga poses, Downward Facing Dog, offers the ultimate all-over, rejuvenating stretch. Downward Facing Dog is one of the poses in the traditional Sun Salutation sequence. It’s also an excellent yoga asana all on its own. Stay in this pose anywhere from 1 to 3 minutes. Then bend your knees to the floor with an exhalation and rest in Child’s Pose.
- Step 1
Come onto the floor on your hands and knees. Set your knees directly below your hips and your hands slightly forward of your shoulders. Spread your palms, index fingers parallel or slightly turned out, and turn your toes under.
- Step 2
Exhale and lift your knees away from the floor. At first keep the knees slightly bent and the heels lifted away from the floor. Lengthen your tailbone away from the back of your pelvis and press it lightly toward the pubis. Against this resistance, lift the sitting bones toward the ceiling, and from your inner ankles draw the inner legs up into the groins.
- Step 3
Then with an exhalation, push your top thighs back and stretch your heels onto or down toward the floor. Straighten your knees but be sure not to lock them. Firm the outer thighs and roll the upper thighs inward slightly. Narrow the front of the pelvis.
- Step 4
Firm the outer arms and press the bases of the index fingers actively into the floor. From these two points lift along your inner arms from the wrists to the tops of the shoulders. Firm your shoulder blades against your back, then widen them and draw them toward the tailbone. Keep the head between the upper arms; don’t let it hang.
- Contraindications and Cautions
Pregnancy: Do not do this pose late-term. High blood pressure or headache: Support your head on a bolster or block, ears level between the arms. Do not hold this pose for any length of time if you have Carpal tunnel syndrome or Diarrhea.
If you have difficulty releasing and opening your shoulders in this pose, raise your hands off the floor on a pair of blocks or the seat of a metal folding chair.
Downward Facing Dog calms the brain and helps relieve stress and mild depression. This pose also energizes the body; stretches the shoulders, hamstrings, calves, arches, and hands; and strengthens the arms and legs. It helps relieve the symptoms of menopause; and relieves menstrual discomfort when done with head supported. Downward Facing Dog helps prevent osteoporosis; improves digestion; and relieves headache, insomnia, back pain, and fatigue. It is therapeutic for high blood pressure, asthma, flat feet, sciatica, and sinusitis.
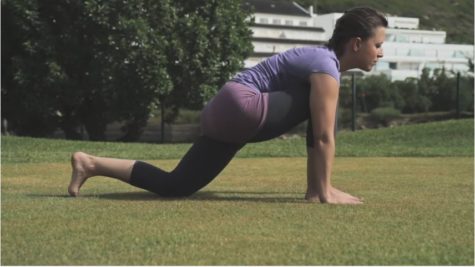
Equestrian Pose – Ashwa Sanchalanasana
The Equestrian Pose is also called the Lunge Pose. Be extra careful to avoid pressure on the back knee, especially if it is on the floor. Consider placing a blanket underneath the knee to support it. This pose is fairly easy to do and gives flexibility to the legs. If the neck is feeling sensitive then look down at the floor in front of you instead of lifting the head up
- Step 1
The Equestrian Pose is done immediately after the Hand To Foot Pose (Standing Forward Bend) when doing the traditional version of the Sun Salutations. So this is the starting pose for the Equestrian Pose.
- Step 2
From this position, take the left leg as far back as possible. In the process, bend the right knee without changing its position. Inhale while stretching the left leg backwards.
- Step 3
Keep the hands straight with fingers touching the floor. Arch the back and tilt the head slightly backward. Look straight ahead.
When done as part of the Sun Salutation exercises a mantra can be chanted while performing this asana. Equestrian Pose is done as the 4th pose and the 9th pose. During 4th pose chant “Om Bhanave Namaha”. It means salutations to the one who shines. During 9th pose chant “Om Adityaya Namaha”. It means salutation to the son of Aditi.
The Equestrian Pose stretches the groin, quadriceps, leg and the hips; and also stretches the back muscles and opens the chest. It tones the abdominal organs and is good for indigestion, constipation and sciatica. It also gives a sense of nervous balance.
Mountain Pose – Parvatasana
In Sanskrit “Parvata’ means mountain. The pose looks like a mountain from the sides and hence the name Parvatasana. Confusingly, in some yoga traditions, Mountain Pose is also a name given to the Tadasana pose and this pose is probably the exact same pose as the Downward Facing Dog or Adho Mukha Svanasana.
As part of the Sun Salutation exercises, Parvatasana Mountain Pose is performed after the Equestrian Pose. Hence the Equestrian Pose becomes the starting pose for Parvatasana Mountain Pose.
- Step 1
From the Equestian Pose, straighten the bent leg and take it backwards. Exhale during this process. Let the right and left foot be together.
- Step 2
Raise the buttocks up. Let the two arms be on the floor and support the body weight.
- Step 3
Lower the head to be between the two arms. The body makes the shape of a triangle when observed from the sides. It looks like a mountain and hence the name.
When done as part of one of the traditional versions of the Sun Salutation exercises, Parvatasana Mountain Pose is done as the fourth pose and the ninth pose.
Parvatasana Mountain Pose can strengthen the wrists and legs. It also increases the flow of blood to the head. It tones the spinal nerves and sends good flow of blood to the spinal region. This pose also increases blood flow to the brains.
Eight Limbed Salutation – Ashtanga Namaskara
The Eight Limbed Salutation is part of the Sun Salutation series of asanas. It appears as the 6th pose in the Sun Salutation or Surya Namaskara. In this pose, the body touches the ground in eight locations – the two feet (toes), the two knees, the two palms, the chest and the head.
In Sanskrit, “ashta” means eight and “anga” means part. Hence the name Ashtanga Namaskara. This pose is also used by devotees for paying obeisance to deities in Indian temples.
- Step 1
Lower the body so that the body is parallel to the ground.
- Step 2
Let the following parts touch the floor – The two feet, the two knees, the two palms, the chest and the chin. The hip and abdomen is slightly raised up.
While performing this pose the breath is held outside and the breathing is stopped for few seconds.
Cobra Pose – Bhujangasana
The Cobra Pose, is one of the main backward bending asanas used in yoga. In the Cobra Pose, the head and trunk resembles a cobra with raised hood, hence the name (Bhujanga means Cobra in sanskrit).
- Step 1
Lie down on your stomach with hands on the side, toes touching together.
- Step 2
Bring your hands to the front at the shoulder level, with palms resting on the floor. Slowly raise your trunk and head with the support of the palms alone. The arms should be bent at the elbows.
- Step 3
Arch your neck slightly backwards, so that the pose looks like a cobra with raised hood. Breathe normally and feel the stomach press against the floor.
- Step 4
Hold the position for few seconds in the beginning stages. One may go up to 2 minutes as one progresses. You can release the pose by bringing the hands back to the sides and resting your head on the forehead. Then, place the hands under your head like a pillow. Bend and rest your head on one side and breathe normally.
Usually our back muscles don’t get much exercise, in our day to day activities. The weakening of these muscles can lead to back aches, stooping, slipped disks and other posture defects. The Cobra Pose is an easy way to strengthen the back muscles. You should avoid this asana if you are pregnant or if you have had any abdominal surgery in the recent past.
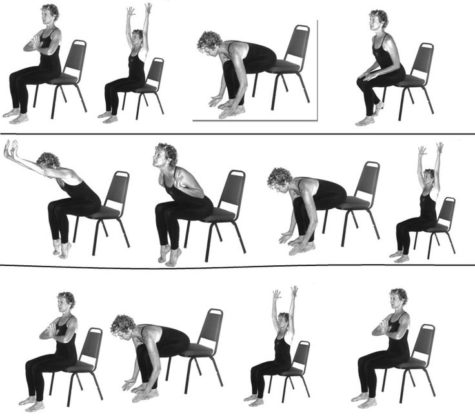
Last But Not Least:
I also found this graphic that shows how to do Sun Salutations in a seated position.
Sources:
Get Moving In The Morning
“Movement is life.” First, on a sheer biological level, without movement, there truly is no life. If your lungs do not move, you can not breathe. If your heart does not move, it can not pump blood through your body. When the blood cells don’t move in your body, they can not carry the much needed oxygen. And the list goes on and on. Movement is what equips our amazing and highly complex bodies to operate. So, movement is life.
So, with that said, any person has the ability to do ten to fifteen minutes of light, moderate movement to start their day. And, this is not “going to the gym for 2 hours” type of exercise. This morning exercise routine is more of a “your body has been asleep for hopefully 7 hours and needs to be primed and stretched before being able to fully function for you through the day” type of exercise.
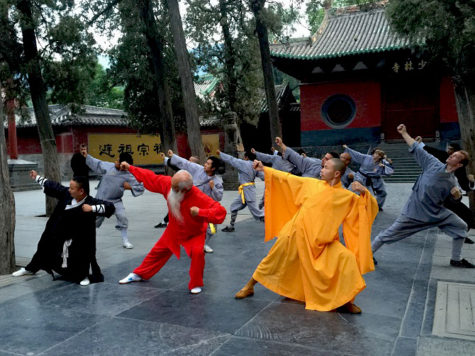
This is an exercise that requires no equipment. It can be done anywhere, inside or outside. It has a track record of thousands of years and shares much in common with yoga but many find it less difficult and you don’t have to get on the floor!
Qi Gong is an ancient Chinese health care system that integrates physical postures, breathing techniques and focused intention to open blockages in the body based on the same meridian system used in acupuncture. The movements are fairly easy to learn and allow access to everyone. To begin to benefit from Qi Gong you do not have to be fit, you don’t have to be flexible; you don’t even have to be able to stand up. The exercises can be modified for almost anyone with patience that wants to learn.
What is Qi Gong?
Qi Gong (qigong, chi kung, chi gung) is an ancient Chinese health care system that integrates physical postures, breathing techniques and focused intention. The word Qi Gong is made up of two Chinese words: Qi (chi) is pronounced chee and is usually translated to mean the life force or vital-energy that flows through all things in the universe. And, the second word, Gong, pronounced gung, means accomplishment, or skill that is cultivated through steady practice. So, put together, Qi Gong (Chi Kung) literally means “Life Energy Cultivation.”
It is a holistic system of coordinated body posture and movement, breathing, and meditation used for health, spirituality, and martial arts training. With roots in Chinese medicine, philosophy, and martial arts, Qi Gong is traditionally viewed as a practice to cultivate and balance qi (life energy). Therefore, it is a system practiced for health maintenance, healing and increasing vitality.
According to Taoist, Buddhist, and Confucian philosophy, Qi Gong allows access to higher realms of awareness, awakens one’s “true nature”, and helps develop human potential. This powerful system of exercise, has been practiced for centuries by millions of Chinese people, and is now practiced worldwide for recreation, exercise and relaxation, preventive medicine and self-healing, alternative medicine, meditation and self-cultivation, and training for martial arts.
Qi Gong practice typically involves moving meditation, coordinating slow flowing movement, deep rhythmic breathing, and calm meditative state of mind. It is based on repetitions of very precise sets of movements, specifically designed to benefit health on many different levels. Some common Qi Gong movements include raising and lowering the arms, moving the head from side to side, and gently rubbing the ears, feet, and hands.
The Benefits of Qi Gong
Sometimes Qi Gong is called a moving meditation in which the mind and body are led to a state of balance and equilibrium also known as homeostasis. A Harvard medical publication said it should also be called “moving medication.” The advantages of improving strength, flexibility and balance are pretty obvious but the advantages of peace that comes from the moving flowing meditative aspect of Qi Gong is equally important.

When the body is in a state of balance all the systems work better.
Much of the tendency to this internal balance is happening all of the time totally out of our awareness. With very little conscious input from us, our bodies are working to keep us in a state of homeostasis, that is, everything just so. The fight-flight reaction vs. the relaxation response is an example of the body tending toward homeostasis.
But in our stressed out world many of us are living in a continuous state of stress without even being aware of it. Without practice the relaxation response doesn’t always occur. Qi Gong can help us return to homeostasis and the relaxation response.
In addition to our tendency to stress there is a second profound tendency to move less as we develop physical limitations. Often the two occur together but either alone can lead to a downward spiral.
The health benefits from Qi Gong comes about both by supporting the body’s natural tendency to return to balance and equilibrium and also gently yet profoundly creating strength, flexibility and balance in the muscles and joints through gentle flowing movements. This is the winning combination: body and mind. The physical and mental practice continuously supports the return to balance.
The Eight-brocade Exercise (Ba Duan Jin)
The Eight-brocade Exercise (Ba Duan Jin) is a simple sequence of movements, appropriate for almost anyone. Unlike more advanced Qi Gong practices, it can be learned from a book. The complete set of movements only takes five to ten minutes to do and helps to release blockages along all twelve meridians.

This 800-year old exercise, which the ancients likened to beautiful brocade, consists of eight sections, is very popular among the Chinese people. There are different postures such as sitting or standing; each section can be practiced on its own and each targets a specific organ or health need. The whole set of movements are fine and delicate with moderate intensity. The movements can vary greatly according to different schools of practice; the following is the most important and widely practiced protocol.
Prepare yourself by standing naturally with feet shoulder-width apart, and the hands hanging by both sides. Be calm, focused and let the body relax and the breathing natural.
- Two Hands Hold up the Heavens
Raise both hands above the head with the palms facing upward, as if holding up the heavens. The eyes should follow the hands over the head. Stretch up on the toes and hold the posture for a few seconds before gently returning to the starting position. Inhale through the nose while bringing the arms up, and exhale through the mouth when bringing the arms down. Repeat the procedure six times.
This section is said to benefit the triple burner, which is the passage for water, nutrients and fluid throughout the body. This exercise activates the fluid flowing in it and ensures proper nourishment throughout the body.
- Draw a bow like shooting a hawk
Separate the legs and bend the knees, with half-clenched fists in front of the chest. Draw the hands up and pull as if drawing a bow to the right; extend the limbs fully; then repeat on the left side. The eyes should follow the trajectory of the imaginary arrow at all times. Inhale through the nose while drawing the arms up, and exhale through the mouth when bringing the arms down. Repeat the whole procedure six times.
This section is said to benefit the lungs by expanding the chest and exercising the muscles of the upper body.
- Separate Heaven and Earth
Standing naturally with arms bent at the elbows, let the palms face upwards and the fingertips touch each other. Raise the hands and turn the palms downwards; then draw the right hand up with the palm facing upward; the left hand moves downward with the palm facing down. When the arms are extended, straighten the legs. Exhale through the nose when both hands are in front of the chest, and inhale through the mouth when the arms are apart. Repeat the whole procedure six times.
This section is said to regulate the spleen and stomach by the lifting and lowering actions. It contributes to the ascending of spleen-qi and the descending of stomach-qi, thus promoting the digestive functions.
- Wise Owl Gazes Backwards
Inhaling while slowly turning the head to the right side as far as possible, look back as much as possible, then exhale and return to the original position. Repeat on the left side as one complete procedure and repeat six times.
This section is said to benefit those with consumptive disease and injuries by enriching the essence and blood, calming the mind and promoting organ functioning.
- Sway the Head and Shake the Tail
Prepare by squatting down halfway with feet apart and the palms on the thighs. Look down and lean the upper trunk forward, exhaling while swinging the head to the left and swinging the buttocks to the right; inhale while returning. Switch directions and repeat the cycle six times.
It is said that swaying the head can send down heart-fire while swinging the buttocks causes the kidney-yin to ascend to meet the heart-fire; it lets both organs mutually complement each other.
- Two Hands Hold the Feet
Bend over slowly and touch your toes keeping the legs straight; keep the head up slightly. Then place the hands on the lower back and bend backward and stretch as far as you can. Inhale through the nose at the start of the bend and exhale through the mouth at the end. Repeat the whole procedure six times.
This section can reinforce the kidneys and strengthen the waist and the knees. The kidneys are the source of all energy in the body and are located near the waist; constant practice benefits the function of all the other organ systems as well.
- Punch With Anger
Take a horse-riding posture; the hands are tightly clenched with palms facing upwards at waist level. Punch with the palm side downward and draw back with alternative arms; imagine pent-up anger being released through the punch. Inhale through the nose and exhale through the mouth.
This section is said to strengthen the muscles of the whole body.
- Bouncing on the Toes
Interlock the hands and put them behind the neck and extend the neck backward while the hands draw forward; stretch up on the toes and hold the posture for a few seconds before gently returning to the starting position. Exhale while lifting on both heels; inhale while returning.
This is a push upward from the toes with a small rocking motion on landing. The gentle shaking vibrations of this piece is said to “smooth out” the qi after practice of the preceding seven pieces. Repeat six times.
This section is said to enhance the protective qi and promote resistance. The Bladder Meridian, which governs the surface of the whole body, passes through the neck. The movements promote the smooth flow of protective qi and secure the striae on the body surface.
Sources:
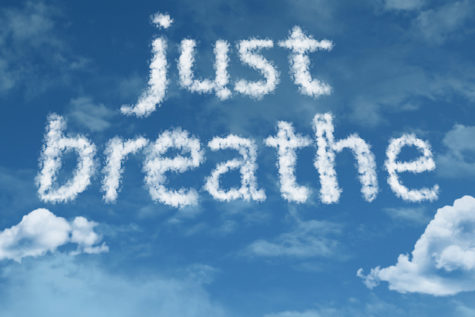
Wake Up and Breathe
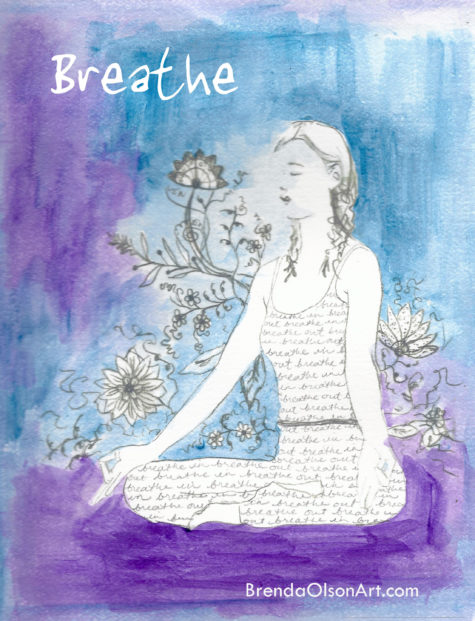
Stress is detrimental. But you already knew that! So why when you open your eyes in the morning to nothing but a dismal morning, does your stress only get heavier and deeper? You draw in a soothing breath, not realizing the benefits swirling about in that one inhalation.
What if you could tap into that energy and positivity upon waking?
Now, please don’t mistake simple breathing workouts as some new age mumbo jumbo, or even think that you should just ignore it because you already know how to breathe!
You know how to run, but can you run a marathon?
How Do Breathing Exercises Work?
Breathing fully and deeply stimulates the parasympathetic nervous system (PNS) (source).
This system is for the mellow, steady-state activity going on in your body constantly. When the PNS is moderated, the blood vessels dilate, the GI tract is stimulated, nutrients are absorbed, and the fight-or-flight response is mitigated.
Thus, breathing exercises give you control over the parasympathetic nervous system by stimulating the vagus nerve that works like an on/off switch (source).
These breathing exercises all have a basis in mediation and yoga and you will start to notice the focus on counting as you go through them.
- Why is this important?
Well, focusing on something other than the day ahead is a great way to actually begin your day relaxed! A novel thought I know, but it works!
6 Breathing Exercises to Jumpstart Your Morning
Breathing exercises may sound like something from yoga class, but there are 6 exercises that can bring sunshine and warmth to every morning. These six morning breathing exercises are not only relaxing, they shake off any lingering remnants of sleep.
By doing this in the morning or whenever you are in a pinch for tranquility, you turn on the PNS, and regain control of your mind and body.
Wake up, breathe, and get ready to tackle the day ahead of you.
- 1. Simple Belly Breathing
This is considered one of the most basic types of breath work – perfect for beginners who want an introduction to these types of exercises. You may find that you know it from a yoga class you took months ago. It is very simple and not too intense.
- Sit or lay comfortably on a flat surface, such as a yoga mat or on your bed. It doesn’t matter as long as your back is straight.
- Place one hand over your stomach, just below the ribcage, with the bottom edge of your hand (the pinky) resting over the navel.
- Place your second hand over your chest.
- Inhale deeply through the nostrils, trying expand the space beneath the bottom hand first. Your chest should not lift or expand in any way.
- Breathe out through your mouth. Purse your lips. Gently use the hand on your stomach to guide the abdominals inwards, pressing out the exhalation.
- Repeat this breathing 3 to 10 times.
Remember to go slowly with the breath to get as much air in and out as possible. You might find that controlling the breath is harder than you think! Keep practicing.
- Equal Breathing
Also called “sama vritti,” this breathing practice works like counting sheep or muttering a calming mantra. You can do this one anywhere or anytime you need instant relaxation.
- To start, find a comfortable position for yourself. Close your eyes and notice your natural rhythm of breath. Do not change it at all.
- Begin to slowly count to four as you inhale. Find a moment of stillness when the lungs are completely full.
- Then count to four as you exhale. Take a moment to sit in the emptiness.
- Repeat this pattern, making the duration of the inhalations and exhalations equal.
Continue for several minutes.
- Morning Breathing
This is the perfect way to start the morning – even more effective than a shot of high quality espresso.
Oftentimes, when you wake up in the morning, you are already primed for stress due to your body still thinking that it is in the year 25,000 BCE and expecting a sabre tooth tiger to pounce on you!
Morning breathing will relax the body, minimizing tension that might have accumulated overnight.
- Stand up straight with the knees slightly bent. Bounce a few times, feeling the floor with the balls and soles of your feet.
- Begin to bend forward from the waist, hinging. Let the arms loose, hanging towards the floor.
- Take a deep breath in. Imagine yourself as an inflatable lawn ornament slowly rising up from the ground. Roll up through the spine, letting the head be the last thing to lift.
- As you exhale again, return to the bent over position.
Repeat this flowing breath until all tension from the body is released and you feel a warmth moving through your limbs.
- Deep Muscle Relaxation Breathing
This is a bit time consuming and thus should only be done when you have a break to devote to pure relaxation. Used together with simple belly breathing, this is a gateway to removing discomfort from various parts of your body.
- Lay down on your back, either on a yoga or pilates mat or the floor (if you have carpet). Close your eyes. Take a few normal breaths.
- Once you have established an even flow of breath, you may move onto the second part of the exercise.
- Relax your face by scrunching the nose and knitting the brows together. Release with the breath.
- Move on to the neck. Tilt the chin up and down, side-to-side. Shake your head yes and no. Then with the exhale, release.
- Relax your shoulders, shrugging them up towards the ears. Hold for a moment then release.
- Relax the torso by moving the limbs into an X form, stretching on in all positions. Stretch for several seconds then release.
- Lastly, relax the legs by pointing and flexing the toes as well as circling the ankles. Point, flex, stretch, and then release.
- Lay in silence for some time, once again returning to modulated breath.
You may desire to repeat this process several times, paying special attention to the parts of your body that need more tension removed.
- Alternate Nostril Breathing
Yoga classes often incorporate this type of pranayama into the beginning of the lesson. It is said to bring forth a sense of unwavering calmness and composure. Definitely worth a try when you are stressed over work or exams.
- Start in any meditative posture that has the spine in a long, straight, neutral position.
- As you breathe, hold the right thumb over the right nostril and inhale solely through the left.
- At the apex of the inhalation, you will switch to sealing off the left nostril with the right ring finger and open the right nostril.
- Exhale through the right nostril.
Continue the pattern for some time then switch the process.
- Kapalabhati or “Skull Shining Breath”
This is an involved, intense breathing practice that offers a challenge to those who may have mastered other exercises.
- You start seated on the floor with legs crossed or extended out in front of you. Begin with the simple breath work to regulate the pattern of the breath.
- Then, take a long, drawn out inhalation. At the end, contract the lower abdominals and sharply exhale. Do this several times to get comfortable with the contraction.
- Once you are comfortable with that, increase the tempo to sharp inhale, sharp exhale for 10 breaths total. Use only the nose.
A Simple Breathing Exercise To Give You More Energy
Most people breathe very shallowly in day-to-day life. This is often referred to as “chest breathing.” Chest breathing generally starts between ages 4 and 7, which is when you start to develop voluntary control of the musculature in the thoracic region (chest).

But do you ever wonder why babies have that wonderful ability to cry and scream very loudly, despite their size? The reason: The way they breathe, which is commonly called “diaphragmatic breathing.” In diaphragmatic breathing, your stomach expands outward, while the lower ribs expand sideways, which causes the diaphragm to contract.
These movements draw air into the lungs, and not just the upper lungs, as in chest breathing. Diaphragmatic breathing fills every part your lungs, including the lower parts. When you exhale, the abdomen pushes in and up. The lower rib cage contracts inward, the diaphragm expands, and the air is forced out.
So why should you breathe from the diaphragm?
The capillaries in your lungs help exchange oxygen with the rest of your body, and there are more of them in the lower parts of the lungs than in the upper parts of the lungs. When you breathe shallowly, you have work harder.
An additional benefit from breathing “low” is that the abdominal muscles expand and contract around all of the organs of digestion. This will assist them in functioning better and promote better digestion.
Finally, imagine feeling more energized and having the ability to think more clearly, with more focus and fewer distractions. Increased oxygen can contribute to greater mental capabilities. Furthermore, higher oxygen content in the blood stream leads to healthier organs, muscles and tissues. I could go on and on about the benefits.
Let’s give it a try. All you need are these four steps:
- Sit up straight in a chair.
- Place your hands on your stomach.
- Inhale through your nose (which filters the air before entering your lungs) and breathe into your stomach, feeling it extend outward (as opposed to your chest).
- Exhale through your nose or your mouth by pushing your stomach in and up (never down).
That’s it.
In Conclusion
With a conscious effort, you could change old habits into healthy new habits. It’s truly painless!
You can integrate breathing into your daily living very easily — you simply have to be conscious of it. When you wake up in the morning, think about it. When you go to sleep at night, think about it. Instead of yelling at a stoplight to change, focus on your breath. When someone is talking to you and you have no interest in what they are saying, turn your attention to your breathing.
After you notice the calming and concentrating effects this simple act can have, you’ll begin to incorporate it more automatically. Focused individuals tend to accomplish more, enjoy a higher standard of living, and often live life more passionately, making each day an adventure instead of simply a destination.
Good luck!
Sources:
Healthy Benefits of Hot Water With Lemon
The benefits of lemon water goes beyond the fact that it can quench thirst better than any other drink – it also provides our bodies with plenty of vitamins, minerals and vital trace elements. It’s also a great energy booster for when we wake up first thing in the morning as our tissues are dehydrated and in desperate need of fluid to push out toxins.
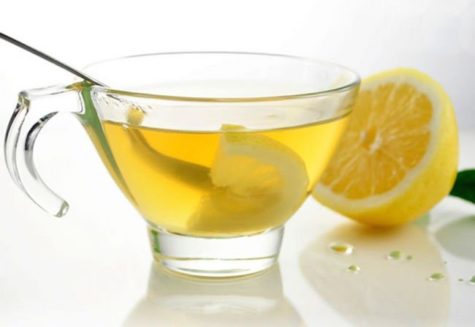
Warm lemon water in the morning helps kickstart the digestion process for the day. According to Ayurvedic philosophy, choices that you make regarding your daily routine either build up resistance to disease or tear it down. Ayurveda invites us to get a jump-start on the day by focusing on morning rituals that work to align the body with nature’s rhythms, balance the doshas and foster self-esteem alongside self-discipline.
There are many health benefits of lemons that have been known for centuries. The two biggest are lemons’ strong antibacterial, antiviral, and immune-boosting powers and their use as a weight loss aid because lemon juice is a digestive aid and liver cleanser. Lemons contain many substances–notably citric acid, calcium, magnesium, vitamin C, bioflavonoids, pectin, and limonene–that promote immunity and fight infection.
How To Do It:
You should be using purified water and it should be warm not scalding hot. You want to avoid ice cold water, since that can be a lot for your body to process and it takes more energy to process ice cold water than the warm. Always use fresh lemons, organic if possible, never bottled lemon juice. I squeeze 1/2 a lemon with each glass and I drink it down first thing before I eat a single thing, or workout, etc.
BONUS: try adding freshly grated ginger or a little cayenne for a boost.
Why It’s Good For You:
- Aids Digestion.
Lemon juice flushes out unwanted materials and toxins from the body. It’s atomic composition is similar to saliva and the hydrochloric acid of digestive juices. It encourages the liver to produce bile which is an acid that is required for digestion. Lemons are also high in minerals and vitamins and help loosen ama, or toxins, in the digestive tract. The digestive qualities of lemon juice help to relieve symptoms of indigestion, such as heartburn, belching and bloating. The American Cancer Society actually recommends offering warm lemon water to cancer sufferers to help stimulate bowel movements.
- Cleanses Your System / is a Diuretic.
Lemon juice helps flush out unwanted materials in part because lemons increase the rate of urination in the body. Therefore toxins are released at a faster rate which helps keep your urinary tract healthy. The citric acid in lemons helps maximize enzyme function, which stimulates the liver and aids in detoxification.
- Boosts Your Immune System.
Lemons are high in vitamin C, which is great for fighting colds. They’re high in potassium, which stimulates brain and nerve function. Potassium also helps control blood pressure. Ascorbic acid (vitamin C) found in lemons demonstrates anti-inflammatory effects, and is used as complementary support for asthma and other respiratory symptoms plus it enhances iron absorption in the body; iron plays an important role in immune function. Lemons also contain saponins, which show antimicrobial properties that may help keep cold and flu at bay. Lemons also reduce the amount of phlegm produced by the body.
- Balances pH Levels.
Lemons are one of the most alkalizing foods for the body. Sure, they are acidic on their own, but inside our bodies they’re alkaline (the citric acid does not create acidity in the body once metabolized). Lemons contain both citric and ascorbic acid, weak acids easily metabolized from the body allowing the mineral content of lemons to help alkalize the blood. Disease states only occur when the body pH is acidic. Drinking lemon water regularly can help to remove overall acidity in the body, including uric acid in the joints, which is one of the primary causes of pain and inflammation.
- Clears Skin.
The vitamin C component as well as other antioxidants helps decrease wrinkles and blemishes and it helps to combat free radical damage. Vitamin C is vital for healthy glowing skin while its alkaline nature kills some types of bacteria known to cause acne. It can actually be applied directly to scars or age spots to help reduce their appearance. Since lemon water purges toxins from your blood, it would also be helping to keep your skin clear of blemishes from the inside out. The vitamin C contained in the lemon rejuvenates the skin from within your body.
- Energizes You and Enhances Your Mood.
The energy a human receives from food comes from the atoms and molecules in your food. A reaction occurs when the positive charged ions from food enter the digestive tract and interact with the negative charged enzymes. Lemon is one of the few foods that contain more negative charged ions, providing your body with more energy when it enters the digestive tract. The scent of lemon also has mood enhancing and energizing properties. The smell of lemon juice can brighten your mood and help clear your mind. Lemon can also help reduce anxiety and depression.
- Promotes Healing.
Ascorbic acid (vitamin C), found in abundance in lemons, promotes wound healing, and is an essential nutrient in the maintenance of healthy bones, connective tissue, and cartilage. As noted previously, vitamin C also displays anti-inflammatory properties. Combined, vitamin C is an essential nutrient in the maintenance of good health and recovery from stress and injury.
- Freshens Breath.
Besides fresher breath, lemons have been known to help relieve tooth pain and gingivitis. Be aware that citric acid can erode tooth enamel, so you should be mindful of this. No not brush your teeth just after drinking your lemon water. It is best to brush your teeth first, then drink your lemon water, or wait a significant amount of time after to brush your teeth. Additionally, you can rinse your mouth with purified water after you finish your lemon water.
- Hydrates Your Lymph System.
Warm water and lemon juice supports the immune system by hydrating and replacing fluids lost by your body. When your body is deprived of water, you can definitely feel the side effects, which include: feeling tired, sluggish, decreased immune function, constipation, lack of energy, low/high blood pressure, lack of sleep, lack of mental clarity and feeling stressed, just to name a few.
- Aids in Weight Loss.
Lemons are high in pectin fiber, which helps fight hunger cravings. Studies have shown people who maintain a more alkaline diet, do in fact lose weight faster. I personally find myself making better choices throughout the day, if I start my day off right, by making a health conscious choice to drink warm lemon water first thing every morning.
More Health Benefits:
- Lemon water will provide your body with plenty of hydrating electrolytes in the form of potassium, calcium and magnesium.
- Lemon is an excellent and rich source of vitamin C, an essential nutrient that protects the body against immune system deficiencies
- Lemons contain pectin fibre which is very beneficial for colon health and also serves as a powerful antibacterial
- It balances to maintain the pH levels in the body
- Having warm lemon juice early in the morning helps flush out toxins.
- It aids digestion and encourages the production of bile.
- It helps prevent the growth and multiplication of pathogenic bacteria that cause infections and diseases.
- Lemon water can help reduce both joint and muscle pain. It helps reducing pain and inflammation in joints and knees as it dissolves uric acid.
- It helps cure the common cold .
- The potassium content in lemon helps nourish brain and nerve cells.
- It helps balance the calcium and oxygen levels in the liver In case of a heartburn, taking a glass of concentrated lemon juice can give relief.
- It is of immense benefit to the skin and it prevents the formation of wrinkles and acne.
- It helps maintain the health of the eyes and helps fight against eye problems.
- Aids in the production of digestive juices.
- Lemon juice helps replenish body salts especially after a strenuous workout session.
- Mixing a teaspoon of lemon juice per half glass of water can help relieve heartburn.
- Lemon water will help your liver produce more enzymes with the help of lemon water than any other substance.
- Several studies have found that cancer cannot thrive in an environment that is rich with alkaline – a substance prevalent in lemon.
- Lemon water also aids your liver in helping it release toxins.
- If kidney stones are a concern for you, drinking lemon water can help dissolve not only those but gallstones, pancreatic stones and calcium deposits as well.
- Lemon water can help you battle everything from sore throats to tonsil inflammation, thanks to the anti-inflammatory property of lemon.
- Drinking lemon water can help relieve tooth pain and fight gingivitis.
- Lemon water can help you better regulate your bowel movements.
- Lemon water has a high potassium content – depression and anxiety are often linked to not having enough potassium in your blood.
- Lemon water can help cleanse your blood and arteries.
- Daily ingestion of one lemon is estimated to reduce high blood pressure by 10% – drinking lemon water is a great way to work towards that quantity.
- Lemons contain vitamin C, which is known to improve skin conditions through the revitalizing of the body.
- Gout pain can be attributed to a buildup of uric acid – lemon water helps dilute this acid, thereby reducing this pain.
- The vitamin C in lemon helps lemon water act as an adaptogen, allowing the body to better cope with various viruses.
- Lemons have pectin fiber, which aids in the suppression of hunger cravings.
- Beneficial during pregnancy because it can help the bone tissue formation of your unborn baby.
From:
Morning Mood Boosters
It would be nice to bounce out of bed in the mornings, full of life and happy to start a fresh new day on this beautiful planet! For many of us though, the sound of our dreaded alarm has us burrowing further under the duvet not quite ready to face the world.

Even if you’re not a morning person here are 10 tips to boost your mood and make your day a happier one. These tips are from WebMD, medically reviewed and approved.
- 1. Think positive
When you wake up don’t roll over and think: “Urgh! Another stressful day to get through.” Start thinking positive thoughts. “The sun is shining; I’ll have lunch outside today.”
Take time to be mindful of all of the good things in your life, family, friends, your health. Spend a few minutes thinking of a holiday you are planning or a birthday party you’re going to.
If you start on a positive note your day has a better chance of continuing in the same vein.
- 2. Get close
Make time to start your day with morning sex. It’s going to lift your spirits and set you up for the day ahead.
Exercise releases endorphins, feel-good chemicals, but you don’t need science to know that being close and loving with your partner makes you feel good.
If there’s no time for sex, make do with a hug and a kiss.
- 3. Stretch
Pilates, tai chi or yoga are relaxing ways to start your day. They work on the mind and body so as well as promoting physical health they can help you achieve an inner mental balance.
“For those of us who creak our way out of bed, a few yoga poses are a lovely way to unfurl the body and dispel the morning grumps,” says yoga teacher Eva Paoli.
“Yoga lengthens and strengthens tight, weak muscles, eases aching back, neck and shoulders and gets the synovial fluid going, which lubricates your joints. Yoga can also be used as preparation for meditation – do both to help preserve your inner calm through a busy day.”
- 4. Exercise
You may have to force yourself to go for a run or hit the gym but exercise is one of the most effective morning mood boosters.
When you exercise your body releases endorphins, feel-good chemicals, in your brain
The NHS says exercise can help people recover from depression and prevent people becoming depressed in the first place.
Also regular exercise can make you feel happier about how you look and make you feel better about your body.
- 5. Go outside
When you wake up, why not make a hot drink and sit in your garden, weather permitting!
There’s some evidence that being outside and listening to nature can boost your mood.
The charity, Mind, believes that activities outdoors like gardening and cycling, or even a walk around the park, are good for our mental health.
- 6. Eat a good breakfast
Eat your way to a happy day! Try starting your morning with a nutritious mix of complex carbohydrates and proteins that will last you until lunch.
“We all know that breakfast is the most important meal of the day. However, it is also proven, not only that people who eat breakfast have a lower incidence of obesity, but they may also be happier,” says British Dietetic Association spokesperson, Jennifer Low.
She says: “Breakfast tends to contain carbohydrates which can increase serotonin, the ‘happy chemical’, in the brain.”
“A good, healthy, low glycaemic breakfast might be a bowl of high fibre cereal and milk, or eggs and two slices of toast, or fruit and low fat yoghurt, for example.”
- 7. Listen to music
Why not switch on the radio or listen to your music player. Music has the power to improve our moods. You know what it’s like when you hear a favourite song, it can transform your mood or take you back to a good memory.
Research by neuroscientist, Dr Jack Lewis, suggests that songs with a high-pitched tone, a fast pace and a predictable melody make us the most happy.
His study suggests hits by Prince, Bob Marley and The Beach Boys are good mood boosters.
8. Use some essential oils
Smell is a very powerful sense. It can also have an effect on our mood.
When you get up in the morning try burning an essential oil that will help you feel more positive.
“Essential oils are the pure scents of nature, from flowers, fruits, woods, bark and leaves. As soon as these pure scents are inhaled the brain actively responds, changing moods and feelings and bringing a sense of well-being and pleasure,” says Jennie Harding from Tisserand Aromatherapy.
“Citrus oils like lemon and orange, with their zesty and mouth-watering aromas, have an instantly uplifting effect, or fresh herbal oils like rosemary and peppermint, help to clear the mind and aid/help concentration.”
Aromatherapy may not be suitable for everyone, including pregnant women or people with a heart condition. Seek medical advice if you are concerned.
- 9. Be prepared and keep calm
Mornings can be a stressful time, especially when children are thrown into the mix, chivvying them to get dressed, brush their teeth and remember their homework.
Make sure that they have their uniforms laid out, bags packed, shoes by the door, the night before so there can be a calm start to everyone’s day.
Keep the happy mood going by making sure you give them a kiss and a hug before school, if they’ll let you!
- 10. Smile
Make yourself smile in the morning. Even if you fake it there is some suggestion that forcing yourself to smile will actually make you feel better.
Psychologist Paul Ekman conducted a study of students to see if they would feel happier by making themselves smile.
The students’ brain activity was measured while they followed instructions to smile. Whether the students’ smiles were real or fake the activity in their brains was virtually the same. They felt happy.
Also smiling is contagious. If your family see you smiling in the morning they are more likely to smile and feel happier themselves.
- Radical Self Care Project Overview by shirleytwofeathers - No Comment
- Radical Self Care Image Gallery by shirleytwofeathers - No Comment
- It’s A Wrap by shirleytwofeathers - 3 Comments
- Something To Consider by shirleytwofeathers - 1 Comment
- Nurturing Your Precious Self by shirleytwofeathers - 3 Comments
Liana: A Prosperity Prayer
B. Joy Barrett: beautiful-turquoise-upholstered-accent-chair-for-living-room-with-within-colorful-accent-chairs-colorful-accent-chairs-transforms-the-look-of-a-room
Claudette Losier: Why Does It Work?
me: Make Your Own Violet Fire
Abdulrahman: Money Chant – Very Fast
Our current project began on July 4. We are exploring the concept and practice of Radical Self Care . Feel free to join in at any time!

Interested? You can visit our current project page, or you can take a look at the About The Project page if you are curious about the concept.
.
Please feel free to join in at any time! No experience necessary.

- Money Chant - Fast
- Money Chant - Slow
- Prosperity Plan
- Amazing Creator
- Cause and Effect
- I Am That I Am
- Spirit Rap
- Lakshmi Spirit Rap
- PowWow Spirit Rap
 Enter your question and receive the wisdom of the Occulatum. You may pose your question in any way that feels appropriate. The answer will come in the form of a small pop up. Try it - your life just might change for the better!


I think it's time to go shopping... maybe even buy some really cool stuff at my online shops!!