Recipes
Frittering My Time Away

I just spent a fair amount of time trying to figure out what to talk about or share next. And in the process, I did a substantial amount of frittering about online and on my phone. And then, suddenly, voila! I found this little piece from the Chicago Tribune! It is cute and fun, and looks delicious.
Frittering away a fall afternoon
Fritters fritter away so little time. Thirty minutes to prep. Two minutes to crisp. One to munch. Thirty-three minutes isn’t frittering. That’s practically staying on task.
There are more effective fritterers than fritters. Consider the Internet, designed to delete whole afternoons. Or the leaf-dropping tree, capable of raking up an entire weekend. Or the World Serious, which requires the seriously observant to slump on the couch for a week, staring morosely and mumbling: “Bad call.”
The fritter, by comparison, is a fleeting distraction. All it requires is mashing cheese, shaping balls, then rolling them in flour, egg and breadcrumb. The triple jacket ensures a crisp outside and melting inside.
Hot from the pan-fry, the fritter goes nicely with a fall salad. It’s a pleasant diversion from computer, rake or couch. And always a good call.

Ricotta fritters
Prep: 30 minutes
Cook: 2 minutes per batch
Makes: 16 fritters (enough to accompany 4 servings of salad)
Ingredients:
- 1 clove garlic
- 3 slices white sandwich bread
- Kosher salt
- 3/4 cup flour
- 1 egg beaten with 1 teaspoon water
- 4 ounces mild goat cheese
- ½ cup whole-milk ricotta cheese*
- Finely grated zest of 1 lemon
- 1 tablespoon snipped fresh chives
- 1 teaspoon fresh thyme leaves
- ¼ teaspoon freshly ground black pepper
- 2 tablespoons unsalted butter
- 2 tablespoons olive oil
Note: *Ricotta should be firm. Pour off any visible liquid. If ricotta seems very soft, drain in a cheesecloth-lined colander for 1 hour.
Grind: With food-processor running, drop garlic down the chute, buzzing it to bits. Break up bread and add to food processor along with a pinch of salt. Grind to fine fluffy crumbs.
Prep: Line up three plates: One holding flour, one holding egg mix and one holding the breadcrumbs.
Mash: Drop both types of cheese into a clean food processor. Swirl smooth. Briefly pulse in zest, chives, thyme, pepper and 1/8 teaspoon salt.
Shape: Use a 1 1/4-inch ice-cream scoop (or a tablespoon) to scoop cheese mix into balls. Drop the balls first in the flour, rolling to coat; then in the egg, rolling to coat; then in the crumbs, rolling to coat. Pat each ball into a disk, about 1 1/2-inches across and ½-inch thick. Let rest, uncovered, 15 minutes.
Crisp: In a heavy skillet, melt butter into oil over medium. Scatter in a pinch of salt. Add cheese pucks without crowding. Crisp to a golden brown, about 1 minute per side. Drain on paper towels. Repeat with remaining pucks.
Serve: Serve fritters alongside any salad. Enjoy.
Provenance: Inspired by TWO Restaurant, Chicago.
Make Some Sun Tea

A great way to make some tea without heating up your kitchen is to use the power of the sun to make sun tea.
Here’s how:
Put 4 to 8 tea bags into a clean 2 quart or gallon glass container (4 teabags for a 2 quart container, 8 tea bags for a gallon container). Fill with water and cap. Place outside where the sunlight can strike the container for about 3 to 5 hours. Move the container if necessary to keep it in the sun. When the tea has reached its desired strength, remove from sun and put it in the refrigerator. You may or may not want to remove the tea bags at this point.
The tea will probably taste more mellow than what you are used to from using boiling water. The slow steeping has a way of bringing out a slightly different flavor from the tea. Also, because you didn’t use boiling water, you should refrigerate the tea and drink it up pretty quickly – a day or two. It will not keep as well as iced tea made from boiling water.
Found at: Eating To Live
Recipe For Modaka
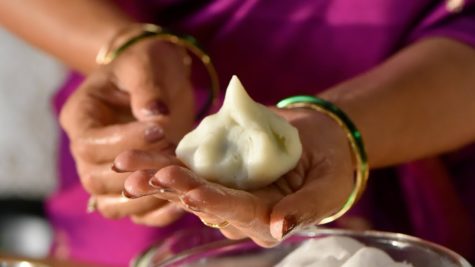
The following recipe will make approximately 20 lime-sized modakas, a treat for the children, and a traditional offering to Lord Ganesha. It takes about two hours to make them.
Ingredients and Utensils:
- 1 lb rice flour
- 2 cups jaggery (or 2 cups brown sugar with 4 tbsp dark molasses added)
- 2 cups raw sesame seeds
- 2 grated coconuts (optional)
- 2 cups melted ghee (melted butter will also work)
- 1 tsp salt
- Banana leaf or waxed paper
- A flour sifter or fine sieve
- An iddli or vegetable steamer
Directions:
Roast the sesame seeds in a pan, without oil, until golden brown (5 to 10 minutes). Crack the seeds by rolling with a rolling pin or pounding. Add 4 tbsp ghee to the jaggery to soften it, and then mix in the sesame seeds and coconut thoroughly. (This mix may be refrigerated in jars for making quick sweets simply by adding a bit of ghee and shaping the dough into balls).
Next sift the rice flour and toast it without oil until it browns slightly – about 5 to 7 minutes. Spread it out on a tray or table top when done, and allow cooling completely.
While the rice flour is cooling, bring approximately a half-gallon of water, with a tsp of salt, to a rolling boil. Put the cooled, toasted rice flour in a bow. And make a well in the middle. Slowly pour a small amount of the hot water into the well and begin working it into the rice flour with your hands.
Keep adding small amounts of the hot water, and work the flour into a ball of dough. It should be moist but not wet when you put it out on the table or breadboard. Knead the dough thoroughly so it is even in moisture and texture.
Next, place water in the bottom of the steamer and bring to a full boil. Spread a thin coating of ghee or oil on a piece of banana leaf or waxed paper. Take a lump of dough half the size of a lime and work it in your hands for a moment to remove the air and then pat it out flat and round on the leaf, about as wide across as your palm. Make it a uniform thickness so it will cook evenly.
Place a lump of the sesame-jaggery-coconut mixture into the center and wrap the dough up around the mixture. Pinch the dough into a cone-shape over the stuffing and wrap the leaf or paper up around it. (The modakas can also be round if desired.) Repeat until you have enough to fill your steamer.
Place the assembled modakas in the steamer, spaced so as to not touch one another. Cover and steam until done (15 to 20 minutes). While they cook you can prepare the next batch. When cool enough to handle, dip the modakas in melted ghee. Now they are ready to offer.
from Loving Ganesa
by Satguru Sivaya Subramuniyaswam
Healthy Benefits of Hot Water With Lemon
The benefits of lemon water goes beyond the fact that it can quench thirst better than any other drink – it also provides our bodies with plenty of vitamins, minerals and vital trace elements. It’s also a great energy booster for when we wake up first thing in the morning as our tissues are dehydrated and in desperate need of fluid to push out toxins.

Warm lemon water in the morning helps kickstart the digestion process for the day. According to Ayurvedic philosophy, choices that you make regarding your daily routine either build up resistance to disease or tear it down. Ayurveda invites us to get a jump-start on the day by focusing on morning rituals that work to align the body with nature’s rhythms, balance the doshas and foster self-esteem alongside self-discipline.
There are many health benefits of lemons that have been known for centuries. The two biggest are lemons’ strong antibacterial, antiviral, and immune-boosting powers and their use as a weight loss aid because lemon juice is a digestive aid and liver cleanser. Lemons contain many substances–notably citric acid, calcium, magnesium, vitamin C, bioflavonoids, pectin, and limonene–that promote immunity and fight infection.
How To Do It:
You should be using purified water and it should be warm not scalding hot. You want to avoid ice cold water, since that can be a lot for your body to process and it takes more energy to process ice cold water than the warm. Always use fresh lemons, organic if possible, never bottled lemon juice. I squeeze 1/2 a lemon with each glass and I drink it down first thing before I eat a single thing, or workout, etc.
BONUS: try adding freshly grated ginger or a little cayenne for a boost.
Why It’s Good For You:
- Aids Digestion.
Lemon juice flushes out unwanted materials and toxins from the body. It’s atomic composition is similar to saliva and the hydrochloric acid of digestive juices. It encourages the liver to produce bile which is an acid that is required for digestion. Lemons are also high in minerals and vitamins and help loosen ama, or toxins, in the digestive tract. The digestive qualities of lemon juice help to relieve symptoms of indigestion, such as heartburn, belching and bloating. The American Cancer Society actually recommends offering warm lemon water to cancer sufferers to help stimulate bowel movements.
- Cleanses Your System / is a Diuretic.
Lemon juice helps flush out unwanted materials in part because lemons increase the rate of urination in the body. Therefore toxins are released at a faster rate which helps keep your urinary tract healthy. The citric acid in lemons helps maximize enzyme function, which stimulates the liver and aids in detoxification.
- Boosts Your Immune System.
Lemons are high in vitamin C, which is great for fighting colds. They’re high in potassium, which stimulates brain and nerve function. Potassium also helps control blood pressure. Ascorbic acid (vitamin C) found in lemons demonstrates anti-inflammatory effects, and is used as complementary support for asthma and other respiratory symptoms plus it enhances iron absorption in the body; iron plays an important role in immune function. Lemons also contain saponins, which show antimicrobial properties that may help keep cold and flu at bay. Lemons also reduce the amount of phlegm produced by the body.
- Balances pH Levels.
Lemons are one of the most alkalizing foods for the body. Sure, they are acidic on their own, but inside our bodies they’re alkaline (the citric acid does not create acidity in the body once metabolized). Lemons contain both citric and ascorbic acid, weak acids easily metabolized from the body allowing the mineral content of lemons to help alkalize the blood. Disease states only occur when the body pH is acidic. Drinking lemon water regularly can help to remove overall acidity in the body, including uric acid in the joints, which is one of the primary causes of pain and inflammation.
- Clears Skin.
The vitamin C component as well as other antioxidants helps decrease wrinkles and blemishes and it helps to combat free radical damage. Vitamin C is vital for healthy glowing skin while its alkaline nature kills some types of bacteria known to cause acne. It can actually be applied directly to scars or age spots to help reduce their appearance. Since lemon water purges toxins from your blood, it would also be helping to keep your skin clear of blemishes from the inside out. The vitamin C contained in the lemon rejuvenates the skin from within your body.
- Energizes You and Enhances Your Mood.
The energy a human receives from food comes from the atoms and molecules in your food. A reaction occurs when the positive charged ions from food enter the digestive tract and interact with the negative charged enzymes. Lemon is one of the few foods that contain more negative charged ions, providing your body with more energy when it enters the digestive tract. The scent of lemon also has mood enhancing and energizing properties. The smell of lemon juice can brighten your mood and help clear your mind. Lemon can also help reduce anxiety and depression.
- Promotes Healing.
Ascorbic acid (vitamin C), found in abundance in lemons, promotes wound healing, and is an essential nutrient in the maintenance of healthy bones, connective tissue, and cartilage. As noted previously, vitamin C also displays anti-inflammatory properties. Combined, vitamin C is an essential nutrient in the maintenance of good health and recovery from stress and injury.
- Freshens Breath.
Besides fresher breath, lemons have been known to help relieve tooth pain and gingivitis. Be aware that citric acid can erode tooth enamel, so you should be mindful of this. No not brush your teeth just after drinking your lemon water. It is best to brush your teeth first, then drink your lemon water, or wait a significant amount of time after to brush your teeth. Additionally, you can rinse your mouth with purified water after you finish your lemon water.
- Hydrates Your Lymph System.
Warm water and lemon juice supports the immune system by hydrating and replacing fluids lost by your body. When your body is deprived of water, you can definitely feel the side effects, which include: feeling tired, sluggish, decreased immune function, constipation, lack of energy, low/high blood pressure, lack of sleep, lack of mental clarity and feeling stressed, just to name a few.
- Aids in Weight Loss.
Lemons are high in pectin fiber, which helps fight hunger cravings. Studies have shown people who maintain a more alkaline diet, do in fact lose weight faster. I personally find myself making better choices throughout the day, if I start my day off right, by making a health conscious choice to drink warm lemon water first thing every morning.
More Health Benefits:
- Lemon water will provide your body with plenty of hydrating electrolytes in the form of potassium, calcium and magnesium.
- Lemon is an excellent and rich source of vitamin C, an essential nutrient that protects the body against immune system deficiencies
- Lemons contain pectin fibre which is very beneficial for colon health and also serves as a powerful antibacterial
- It balances to maintain the pH levels in the body
- Having warm lemon juice early in the morning helps flush out toxins.
- It aids digestion and encourages the production of bile.
- It helps prevent the growth and multiplication of pathogenic bacteria that cause infections and diseases.
- Lemon water can help reduce both joint and muscle pain. It helps reducing pain and inflammation in joints and knees as it dissolves uric acid.
- It helps cure the common cold .
- The potassium content in lemon helps nourish brain and nerve cells.
- It helps balance the calcium and oxygen levels in the liver In case of a heartburn, taking a glass of concentrated lemon juice can give relief.
- It is of immense benefit to the skin and it prevents the formation of wrinkles and acne.
- It helps maintain the health of the eyes and helps fight against eye problems.
- Aids in the production of digestive juices.
- Lemon juice helps replenish body salts especially after a strenuous workout session.
- Mixing a teaspoon of lemon juice per half glass of water can help relieve heartburn.
- Lemon water will help your liver produce more enzymes with the help of lemon water than any other substance.
- Several studies have found that cancer cannot thrive in an environment that is rich with alkaline – a substance prevalent in lemon.
- Lemon water also aids your liver in helping it release toxins.
- If kidney stones are a concern for you, drinking lemon water can help dissolve not only those but gallstones, pancreatic stones and calcium deposits as well.
- Lemon water can help you battle everything from sore throats to tonsil inflammation, thanks to the anti-inflammatory property of lemon.
- Drinking lemon water can help relieve tooth pain and fight gingivitis.
- Lemon water can help you better regulate your bowel movements.
- Lemon water has a high potassium content – depression and anxiety are often linked to not having enough potassium in your blood.
- Lemon water can help cleanse your blood and arteries.
- Daily ingestion of one lemon is estimated to reduce high blood pressure by 10% – drinking lemon water is a great way to work towards that quantity.
- Lemons contain vitamin C, which is known to improve skin conditions through the revitalizing of the body.
- Gout pain can be attributed to a buildup of uric acid – lemon water helps dilute this acid, thereby reducing this pain.
- The vitamin C in lemon helps lemon water act as an adaptogen, allowing the body to better cope with various viruses.
- Lemons have pectin fiber, which aids in the suppression of hunger cravings.
- Beneficial during pregnancy because it can help the bone tissue formation of your unborn baby.
From:
Let’s Go To The Opera

They say it isn’t over until the fat lady sings. And since our project is winding down, I thought it might be a good idea to go to the opera. Never been? No worries. From Huffington Post we have this great guide.
Your Definitive Guide To Going To The Opera
Opera can be a little intimidating.

Luca Pisaroni in The Enchanted Island
But underneath the grandeur (and layers of makeup), are poignantly human stories to the tune of beautiful music. Because opera is not a mainstream form of entertainment, it is often regarded as a pretentious one, something untouchable. However, if you give it a fighting chance, you’ll find that opera can be enjoyed by classical musicians and complete newcomers alike — old to young. Here’s our guide to making that happen:

Warrior Woman of Yang – China National Peking Opera Company
Picking An Opera
When deciding on an opera to see, think about what type of movie you like (or, what Netflix would suggest for you). Rom-com fan? Try “Don Pasquale.” Psychodrama? “Lucia di Lammermoor.” Bawdy humor? “The Marriage of Figaro.” More into big explosions and theatrics? You’re probably better off with some Wagner. Then there’s always the classic ABCs of opera: “Aida,” “La Boheme” and “Carmen.”
If you want to see an opera live, you have to look into what’s being performed at your local house (or movie theater). Then do a little research — even just the first sentence on a show’s Wikipedia page will help — on an opera’s plot and genre. Don’t research too far — you don’t want to spoil the ending, do you?
Opera tickets can run expensive, but there are usually cheaper options to be found — think about it like a Broadway show or a football game. Aside from standing room and top tier seats, look out for rush tickets and programs for students or seniors, as well as special promotions from places like Gilt. Programs vary at different opera houses.

What To Wear
No, men, you do not have to wear a tux. And unless you ladies plan on going to an extravagant ball later — or you rabidly enjoy dressing up — there’s no reason to whip out a long gown.
For men, slacks (or, if you’re in a pinch, a nice pair of jeans) and a button-down shirt will do. Jacket and tie optional. Please don’t wear your dirty gym sneakers.
For women, dress pants or a skirt and blouse work, as does a cocktail or work dress. Heels if you feel like it.

If you’re into dressing up, have fun with it and use it as an excuse to get creative. If not, don’t worry about it. Just wear something generally presentable and you’ll be fine. Oh, and probably layer up, you never know what the temperature will be like inside.
Before The Curtain Opens
You’ll probably want to eat something before you get there — operas feel extra long when you’re hungry. Ditto for getting a coffee and using the restroom before you take your seats.

The ushers are there to help. Don’t be embarrassed asking them to direct you to your seats. The ushers will also hand you a playbill. The playbill has information about the singers and conductor, which is usually pretty interesting if only to see all the different countries from which everyone hails.
The playbill also includes the synopsis, broken into acts, as well as information on intermission(s). Reading the synopsis will help you understand what’s happening in the upcoming act, but if you’re the kind of person who doesn’t like plot spoilers, tread carefully.
Check about fifty times that your phone is on silent — or, better yet, off.
Curtains Open
After the lights dim, if the audience starts mysteriously applauding, it’s because the conductor is walking out to his or her stand. You should always applaud for the conductor: they’re the one running the show, after all.

The right times to applaud can get confusing, especially depending on what you’re seeing. The easiest approach is to wait for someone else to start clapping, and then join along. A brief silence after singing doesn’t always mean it’s applause time.
Yes, most operas are sung in languages that are not English, and even English is hard to understand in operatic form. No, you do not have to know Italian/German/French/etc. to understand what’s going on. All opera performances will have some form of subtitles for every line. Sometimes it’s a projection to the sides or above the stage, and in other places it’s a screen on the seat in front of you. If it is a screen, make sure you hit the appropriate button for your subtitles to show up.
Intermission
Depending on the length of the opera, there could be an intermission or two. During intermission, get out of your seat and stretch out some. Wander around the opera house. They tend to have art and old opera artifacts and portraits hanging around, which are neat to see.

Stop by the bar and get a drink or snack, if you’d like. And don’t be embarrassed if you feel the need for a coffee — it’s better to drink a coffee during intermission than fall asleep during the performance.
There will be some indication — flickering lights, chimes — that the show is going to start soon, so head back to your seat.
Oh, The Drama
Opera can inspire a lot of emotions. As Kasper Holten, director of opera at the Royal Opera House in London, said, “In one evening, you go through in two and one-half hours what the rest of us spend our whole emotional lives living through.” What you see on stage may not look like real life, but it’ll feel like it.

Verdi’s Il Trovatore – Metropolitan Opera.
Our best recommendation is that if you feel yourself getting swept away, flow with it. Operas can be hysterically funny (even by modern standards), devastating, devastatingly gorgeous (musically or visually), sexy, thrilling, tense, poignant and — it happens — boring. If you don’t enjoy one opera, that doesn’t mean you should completely write all opera off. That would be like saying you didn’t like one TV show, so now you’re never going to watch TV again.
But if you do get caught up in it all, go on ahead. Cry, laugh, gasp and shout — we can assure you that you won’t be the only one doing so.
Just don’t throw tomatoes; we don’t do that anymore.
When It’s All Sung And Done
If you enjoyed what you saw, keep the momentum moving. Most young opera “aficionados” know so much about the opera thanks to nothing fancier than the internet. Check out videos of a certain aria or a certain singer on YouTube, find the snarkiest review of a show that you can, and get lost in singer gossip.
Here’s a cool example of what can be found on YouTube:
“It’s Diana Damrau with her most famous rendition of the Queen of the Night’s “Der Hölle Rache”, in HD. All hail to the Queen! I always wonder if the people in that room were aware they had just witnessed perfection.”
If you have a friend who’s super into opera, they would love answering any question you have and talking all about the art form. And of course you can always pick up books on the subject.
What is Opera?
From Opera Europa we have this great informational article that explaines opera.
- Opera, the art of emotions
Opera is a total art form which joins music, singing, drama, poetry, plastic arts and sometimes dance. In each work, all the components of opera combine their expressiveness and their beauty.

This complex alchemy makes an opera performance an extraordinary show, monopolizing the sight, hearing, imagination and sensibility of the audience, where all human passions are at work.
- The libretto
The libretto is the ‘script’ of an opera. It can be an original creation, sometimes written by famous poets or novelists (as Hugo von Hofmannsthal and Stefan Zweig for Richard Strauss’s works), but often it is an adaptation of plays (Shakespeare was a great source of inspiration for librettists), tales or novels. The subjects developed in libretto are various: forbidden love, infidelity, revenge, craving for power, war, ancient myths or historic events…

With such subjects, opera inhabits a universe where human passions explode. Love, Tragedy and Death are often at the heart of the plot. The characters, sometimes torn between their feelings and their duty, are confronted with extraordinary situations and are carried away by heightened feelings.
This excess burns them, leading them to commit acts of violence and sometimes to death. Love at first sight, sacrifice, enchantment, courage, suicide and murder appear together in the libretto. Some characters are punished for their crimes, other find redemption or are stricken with remorse… and sometimes there is a happy ending!
- The singing
Unlike most theatre, the text is sung by the artists in operas. The emotion and the intensity of singing have an impact on the weight and the meaning words.

There are different voices classified in six principal categories, from the more high-pitched to the lower: soprano, mezzo-soprano, contralto for women; and tenor, baritone and bass for men. Moreover, voices are characterized according to their power and agility: they can be light, lyric or dramatic. A light voice is not very powerful but can easily reach the high notes and vocalizes, unlike a dramatic voice which is powerful but less agile.
Voices are generally associated with types of roles. They emphasize some aspects of the characters like their personality or their nature. In Bizet’s Carmen, Carmen is a wild seductress who has experience of the world: so she is played by a mezzo soprano with a dark and warm voice. Gilda in Verdi’s Rigoletto is a lyric soprano: her clear and high-pitched voice symbolizes her purity, innocence and naivety.
- The music
Music expresses in another way the emotions and the action taking place on stage. In the mind of the camerata fiorentina(see ‘History’ page), whose researches and studies on Ancient Greek theatre led to the creation of the operatic genre, the music was at the service of the libretto: ‘Prima le parole, dopo la musica’ (‘The words first, the music after’). But this conception is questionable. It is an old and continuing debate: according to the eras, libretto and music have alternately claimed primacy.
Actually music does not only serve the libretto and the singing: it completes and exalts them by highlighting the intensity of situations and the characters’ passions and feelings.
By playing with rhythms, tones, melodies, nuances, the composers exploit the extraordinary suggestive power of the music in order to create particular atmospheres that lyrics or staging can not create. Some authors use recurrent musical motifs to represent a character, an emotion or a concept. In the prelude to Das Rheingold, Wagner manages to relate the Rhine’s birth.

The opera begins with a unique triad which slowly emerges from silence and resonates in infinite depths: the Rhine comes out of original chaos. Little by little motifs add to this triad until creating a melody: first brass instruments, majestic, then strings, more ethereal, like sparkling waves on the river’s surface. The more the orchestra becomes animated and enriches the prelude, the faster the motifs become as the more the Rhine swells and stirs, until foaming.
Music is beyond words. It addresses directly the audience’s heart and appeals to its sensibility and imagination. Here’s a link to a video with the opening music. It starts off with silence, so you have to wait for it.
The staging
Before the 20th century, the theatrical dimension was marginalized: in the 17th century, opera productions were quite static and looked like a costumed concert. The staging became important when the programming of opera houses became more focused on an existing repertory than on new creation. Moreover, during the 20th century, the importance of singing and dramatic gifts began to be considered as equal.
But opera stages have always be an extraordinary place, with spectacular visual effects and big machinery. The possibilities of staging have benefited from technical progress, and now special effects, digital technology and image projections are used in many productions.

“La Traviata” von Giuseppe Verdi
A staging is not a simple illustration of a work: it carries a concept or meaning. The director proposes a view of an opera. This view may be close to the libretto and the author’s conceptions or a more personal interpretation of the work. Some directors transpose the action to another era, in another situation or in a timeless and immaterial context.
These transpositions bring out certain dimensions of the works and enrich their significance by disclosing some of their unknown aspects. For example, in a modern production, the themes developed in a baroque opera can be revealed as very actual. These perspectives adopted by directors change the way that audience sees and understands the works. Opera recreates and reinvents itself constantly.

Before the rise of the curtain, nobody knows what will happen on the stage. That is what makes opera so exciting.
Still Not Convinced?
Here is a small collection of scenes from various operas. They certainly tweaked my interest:


So now that we know a little bit about the opera, let’s have cake!
Make An Opera Cake
From The Splendid Table
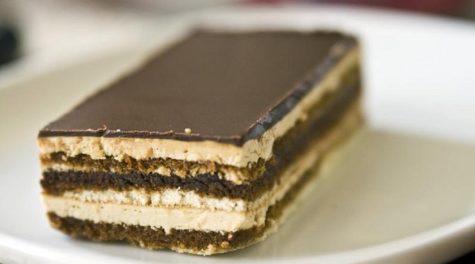
It is hard to say exactly who invented the Opera Cake. Some sources claim there was a type of Opera Cake sold in Paris as long ago as 1890, and some think the Parisian specialty was created closer to 1950. But the point about which there is no controversy is the only important point: The greatest Opera Cake is made at Dalloyau. There, executive pastry chef Pascal Niau makes a cake as sleek and smooth as an opera stage and as gloriously delicious as La Boheme is affectingly beautiful.
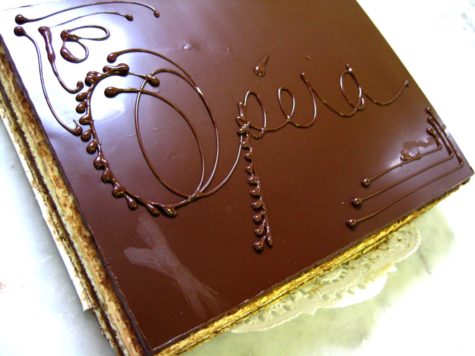
The classic Opera Cake is a work in six acts. There are three thin layers of almond cake, each soaked in a potent coffee syrup; a layer of espresso-flavored buttercream; one layer of bittersweet chocolate ganache; and a topping of chocolate glaze.
Traditionally, the cake is decorated with its name written in glaze across the top and finished with a piece of shimmering gold leaf. It is obviously a rich cake, but it is surprisingly not a filling cake, and I’m convinced this is because Maestro Niau has orchestrated the cake’s elements so perfectly.
- A note on size:
This recipe makes a square Opera Cake that is a festive – and impressive – 10 inches (25 cm) on a side. If this is more cake than you need, don’t cut down the recipe – you won’t be successful with some of the cake’s components, particularly the buttercream, if you reduce the quantities. Instead, make the full cake, cut it into smaller size cakes and stock them in your freezer.
Ingredients
The cake:
- 6 large egg whites, at room temperature
- 2 tablespoons (30 grams) granulated sugar
- 2 cups (225 grams) ground blanched almonds
- 2 1/4 cups (225 grams) confectioners sugar, sifted
- 6 large eggs
- 1/2 cup (70 grams) all-purpose flour
- 3 tablespoons (45 grams) unsalted butter, melted and cooled briefly
The coffee syrup:
- 1/2 cup water
- 1/3 cup sugar
- 1 1/2 tablespoons (7 grams) instant espresso or coffee
The coffee buttercream:
- 2 tablespoons (10 grams) instant espresso or coffee
- 2 tablespoons (15 grams) boiling water
- 1 cup (100 grams) sugar
- 1/4 cup (30 grams) water
- Pulp of 1/4 vanilla bean
- 1 large whole egg
- 1 large egg yolk
- 1 3/4 sticks (7 ounces; 200 grams) unsalted butter, at room temperature
The chocolate ganache:
- 8 ounces (240 grams) bittersweet chocolate, finely chopped
- 1/2 cup (125 grams) whole milk
- 1/4 cup (30 grams) heavy cream
- 4 tablespoons (2 ounces; 60 grams) unsalted butter, at room temperature
The chocolate glaze:
- 5 ounces (150 grams) bittersweet chocolate, finely chopped
- 1 stick (115 grams) unsalted butter
Instructions
1. To make the cake: Position the racks to divide the oven into thirds and preheat the oven to 425 degrees F (220 degrees C). Line two 12 1/2-x15 1/2-inch (31-x-39-cm) jelly-roll pans with parchment paper and brush with melted butter. (This is in addition to the quantity in the ingredient list.)
2. Working in a clean dry mixer bowl fitted with the whisk attachment, beat the egg whites until they form soft peaks. Add the granulated sugar and beat until the peaks are stiff and glossy. If you do not have another mixer bowl, gently scrape the whites into another bowl.
3. In a mixer fitted with the paddle attachment, beat the almonds, confectioners sugar and whole eggs on medium speed until light and voluminous, about 3 minutes. Add the flour and beat on low speed only until it disappears.
Using a rubber spatula, gently fold the meringue into the almond mixture, then fold in the melted butter. Divide the batter between the pans and spread it evenly to cover the entire surface of each pan.
4. Bake the cakes for 5 to 7 minutes, or until they are lightly browned and just springy to the touch. Put the pans on a heatproof counter, cover each with a sheet of parchment or wax paper, turn the cakes over and unmold.
Carefully peel away the parchment, turn the parchment over and use it to cover the exposed sides of the cakes. Let the cakes come to room temperature between the parchment or wax paper sheets. (The cakes can be made up to 1 day ahead, wrapped and kept at room temperature.)
5. To make the syrup: Stir everything together in a small saucepan and bring to the boil. Cool. (The syrup can be covered and refrigerated for up to 1 week.)
6. To make the buttercream: Make a coffee extract by dissolving the instant espresso in the boiling water; set aside.
7. Bring the sugar, water and vanilla bean pulp to a boil in a small saucepan; stir just until the sugar dissolves. Continue to cook without stirring until the syrup reaches 255 degrees F (124 degrees C), as measured on a candy or instant-read thermometer. Pull the pan from the heat.
8. While the sugar is heating, put the egg and the yolk in the bowl of a mixer fitted with the whisk attachment and beat until the eggs are pale and foamy. When the sugar is at temperature, reduce the mixer speed to low and slowly pour in the syrup.
Inevitably, some syrup will spin onto the sides of the bowl – don’t try to stir the spatters into the eggs. Raise the speed to medium-high and continue to beat until the eggs are thick, satiny and room temperature, about 5 minutes.
9. Working with a rubber spatula, beat the butter until it is soft and creamy but not oily. With the mixer on medium speed, steadily add the butter in 2-tablespoon (30-gram) chunks. When all the butter has been added, raise the speed to high and beat until the buttercream is thickened and satiny.
Beat in the coffee extract. Chill the buttercream, stirring frequently, until it is firm enough to be spread and stay where it is spread when topped with a layer of cake, about 20 minutes. (The buttercream can be packed airtight and refrigerated for 4 days or frozen for 1 month; before using, bring it to room temperature, then beat to smooth it.)
10. To make the ganache: Put the chocolate in a medium bowl and keep it close at hand. Bring the milk and cream to a full boil, pour it over the chocolate, wait 1 minute, then stir gently until the ganache is smooth and glossy.
11. Beat the butter until it is smooth and creamy, then stir it into the ganache in 2 to 3 additions. Refrigerate the ganache, stirring every 5 minutes, until it thickens and is spreadable, about 20 minutes. (The ganache can be packed airtight and refrigerated for up to 3 days or frozen for 1 month; bring to room temperature before using.)
12. To assemble the cake: Line a baking sheet with parchment or wax paper. Working with one sheet of cake at a time, trim the cake so that you have two pieces: one 10-x-10-inches (25-x-25-cm) square and one 10-x-5-inches (25-x-12.5-cm) rectangle. Place one square of cake on the parchment and moisten the layer with coffee syrup.
Spread about three-quarters of the coffee buttercream evenly over the cake. (If the buttercream is soft, put the cake in the freezer for about 10 minutes before proceeding.) Top with the two rectangular pieces of cake, placing them side by side to form a square; moisten with syrup.
Spread the ganache over the surface, top with the last cake layer, moisten, then chill the cake in the freezer for about 10 minutes. Cover the top of the cake with a thin layer of coffee buttercream. (This is to smooth the top and ready it for the glaze – so go easy.)
Refrigerate the cake for at least 1 hour or for up to 6 hours; it should be cold when you pour over the glaze. If you’re in a hurry, pop the cake into the freezer for about 20 minutes, then continue.
13. To glaze the cake: Bring the butter to a boil in a small saucepan. Remove the pan from the heat and clarify the butter by spooning off the top foam and pouring the clear yellow butter into a small bowl; discard the milky residue.
Melt the chocolate in a bowl over—not touching—simmering water, then stir in the clarified butter. Lift the chilled cake off the parchment-lined pan and place it on a rack. Put the rack over the parchment-lined pan and pour over the glaze, using a long offset spatula to help smooth it evenly across the top.
Slide the cake into the refrigerator to set the glaze and chill the cake, which should be served slightly chilled. At serving time, use a long thin knife, dipped in hot water and wiped dry, to carefully trim the sides of the cake so that the drips of glaze are removed and the layers revealed.
- Tips and tricks
Each element of the cake can be made ahead, as can the assembled cake. The cake can be kept in the refrigerator, away from foods with strong odors, for 1 day, or you can freeze the cake, wrap it airtight once it is frozen, and keep it frozen for 1 month; defrost, still wrapped, overnight in the refrigerator.
An American in Paris, I rarely play around with this classic, but when I do, it’s to add a little crunch to the mix by pressing toasted sliced almonds onto both the buttercream and the ganache.
From The Splendid Table
Almost A Vacation!

If we were actually rich, we’d be able to hop on our private jet and fly off to the beach whenever we wanted. Then we could relax, and live the good life, and it might look something like this:


That’s a nice fantasy, so how do we convert it into “living as if…? ” I have a few ideas.
Maybe we can’t actually jump on a private jet and fly off to a secluded island or amazing beach, but what we can do is relax and enjoy a video or two… maybe even hang out in a cool hammock, have a picnic, enjoy a fancy beverage, make a cool meal, and imagine that we are actually there.

Here is a relaxing “almost a vacation” YouTube video:
But wait… Hammocks are the ultimate symbol for the outdoor rest fan. They’re portable beds, easily strung up between two sturdy long structures from trees to poles.

Instant Hammock in 9 easy steps:
Here’s how to make a hammock in a minute from a sheet or any big piece of cloth. It’s the simplest method, and does not require a sewing machine or any complicated directions… here ya go:

First bunch up the ends and tie knots in them as shown. If you don’t have much cloth, are skilled with rope, or don’t care if you fall you can skip this step.

Next, tie a rope to each end with a lark’s head knot, just like this, or tie whatever knot you like best. If you don’t fall it means you did it right.

Hang it up, get in, and relax in utter comfort. For extra coziness pull the hammock around you like a cocoon. And since you can hang it up indoors as well at out, why not enjoy some relaxing waterfall and jungle sounds.
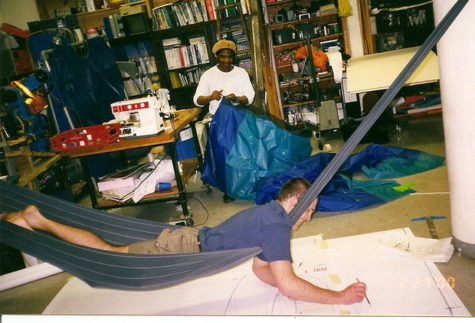
For a Working Vacation:

So if your budget doesn’t allow for a bonafide working vacation at the beach, you can use your hammock for a workstation for large drawings, or if you are painting a cool mandala on the floor, or anything else you can think of that would be fun to do in the comfort of a hammock…

If you do have to work, be sure to have this video playing so that you can pretend that this is a super cool hideaway… complete with beach and waterfall:
Outdoor fun:
Here is a cool triangular hammock. It’s a bedspread tied at the corners to three trees.

Helpful tips:
A king size sheet is a good size for an adult. Your local thrift store has used sheets in fun patterns for cheap, just give them a good wash.
Yes, the tutorial images show how easy it is to make a hammock, but they don’t look all that luxurious. So here is a small collection of images that might give some ideas on how cool it could look given the right choice of fabric. Say, for example, a super cool king size bedspread…


Now add some cool outdoor decor, some fun lighting and voila!
A Picnic
Why not have a nice little picnic to go with our relax at the beach theme:

Here’s a list of items you don’t want to forget to bring to your nifty picnic lunch!
- Frozen Bottles of Water
The main rule for outdoor eating is to keep hot foods hot and cold foods cold. Ice packs will get the job done, but frozen bottles of water do double duty. After they melt (and the food’s been eaten), you’ll have cold drinks on hand for everyone.
- Corkscrew/Bottle Opener
If you’re packing wine, beer, or bottles of soda, be sure to toss a corkscrew with a bottle opener in your bag. (Bonus points for packing plastic cups with sturdy, flat bottoms too.)
- Wet Wipes
Pre-moistened wipes will keep hands clean and help clean up sticky spills, even if there’s no running water nearby.
- Salt and Pepper
Seasoning is a small thing, but goes a long way in making your picnic feel more thoughtful—especially if you happen to be eating fried chicken.
- Paper Towels
You never know when you might have a big spill on your hands. And a roll of paper towels won’t blow away like a stack of napkins will.
- A Tray
If you’re eating on the ground, a lightweight plastic or enamel tray will provide a smooth surface to prevent drinks from toppling over.
- Serving Spoons
Cutlery is essential, of course, but don’t forget a large spoon or two for serving food.
- Folding Knife
A small folding knife will come in handy for a variety of jobs, and is essential if you’re serving meats and cheeses.
- Cutting Board
A lightweight cutting board is also a good idea if cheese is on the menu, or if you’re slicing sandwiches or fruit.
- Trash Bags
Always throw a trash bag or two in your bag for easy clean up when the picnic’s over. Even if there are plenty of trash cans nearby, your own bag will save you from having to walk back and forth to throw everything away.
Don’t have a nifty place to go for a picnic? Easy peasy! Just play this video and pretend. It doesn’t even have to be a beach, it could be a beautiful waterfall in the heart of the rainforest.
All this traveling around from beach to rainforest is making me hungry. Here’s a cool recipe for a picnic basket pie.. super cool… not so easy to bake, but definitely worth the effort.

I saw this on The Great British Baking Show, and I’ve been wanting to try it ever since.
Picnic Basket Pie
Ruby’s Picnic Basket Pie recipe appears in the The Final episode of Season 2 of The Great British Baking Show. It’s a savory pie filled with layers of deliciousness. Here’s a pic of what it looks like inside that yummy little picnic basket pie.
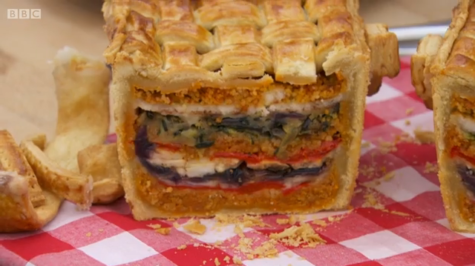
This recipe is for a savory pie, but I think it would be equally yummy if it had layers of apples, walnuts, and cinnamon. The most important aspect when it comes to the filling is that it not be juicy. If it gets juicy while baking, the crust will be soggy. So if you opt for a fruit and cheese filling – cook the fruit first.
Ingredients
For the pastry:
- 600g/1lb 5oz plain flour
- 300g/10½oz unsalted butter, at room temperature but not soft
- salt
- ½ tsp baking powder
- 50ml/2fl oz milk, to brush
- 1 free-range egg, beaten, to glaze
For the roasted vegetables:
- 2 tbsp sunflower oil
- 2 medium red onions, chopped
- 2 garlic cloves, in whole cloves, skin on, lightly crushed under fork
- 3 Romano red peppers, chopped
- 1 large courgette, chopped *(see note below)
- 1 aubergine, chopped into 1cm/½in cubes *(see note below)
- salt and freshly ground black pepper
For the filling:
- 100g/3½oz couscous
- 90g/3¼oz sun-dried tomato paste
- 250g/9oz halloumi *(see note below)
- 100g/3½oz mozzarella, grated
- small bunch fresh oregano
- small bunch fresh basil
For the caramel
- 100g/3½oz caster sugar
Directions
Preheat the oven to 200C/400F/Gas 6.
For the pastry, rub the butter into the flour using your hands until it resembles fine breadcrumbs. Add 150ml/5fl oz water and bring the mixture together to form a dough (be careful not to overwork it). Wrap the dough in cling film and leave to rest in the fridge while you prepare the filling.
For the roasted vegetables, lightly oil a roasting tray with sunflower oil, and arrange the onions, garlic, peppers, courgette and aubergine on the tray. Toss to coat the vegetables in oil.
Roast for 30-40 minutes, or until the vegetables are tender. Season with salt and freshly ground black pepper. Set aside to cool.
For the filling, put the couscous in a bowl and add enough boiling water to just cover it. Cover the bowl and let it stand for 5-10 minutes.
When the water has been absorbed, use a hand-held blender to blend half of the couscous with the sun-dried tomato paste. Combine with the unblended couscous. Season with salt and pepper and set aside in the fridge.
Slice the halloumi, pat dry with kitchen paper and dry-fry until brown spots appear. Flip it over and fry the other side in the same way. Leave to cool.
To make the pastry basket, divide the pastry dough into four portions: 350g/12oz for the case, 300g/10½oz for the lattice ‘basket’, 150g/5½oz for the lattice lid, and 100g/3½oz for the handle and other extras.
Roll out the pastry dough for the lattice to about 3mm thick, keeping the pastry cold (return it to the fridge for five minutes to chill if required).
Cut five strips 2cm/1in wide. The strips need to be long enough to go down one side of the tin, across the width of the base and up other side of tin, leaving a slight overhang each side. The strips will be about 25-30cm/10-12in long (depending on the size of the tin).
Lay the strips inside the tin – spacing the strips evenly along the length of the tin.
Cut four strips also 2cm/1in wide and the same length as the tin (two strips for each long side of the tin). Place one strip flush with the tin’s base and the other about two-thirds of the way up. Weave the strips in an out of the vertical strips to make a lattice. Where the strips overlap, brush with a little water or milk and press into place.
Freeze the tin with the lattice inside.
Meanwhile, roll out the pastry for the case into a rectangle big enough to line the base and sides of the tin. Transfer the pastry rolled pastry to the fridge to rest.
Make a rectangular lattice for the hamper lid, cutting long strips of pastry, and interweaving them (it’s best to do this on a baking tray lined with greaseproof paper). Leave small gaps between rows so there are holes in the lid where any steam can escape during cooking. Rest the pastry in the fridge.
Make a basket handle and two buckles out of the remaining pastry (you can mould the handle over a piece of scrunched up tin foil). Transfer to the fridge to rest.
Brush the inside of the frozen lattice with milk and line it with the rolled pastry case, pressing lightly to stick the case to the lattice. Rest it in the fridge for 15 minutes.
Remove the garlic cloves from the cooled roasted vegetables and discard.
To fill the pie, lay half of the couscous on the bottom (this will soak up any liquid) and pack it firmly by pressing it down. Layer the vegetables, halloumi and grated mozzarella on top. Sprinkle over the oregano and basil. Top with the remaining couscous, again pressing down. Make sure all layers are tightly packed.
Brush the edges of the pastry with milk, then slide the lattice lid into place from the greaseproof paper. Press the edges to seal. Brush the top of the pie with beaten egg.
Bake for 50 minutes.
Bake the pastry buckles, hinges and handles separately for 10-15 minutes towards the end of the pie’s cooking time.
Remove the pie from the tin and brush the sides with beaten egg. Return it to the oven and bake for another three minutes. Remove from the oven and leave to cool.
For the caramel, melt the sugar in a pan with a couple of tablespoons of water. Do not stir. Let it reach a light golden-brown colour.
Dip the handle ends and buckles into the caramel and stick them to the pie (caution: melted sugar is very hot. Take care not to burn yourself). Hold in place while the caramel sets.
Tips/Techniques
- Equipment and preparation:
You will need a 900g/2lb loaf tin (preferably with straight, rather than curved, sides) and a hand-held blender.
Notes:
- What is a courgette?
Zucchini (/zuːˈkiːniː/, American English) or courgette (/kʊərˈʒɛt/, British English) is a summer squash which can reach nearly a meter in length, but is usually harvested immature at 15 to 25 cm (6 to 10 in). In the British Isles, a fully grown zucchini is referred to as a marrow.
- What is an aubergine?
Brit term for what is called an Eggplant in the US. Also refers to the deep purple color associated with the commonly available type of eggplant.
- What is Halloumi?
Halloumi is a Cypriot firm, brined, slightly springy white cheese, traditionally made from a mixture of goat and sheep milk, although these days cow’s milk is also used.
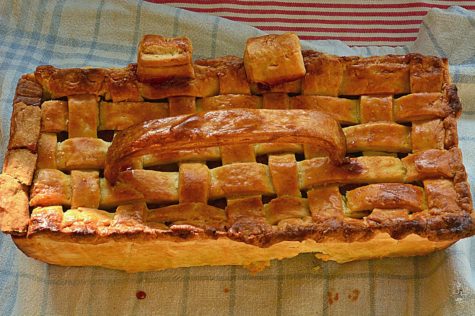
Here’s a pic of the finished basket:
Cocktails anyone?
Sweet and fruity with a hint of coconut, it is just the thing to sip on a warm beach while you watch the waves come in.

Fantasy Island Cocktail
Ingredients:
- 2 ounces coconut rum
- 1 ounce melon liqueur
- 2 ounces pineapple juice
- Pineapple chunk
- Maraschino cherries
Directions:
Combine rum, melon liqueur and pineapple juice in an ice-filled shaker. Shake well, strain into martini glass. Granish with pineapple wedge and cherries.
Makes one drink
Beach Art

I also thought it might be fun to browse google for beach art, and find some images to use as wallpaper for my computer, or my phone. Maybe I’ll even post some as a “where I’d rather be” on Facebook. Do you see anything you like?


Not big on the beach art? No worries… here’s some cool hammock art to choose from:


Sources:
Tea and Crumpets
Now that we’ve worn ourselves out cleaning, decluttering, and rummaging through our closets, I think it’s time for a spot of tea. Even better… let’s have some tea and crumpets!
First up, let’s talk about the tea.
What’s in a tea? Well, hundreds of benefits are hidden within this coloured water that not so many people are particularly fond of. Summer is a great time to take up this wonderful habit, by creating the most appealing iced teas and thus benefiting from their medicinal and restorative powers.
What few of us know is the fact that the word “tea” is correctly used for the following types only:
- Green tea
- Black tea
- White tea
- Oolong tea
- Pu-erh tea
These 5 teas are definitely worth the try. The rest should simply be referred to as infusions. The five kinds are all derived from the Camellia sinensis plant, a shrub native to China and India, and contain unique antioxidants called flavonoids. They all protect against free radicals that can contribute to cancer, heart disease, and clogged arteries. Oolong and black teas are oxidized or fermented, so they have lower concentrations of flavonoids than green tea, but nevertheless their antioxidising power is still high.
Green tea makes you smart and slim
Green tea is supposedly the healthiest beverage on our planet. It contains more than just plain caffeine. Apart from the fact that it produces a response without causing the “jittery” effects associated with too much caffeine, it also has the amino acid L-theanine, which increases the activity of the inhibitory neurotransmitter GABA, which has anti-anxiety effects. It also increases dopamine and the production of alpha waves in the brain.
In other words, these two components mixed together are particularly capable of improving overall brain function.
Apart from making you smart, your drinking at least three cups of green tea a day is recommended to raise the body’s metabolic rate. It is believed that the catechins found in it increase the production of heat within the body, which is related to burning calories. These compounds may inhibit certain chemicals in the brain, thus prolonging this process.
Black tea makes your teeth healthy
Black tea was proved to reduce plaque formation as well as restricting bacteria growth that promotes the formation of cavities and tooth decays. The flavonoids found in black tea kill and surpass cavity bacteria as well as inhibit the growth of bacterial enzymes that form along with that sticky white stuff on our teeth that attracts plaque like a magnet.
White tea keeps your bones healthy
White tea’s antioxidants and anti-aging properties not only protect and help reverse damaged skin, but a regular intake of white tea can improve bone density and strength, and may provide a natural relief from the symptoms of osteoporosis.
Oolong tea makes your skin look healthy and young
According to the Tea Association of the United States, oolong tea falls somewhere between green and black teas, as its leaves are only partially oxidized.
Patients diagnosed with eczema are recommended to drink 3 cups of oolong tea per the day. The beneficial results of oolong tea are likely to be seen in less than a week in these patients. All oolong tea drinkers show remarkable improvement in their skin.
Keep in mind that despite its miraculous effects, oolong tea tends to be very high in caffeine, which is not the healthiest component of this beverage. So if a healthy skin is your aim, try not to exaggerate and drink more than 3 cups a day.
Pu-erh tea is the best hangover cure
In traditional Chinese herbalism, pu-erh tea is considered to open the meridians and warm the spleen and stomach. It helps digestion and cleans your blood. It is often consumed after heavy meals or drunk as a hangover cure or preventative.
The microbial aging of pu-erh tea can result in the production of lovastatin, a natural statin that is used to lower levels of bad cholesterol such as LDL. One study found that the longer this type of tea was aged, the more statin was produced.

So drink up! It is recommended to have a slightly hot cup of tea every time you feel hot, and your body’s temperature will return to its regular value.
How to make a good pot of tea
These are the golden rules:
- Tea loves oxygen – it helps the flavor develop, so always use freshly drawn cold water in the kettle.
- Make sure your pot is clean.
- Warm the pot by swirling a small amount of boiled water in it.
- For black tea, only pour on freshly boiled water and do not over-boil it.
- For green tea, always use the water just at the boil.
- One teaspoon of loose tea per person and one teaspoon for the pot is about right, but add as much or as little to make it to the strength you like.
- Some people believe that sugar masks the flavors in tea. Why not try a fruit tea if you prefer a sweeter taste?
- A tea cosy extends the brewing time and can make the tea bitter and stewed. A removable infuser or teabags can help to get round this problem.
How long should I allow a teabag to brew?
Twinings of London recommends that you allow the teabag to brew for two and a half to three minutes. This allows the flavor to fully develop. Then add milk or lemon or enjoy it black, whatever your preference.
And how long should I allow loose tea to brew?
We recommend that you allow loose tea to brew in a teapot for up to seven minutes. The general rule is: the larger the leaf, the longer the brewing time. Earl Grey and Lady Grey need five minutes, while a smaller leaf tea will only need about four minutes.
Does loose tea make better tea than teabags?
Both have their benefits. For many people, the ritual of preparing loose tea is a pleasure in itself, so this contributes to the enjoyment, while teabags are more convenient. The leaf size is different but the quality in the cup will be the same.
Should the milk go in first or second?
Historically, the ‘milk in first’ rule was to protect the fine bone china it was served in – it’s a very individual thing.
Sometimes I get an oily residue around my cup and on the surface of my tea – what is it?
Because of the small leaf-size in a teabag, the tea can release some essential oils which can sometimes produce a residue. However, this brown residue occurs most often in areas with hard water, so a carbon water filter will reduce this considerably.
How should tea be stored?
Tea absorbs moisture and kitchen smells. To keep your tea fresh and avoid spoiling the flavor, keep loose tea or teabags in a sealed jar or tin.
Some Interesting Tea Lore
- Tea was MONEY:
In the twelfth century when China began exporting tea, TEA BRICKS became the often preferred form of currency. It was light, valuable and in desperate need you could even eat the bricks. Tea contains, along with its many other nutrients, small amounts of protein.
- Green Tea Cleanses the Body and the Soul
Green Tea originated as a large tree growing in the Himalayan jungles. It was cultured into the short bushes grown throughout the world now, by Chinese monks who had discovered its many benefits.
The Taoists claimed green tea as an important ingredient of the elixir of immortality. The Buddhists used it extensively to prevent drowsiness during their long hours of meditation.
The first bowl moistens my lips and throat; The second bowl banishes all loneliness; The third bowl clears my mind of words and books. The fourth cup, I begin to perspire, Life’s troubles evaporate through my pores. The firth cup cleanses my entire being. Six cups – ah, but I can drink no more: I can only feel the gentle breeze blowing through my sleeves, Wafting me away to the Isle of Immortality!
Lu ton, Eight-century Chinese Poet, from In Gratitude for a Gift of Fresh Tea
- Tea Transformed Japan’s Culture
Green Tea was said to be introduced into Japan in 1191 by the monk Eisaid when he returned to Japan with Buddhism. The cult of tea began after Eisai helped cure the famous shogun of Japan Minamoto.
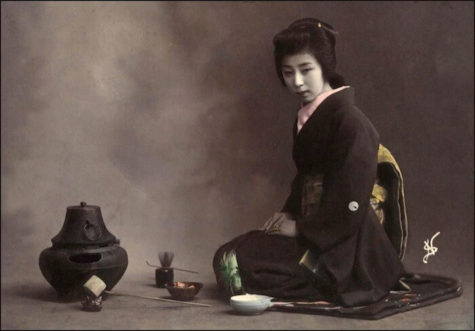
The whole culture of the country evolved around the Japanese Tea Ceremony which uses very finely ground green tea leaves in an elaborate ceremony lasting many hours.
The Tea Ceremony was a worship of the art of life, an appreciation of refinement and purity, a process to go beyond the dreary waste of existence.
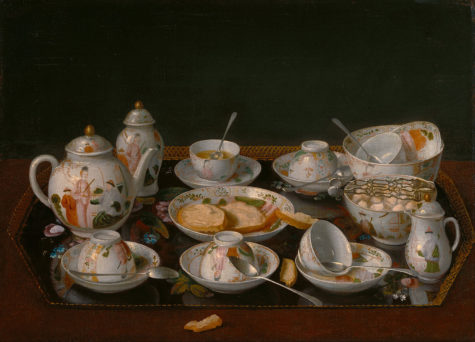
- Tea Transformed British Culture
In Britain, tea rapidly replaced much of the beer, ale and alcohol consumption with a beverage that was actually good for you. The British were transformed from an aggressive, meat and beer drinking mass to a more gentle, civilized people.
For the middle class of Britain, the tea parties and tea gardens allowed women and children to get out and socialize for the first time in their history. Many movements such as missionaries, charities and the girl guides started as tea groups.
For the lower class of Britain, tea breaks made life bearable – the tea gave them energy and a lift of spirits which other beverages could not. They spent HALF their food budget on tea (and sugar to put in it) for good reason.

Now that we know a little bit about tea, lets make some crumpets to go with it!
Crumpets
What is a crumpet? This traditional British teatime treat is midway between English muffin and pancake. Like an English muffin, it’s full of holes, perfect for collecting rivulets of melted butter. But it’s also moister and thinner – more like a small pancake.

These are best enjoyed toasted, and spread with butter, jam, and/or clotted cream. Since their holes reach to the outside crust, there’s no need to split them before toasting.
You can make crumpets without English muffin rings (or cleaned tuna cans), but they’ll be perfectly round and ever so much nicer looking if you use rings. Here’s a recipe from King Arthur Flour.
A Great Crumpet Recipe
Ingredients:
- 1 1/2 cups lukewarm water
- 1 cup lukewarm milk
- 2 tablespoons melted butter
- 3 1/2 cups Unbleached All-Purpose Flour
- 2 1/2 teaspoons instant yeast
- 1 teaspoon baking powder
- 1 1/4 teaspoons salt
Instructions:
Combine all of the ingredients in a bowl, and beat vigorously for 2 minutes. A stand or hand mixer, set on high speed, work well here.
Cover the bowl, and let the batter rest at room temperature for 1 hour. It will expand and become bubbly. Towards the end of the rest, preheat a griddle to medium-low, about 325°F. If you don’t have an electric griddle, preheat a frying pan; it shouldn’t be as hot as the temperature you use to cook pancakes.
Lightly grease the griddle or frying pan, and place well-greased 3 3/4″ English muffin rings in the pan, as many as will fit. (If you don’t have English muffin rings, use well-cleaned tuna cans, from which you’ve removed the top and bottom.) Pour sticky batter by the scant 1/4-cupful into each ring; a muffin scoop works well here.
After about 4 minutes, use a pair of tongs to slip the rings off. Cook the crumpets for a total of about 10 minutes on the first side, until their tops are riddled with small bubbles/holes. They should be starting to look a bit dry around the edges. Their bottoms will be a mottled, light-golden brown. Note: They probably won’t be as full of holes as store-bought crumpets; that’s OK.
Turn the crumpets over, and cook for an additional 5 minutes, to finish cooking the insides and to brown the tops gently. This isn’t traditional; “real” crumpets are white on top, but the crumpet police won’t chastise you for adding a little color to the tops.
Remove the crumpets from the pan, and repeat with the remaining batter, until all the crumpets are cooked. Serve warm. Or cool completely, wrap in plastic, and store at room temperature. To enjoy, warm in the toaster. Serve with butter, or butter and jam.
Sources:
Morning Coffee Magick
Did you know that coffee has magickal properties? According to my sources, it does! How fun is that? I say, let’s start the day with some magick, along with a really yummy cup of spiced coffee!

Magickal Properties of Coffee
- Provides peace of mind and grounding.
- Helps to dispel nightmares, negative thoughts, and overcome blockages and unhealthy emotions. It’s great for protection and getting rid of all kinds of nasties.
- Coffee is a stimulant and can be used to give spells, potions and charms an extra kick, or speed things up.
- Coffee grounds can be used in divination and read like tea leaves.
- It is considered excellent for curse breaking.
- It can be used as an offering to deities, entities, and ancestors.
- Some sources suggest it can be used for compulsion, and encouraging others to be more persuasive towards you. This is most effective when the coffee is served to the target.
Here’s a recipe for a cup of magickal morning brew.

Magickal Morning Coffee:
Ingredients:
- 3 pinches ground ginger
- 3 pinches cinnamon
- 1 pinch nutmeg
- your favorite ground coffee
Directions:
- Add cinnamon to the ground coffee and say: “Cinnamon is for vision, money and love.”
- Add the ginger and say: “Ginger is for strength when push comes to shove.”
- Add the nutmeg and say: “Nutmeg is for vision, good fortune, and wealth.”
- Kiss your fingers and hold them over the coffee and spices, visualizing your love flowing into the coffee, and say: “A kiss keeps you happy and glowing with health.”
- Move your hand in a clockwise direction over the coffee spice mixture three times to blend the energies together, then proceed to brew the coffee in your usual manner.
Note: If you add sugar or cream to your coffee, know that sugar sweetens the experience, and cream smooths the way.

Medicinal Properties of Coffee
But wait, there’s more! Coffee has medicinal properties as well.
- Caffeine (in coffee) improves short-term alertness, attention, memory and may have long term protective benefits on cognitive decline as well.
- Many studies confirm that aspirin and other analgesics work faster and better on headaches, when combined with caffeine.
- Coffee consumption has been associated with long term weight loss, likely from the thermogenic effects of caffeine raising the metabolic rate.
On a side note: Nursing mothers who drink coffee might transfer the caffeine to their babies, giving them insomnia, in which case this may not be the best way to start the day.
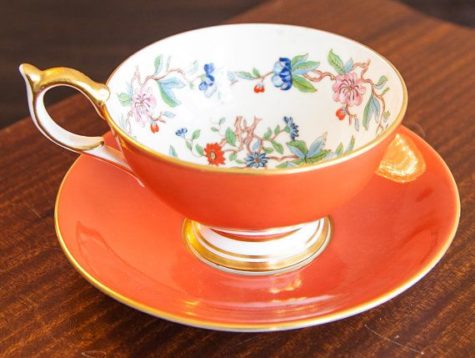
Color Matters
Also, it does seem to matter what cup you put that coffee in. Research shows that hot beverages served in an orange cup or mug taste better than drinks served in say, for example, a white one. So… if you have an orange cup, drink your coffee in that. But if you don’t, that’s OK too. Just be on the look out at garage sales and thrift shops for cups and mugs that are orange. They don’t have to be orange on the inside, it’s the outside color that seems to matter. And if you find something really beautiful… well… that’s even better!
Sources: Vayas Witchcraft, Cheeky Witch, and Color Therapy
- Radical Self Care Project Overview by shirleytwofeathers - No Comment
- Radical Self Care Image Gallery by shirleytwofeathers - No Comment
- It’s A Wrap by shirleytwofeathers - 3 Comments
- Something To Consider by shirleytwofeathers - 1 Comment
- Nurturing Your Precious Self by shirleytwofeathers - 3 Comments
Liana: A Prosperity Prayer
B. Joy Barrett: beautiful-turquoise-upholstered-accent-chair-for-living-room-with-within-colorful-accent-chairs-colorful-accent-chairs-transforms-the-look-of-a-room
Claudette Losier: Why Does It Work?
me: Make Your Own Violet Fire
Abdulrahman: Money Chant – Very Fast
Our current project began on July 4. We are exploring the concept and practice of Radical Self Care . Feel free to join in at any time!

Interested? You can visit our current project page, or you can take a look at the About The Project page if you are curious about the concept.
.
Please feel free to join in at any time! No experience necessary.

- Money Chant - Fast
- Money Chant - Slow
- Prosperity Plan
- Amazing Creator
- Cause and Effect
- I Am That I Am
- Spirit Rap
- Lakshmi Spirit Rap
- PowWow Spirit Rap
 Enter your question and receive the wisdom of the Occulatum. You may pose your question in any way that feels appropriate. The answer will come in the form of a small pop up. Try it - your life just might change for the better!


I think it's time to go shopping... maybe even buy some really cool stuff at my online shops!!