DIY
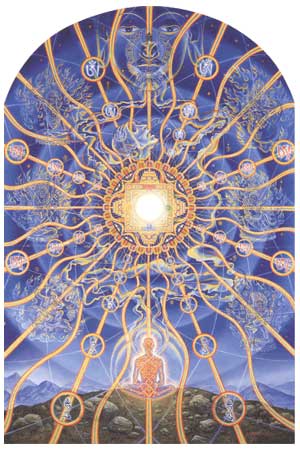
Creating An Angelic Sigil
Today we have a rather unconventional – yet very powerful – way to connect with Angelic forces through the use of sigils. This is a fairly simple process. You can try it out for yourself and see if it resonates with you.
What is a Sigil?
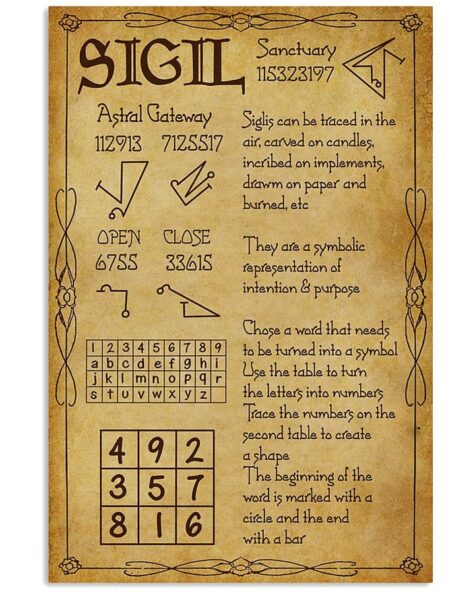
Sigils are representations taking the form of unique symbols, of elements in magickal practices. They may represent Angels, Spirits, Djinn or even thoughts and actions.
The word ‘sigil’ comes from the Latin word ‘sigillum’ which means ‘seal’ and they played an important role in Medieval ceremonial magick, where symbols were used to raise and control a specific entity, like an angel or a demon. A good example is The Lesser Key of Solomon, an anonymous grimoire of 72 sigils used to control 72 demons compiled in the late 1600s. But please don’t let this alarm you!
In modern day magick, like the kind this post is concerned with, sigils are used for personal matters such as attracting wealth, protection, healing, setting stronger boundaries and used to represent an intention or thought and have no connection to demonology or dark magick.
They can be drawn, carved or burned into any kind of material, but usually they are simply drawn with a pen or pencil on a piece of paper. This makes them easier to destroy usually by burning either when activating them (more about this later) or when the magick is complete. Drawing it on paper also makes it easier to carry and conceal.
What does it do?
Making a sigil is a great way to give a physical form to your intentions and goals and is an incredibly powerful form of magick. The great thing is there are many ways to make a sigil that is packed with the power of your intention making it a great form of magick for those Witches on a budget (like me!). It can also be a discreet form of magick for those practicing in the broom closet.
Many of these hidden symbols and keys were found in ancient scripts and documents like in the Kabbalah*, as well as in more recent forms and adapted and reworked into more workable sigils and rituals since the 1880’s. These sigils and keys are based on centuries of magickal knowledge, research, and experience, and move beyond the confines of theory and tradition. And they undoubtedly open a powerful angelic doorway.
They key to this doorway is need. When we have genuine need for help from the angels – rather than order them to do as you wish – the angels are compelled to heed you and respond. If you work sincerely with these sigils and keys – with real faith and trust, they will work instantly whether you feel it or not.
It’s important to remember that Angelic Magick is an opportunity to make healing possible. It shouldn’t be used to replace ordinary medicine, but rather work alongside it. In this way it will be so much more powerful.
You will need to make a simple preparatory ritual before concentrating on the specific sigil, letting your request known. If you are requesting help from a specific Angelic being, repeat the specific angels name three times to open the doorway. If you do not have a specific Angel in mind, you could say something simple such as ” Calling for an Angel who will help me” or “My Guardian Angel.”
If you call on them with hope and and open heart, the magick activates a connection between you and your angel as you allow them to work as they will, without impatience or desperation.
Sometimes it will work instantly, but in many cases angelic magic will work more slowly -depending on what is best for you at this point in your life. Know that the angels will always bring the best possible outcome for you… all you need to do is trust.

Working with Archangels
When you work with Archangels it’s helpful to know that most of them have specific areas they “specialize” in.
Whether you decide to use the method of prayer, magick sigils and keys, or meditation – remember that these are just examples so explore and see for yourself what feels right and works for you.
Some angels may “appear” to you through a feeling, sound, particular fragrance, or a glimpse of flickering light. But remember that the angel is present whether you feel anything or not.
Remember that you too are a powerful being of light, and when your heart is open and pure you can receive these wonderful blessings of abundance and healing.
In some cases – when you don’t know who to ask for a specific request – you can call on your guardian angel first. They will be able reveal who can best aid your specific request, and work in unison with the archangels to assist you. Know that you personal guardian angels are always near, so whenever you invoke an archangel, they will be present too.
While your guardian angel can be called on for anything you need – at any time – it is best to invoke the archangels only when there is a real great and urgent need and you are prepared for real and powerful changes. And don’t forget to be specific – the more specific your need is, the better they will be able to respond in turn.
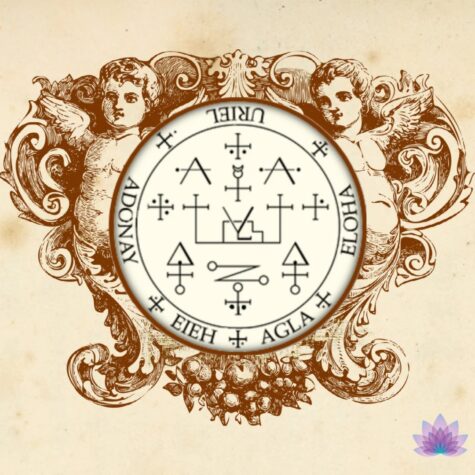
Here is a list of some of more well-known Archangels and how they can help your specific needs. Remember that I am just touching the surface here, and there are so many more areas that you can discover for yourself as well, once you start working with them.
- Archangel Michael – Gives you courage and spiritual strength, protection; helps you with difficult tasks; aid you in finding a new direction in your life.
- Archangel Metatron – Aids those striving to personal growth, enables your to think deeply about important matters and make the right choices.
- Archangel Raziel – Works with magick and manifestation; helps you develop ideas and form answers when you are stuck
- Archangel Zadkiel – Helps free you from oppression; gives you power to tap into your own knowledge and soul memory
- Archangel Raphael – Brings healing or relief from suffering for yourself or others you ask for.
- Archangel Gabriel – Helps you in your own self-discovery; assists you in times of crisis
- Archangel Sandalphon – Brings clarity; offers protection from evil forces, both human or supernatural.
- Archangel Jophiel – Inspires and awakens creativity of any kind; brings more beauty into your life
- Archangel Tzaphqiel – Assists in clear communication, both in speaking and written word.
- Archangel Uriel – Helps you solve problems or dillemas, and find the right answers.
- Archangel Haniel – Encourages feelings of love; restores relationships; and brings positive change.
Invoking An Archangel
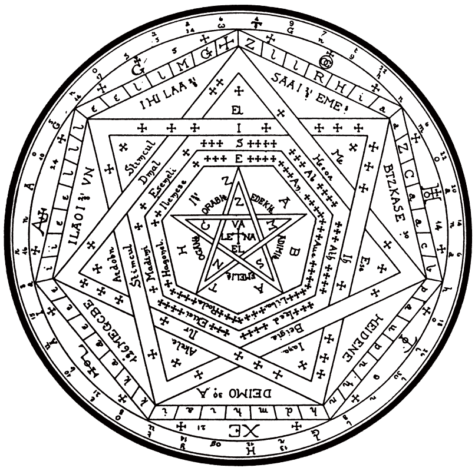
This sigil utilizes a wheel and the Hebrew alphabet. I like to use a piece of tracing paper on top of the sigil template, this is personal choice. I have found it more effective to spell the name from right to left, using the example below.
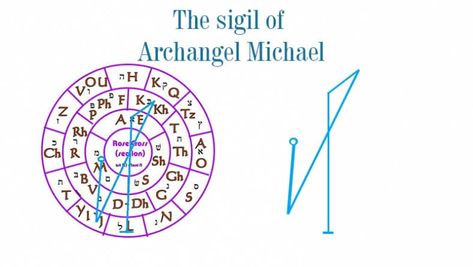
Starting at L-EA-CH-I-M. Drawing a dash at the L then a line to EA, the example here uses the Jewish spelling of Michael and goes to KH instead of CH, this is a personal choice, continue drawing the the line to the I and ending on the M where you draw a small circle. It is now up to you if you choose to decorate the sigil in your personal style including using color.
So as not to trap the angels I destroy the sigil as soon as I have completed my work, I typically destroy the paper by fire.

Setting Your Intentions
When creating your sigil, it’s important to take your time to formulate your intentions before you begin. Your intentions are the very heart of your sigil and they are what gives this kind of magick power and energy.
Sit somewhere quiet to think exactly what your intentions are. Be as specific as you can. Using this method, I have found that it works better to either chose one word to represent your intentions or a short and concise phrase only a few words long. This helps to keep the energy of your sigil focused and prevents more than one goal from being attached it.
As with all spell-work, keep your intentions realistic and phrase them as positively as you can.

Step two – Simplify Your Intentions
Once you have your chosen word or phrase, you can simplify your intentions by removing any vowels and repeated letters, but this is an optional step so do what you feel is right. The more letters you remove, the simpler the final sigil will be.
For Example:
- Original intention: I have energy and enthusiasm for life
- Repeated letters removed: IHAVENRGYDTUSMFOL
- Vowels removed: HVNRGYDTSMFL
- Simplified further: Energy and Enthusiasm Are Mine
- Repeated letters and vowels removed: NRGYDTHSM
Play around with it until you have something that feels energetically correct.
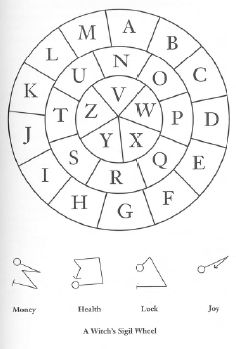
Next, pick a template to use for the creation of your sigil:


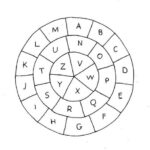
The next step is to draw or print out the sigil wheel of your choice. The idea is that you use the letters on the wheel drawing a line from one letter to the next until you’ve spelled out your chosen words, and the shape that is created by the end is your sigil.
For the first letter of the intention, a dot or small circle is usually drawn on the first letter before moving on to the next, a line is then drawn from one letter to the next and traditionally ended with a small bar at the last letter, as shown below:
Types of Sigils
Sigils can be destructible, temporary, or permanent. How you create and charge the sigil may change based on which type you’d like to create.
- Destructible Sigils
Destructible sigils are activated by being destroyed. The act of destroying is what creates the burst of energy giving the sigil its power. This is usually done by writing your sigil on a piece of paper and then setting it on fire though you could also carve the sigil onto food and then consume it.
- Temporary Sigils
Temporary sigils are sigils that will eventually disappear with time. These types of sigils could be drawn on your skin with a marker or carved into a candle which will eventually be melted.
- Permanent Sigils
Permanent sigils are made to last and are meant to be active for a long period of time. Occasionally permanent sigils are recharged to keep the energy active. Sigils like these could be made into pottery as an art piece or you could write a sigil on a piece of paper to be placed behind a painting or under a piece of furniture.
Empowering Your Sigil
Find a quiet, calming spot and relax your mind. Make sure that wherever you go is isolated and peaceful enough to let you focus. If you have a sacred space or altar, go there. However, neither is necessary: any place around your home where you can work undisturbed is fine. Then, close your eyes and meditate briefly.
Meditation isn’t mandatory to make the sigil ritual a success, but it’s best if you at least close your eyes and breathe a few times deeply to relax your body.
If it helps you relax, try turning out the lights, turning off electronics, and lighting candles and incense.
Hold the sigil and focus on it. Take a moment to hold the sigil in both hands and stare at it for a few minutes, reflecting on its meaning and significance. Imagine light energy flowing from your hands to the sigil, and keep looking until your vision blurs slightly and the sigil looks a little warped on the page. Once you notice the distortion, it’s time to finalize the activation.
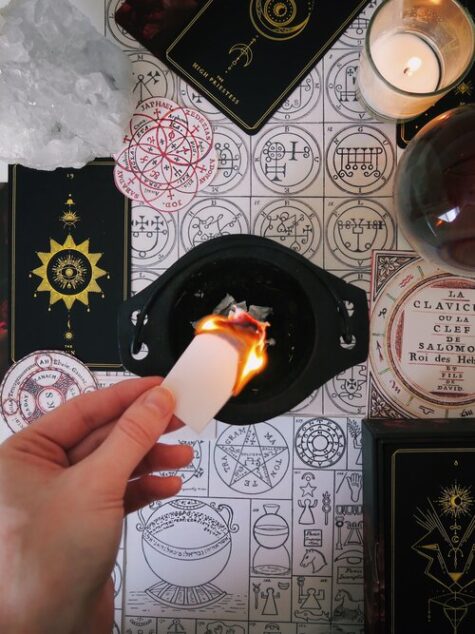
- Activation by Fire
Burn the sigil in a fire-proof bowl. Light a candle and then use it to set the sigil on fire while holding the paper and candle over the fire-proof bowl. After a few seconds, drop the sigil into the bowl and let it burn. The fire is what charges and activates your sigil, allowing it to take effect in the future.
Make sure there’s nothing flammable nearby before you light the candle, and handle the paper carefully. Set it on fire far from where you’re holding it to ensure you don’t get burned.
Alternatively, crumple up the piece of paper with the sigil on it and place it inside the fire-proof bowl before setting it on fire.
Lighting a paper sigil on fire is the most common example of destructible activation, but it doesn’t have to be so physical.
- Destructible Sigils
Destructible sigils are designed to give the creator an immediate burst of energy and inspiration. Draw the sigil with a finger, visualizing it as you trace the air, and then push the sigil through an imaginary black hole to evoke its destruction.
Carve a destructible sigil into your food and then eat the food. Another method of activating a destructible sigil is to etch the design into food. Using a knife, toothpick, or any other kitchen tool with a fine point for tracing, carve the sigil into the food you’re about to bake, and then keep preparing the dish as normal.
Once it’s ready, consume the sigil to activate it. This method of using destructible sigils is just as effective as fire, and a solid choice if you want to incorporate sigil casting into your everyday life.
- Temporary Sigils
Temporary sigils are intended to disappear and take hold gradually. A candle is a perfect medium for activating a temporary sigil for a few days since it’ll burn down slowly with use. Carve the sigil gently with any fine carving tool, and then go back in and retrace your lines more boldly once the design is in place. Light the candle and let the sigil melt away.
You can also draw a temporary sigil on your body with a marker or pen. Wear the sigil on your skin to activate it, and let it fade away naturally with washing and time. Since temporary sigils are supposed to provide energy and power for a brief time, this is a great solution to keep the sigil charged for a few days.
- For A Permanent Sigil
While creating your permanent sigil, stay in a meditative concentrated state of mind so that you will pour only the energy of your intention into it. If it cannot be created in one sitting, keep it in a safe or sacred space between workings.
Permanent sigils give off power continually as they are designed to be active indefinitely and/or for long periods of time. Once you’ve created your permanent sigil, put it somewhere meaningful. The best place for it will be a personal decision.
You might want to place it in your home where it will always be visible. Alternatively, you could engrave it on a piece of art or place it with artwork inside a picture frame. The Sigil could also be carved into something you might wear on a necklace, or even embroidered and hung as a house blessing.

Letting It Go
After your sigil is created, forget about it. Don’t dwell on it or stress about whether it’ll work; the more you think about your sigil, the more difficult it’ll be to carry on with your life. Take a moment to appreciate that you have manifested the energy you want to see in your life and let the universe decide what happens next.
Sigil magic is based on the concept of planting an idea in your subconscious and letting your subconscious guide you as a result. It’s important to forget the sigil so your conscious mind doesn’t unintentionally get in the way.
A Small Warning
But first I must give a warning. This is not a practice you should take lightly. This is a practice that goes back to at least the time of King Solomon who is said to have used sigils to trap both demons and angels to do his bidding.

Sources:
- Susan Walter Art
- WikiHow
- Katrina Koltes
- Arcane Academy
- Angelic Sigils, Keys & Calls by B. Woodcroft
Ideas To Lighten The Mood
When we explored Altschmerz, it occurred to me that I might really benefit from a specific time limit, or regularly scheduled space in my daily routine for either dealing with, or reliving the thoughts and feelings that put me in a funk, or ruin what might possibly have been a really nice day.
What I came up with is a number of fun little arts and crafts ideas that can be as basic and simple or as elaborate and complicated as you’d like them to be. It seems smart to start with simple and then embellish as time goes by, but I know myself pretty well, and I fully expect I’ll go full out elaborately complicated.
- Happy Memories
Ok, so here’s what I was thinking. Instead of torturing myself with the sad, bad, or otherwise unhappy moments in the past, I thought it might be fun and useful to spend a few minutes each day thinking about the best days, fun times, happy memories or experiences. And then, taking it one step further and writing it down.
Sylvia Hartman suggests a Star Memories journal, where you have a simple journal, and then just jot down your best memories, the date, your age, and anything else about that experience that you’d want to share. I like this idea.

It might also be fun to have a box. It doesn’t have to be an awesome and amazing box. Something as simple as a shoe box would work just fine. And then just jot down memories that cheer you up or make you smile and toss them in. Maybe pictures, mementos, little stuff could also go in. If you are cleaning house, or decluttering your car, and find a little something that makes you smile, it could go in the box too.
On the days when nothing is happy or fun, you could open the box and spend a little time reliving those little moments. And, on days when you feel up to it, you could spend some time adding to your memory box.. or decorating it.
What I really like about this idea is that at some point, when your time is up, and you have left this life – there will be a box of happy memories that your family and friends might find comfort in.
- Write About It
Some days, I need (or want) to just wallow in my “stuff.” And I am pretty sure that those are the days that the “Happy Memories” box will stay on the shelf, unopened.
For those days, I thought it might be helpful to simply acknowledge whatever it is that I’m in a funk about. I thought it might look like this:
I am ______ (pinpoint the feeling)
And I must really like feeling this way
Because if I didn’t, I would __________ (write the first thing that comes to mind)
And/or _________ (write the next thing that comes to mind)
So, it must be useful to me in some way
And I might as well spend the next ______ minutes enjoying it.
For me, today, it went like this:
I am feeling really tired and overwhelmed. I must really like feeling this way because if I didn’t, I would do something about it, and maybe get more sleep, go outside and get some fresh air, or even begin to implement a plan to cope with it. So, it must be useful to me in some way and I might as well spend the next 10 minutes enjoying it.
And I did spend about 10 minutes wallowing in the feeling, and then I actually got up and went outside and got some fresh air. Amazingly, it felt really good and helped a lot.
I didn’t want to forget this little exercise, and I thought it might be helpful if I had some little booklets all made up in advance. This video shows how to make little emoji booklets out of one sheet of paper with no glue… I’m going to make several when I finish with this post.
You will end up with 8 little pages. Some of the pages are doubled or even tripled, which bothered me a little bit, and I solved it by cutting the bottom edges of the bulkiest ones and then using scotch tape to bind up the middle parts where the booklet kind of separated.
My method gave me enough pages to do it like this:
- I am feeling:
- (leave blank to write on)
- I must really like
- Feeling like this
- Because
- If I didn’t
- I would:
- (leave blank to write on)
- and/or:
- (leave blank to write on)
- So it must be useful to me
- And I might as well
- Spend ______ minutes
- Enjoying it.
If you love your little booklets and want them to be really cute, you could use washi tape to secure the middles and around the sides. The double sided ones could even be left open at the top or on the side to give you a little pocket for… I dunno what… but something fun?
This has the added bonus of being wonderfully distracting! I love arts and crafts solutions to emotional issues. Plus you can take one or two of them with you in case you need to use it at work… when waiting for an appointment… or while visiting relatives.
- Blow It Off
Here’s another fun idea. It looks really really easy, and doesn’t require a lot of materials. Plus you have the added bonus of simply using a regular box of tissues and decorating it (if you want to). My vision for this is to pull out a tissue and blow your angst, anxiety, issues… whatever it is that’s bothering you… into it. Really get it all blown out of your head and into the tissue.
And then flush the tissue with a wave good-by and a squirt of room sanitizer, a spritzer of aromatherapy fragrance… whatever you have that you think will clear the room. Some days it might take several tissues to get it all out. Other days, you might not even need it.
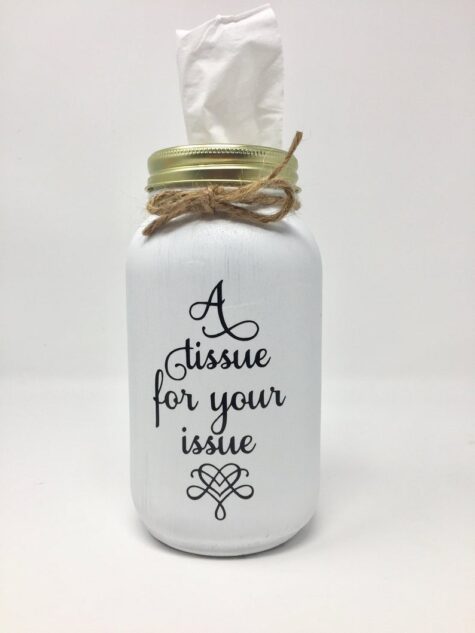
There are a lot of tutorials online about how to make these. You can also buy them ready made on Etsy. Or you can keep it simple and just decorate a box of tissues.
If you want to make one out of a jar, it’s pretty easy:
Start with a mason jar, take the lid off and decorate the jar with paint, fabric, or whatever you like. The round middle part of the lid can be replaced with either felt or cardboard. Or even the top of the tissue box if the opening is small enough. Simply use the middle lid to cut the right size circle from the felt or cardboard. Make an opening to pull the tissues through. Decorate the top of the lid however you want, and voila!
Most of the tutorials call for a mason jar because the lid is easy to alter. You can use any wide mouth jar, even a plastic peanut butter jar, the only draw back is that the plastic lid will have to be cut for the tissues to pull through.
- Put It On A Stick
This is a cute and fun little all purpose idea that requires either popsicle sticks or strips of colored cardstock. When I was a kid, my parents had a little set of bible verses on strips of cardstock that they kept in a container on the dining room table. Every morning we would pick one and read it aloud, and that would be our spiritual theme for the day.
This idea is similar. What you would do is spend some time making the different bits for it. It can be approached as a work in progress. When you find yourself spiraling down the rabbit hole, you could pull this out and add to it. If you’re already too far gone, you can pull something out of your jar and maybe it will help.
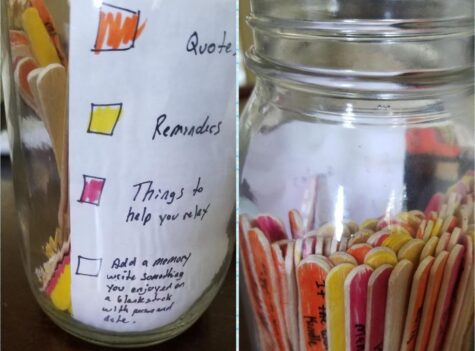
This would also make for a great group project. Get everyone in the family involved on a lazy Sunday afternoon, or get together with friends and help each other think of stuff to write down.
I find that the simple process of making something like this acts as a huge mood booster. It’s wonderfully distracting, feels productive and useful, and if you give it something cute to live in, you can keep it out and have it ready for those times when you really might need it.
- Count Your Blessings
This can take any form. You can think about and list your good qualities and loveable attributes. You can list all the things that you have that make your life easier and more comfortable. You can use it as a gratitude journal, box, jar…
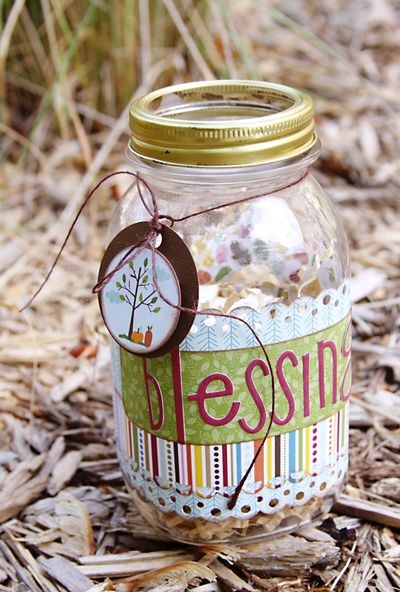
Alternatively, if this sort of thing works for you, you can fill your container or your book with affirmations, uplifting thoughts, and positive images.
I like the idea of using a bottle or a box over a journal simply because I have so many unfinished journals. However, I have been exploring Junk Journal making. It’s a really ambitious and complicated idea, but maybe i will make more than one. If I do, it might be fun to create a blessing / gratitude / positive thoughts journal. I’m really intrigued with the idea of a tiny one. Here’s a link to one of the tutorials that got me inspired.
Make Some Sun Tea
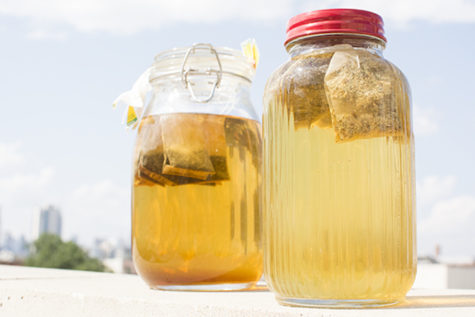
A great way to make some tea without heating up your kitchen is to use the power of the sun to make sun tea.
Here’s how:
Put 4 to 8 tea bags into a clean 2 quart or gallon glass container (4 teabags for a 2 quart container, 8 tea bags for a gallon container). Fill with water and cap. Place outside where the sunlight can strike the container for about 3 to 5 hours. Move the container if necessary to keep it in the sun. When the tea has reached its desired strength, remove from sun and put it in the refrigerator. You may or may not want to remove the tea bags at this point.
The tea will probably taste more mellow than what you are used to from using boiling water. The slow steeping has a way of bringing out a slightly different flavor from the tea. Also, because you didn’t use boiling water, you should refrigerate the tea and drink it up pretty quickly – a day or two. It will not keep as well as iced tea made from boiling water.
Found at: Eating To Live
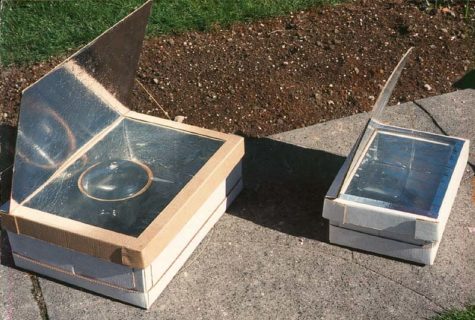
Make A Solar Cooker
I was thinking that it might be fun and good to use the Sun’s power in a simple practical way. And so, from the Mother Earth News, we have this great little article that explains how to make a simple solar cooker. I love this idea, especially for summer time picnics. Here it is:
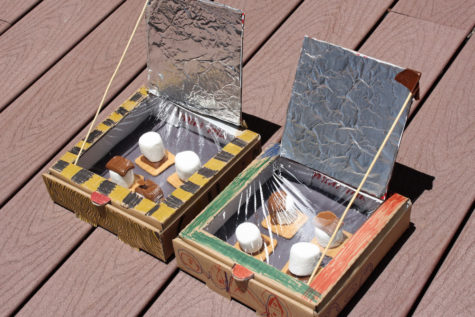
By now, we’ve all heard about solar cookers of one sort or another. And you know an idea has finally gone “mainstream” when you open a glossy mail-order catalog and find solar cookers for sale. Nevertheless, most residents of the United States still think of solar cookers as some sort of novelty, perhaps a good weekend project for Scouts, but not something that is practical and useful.
In fact, solar cooking is practical in every state of the Union (except Alaska) for at least six to eight months every year. Even with snow on the ground, you’ll still be able to cook if the day is sunny. As for cost — well, I wouldn’t consider purchasing a prefab solar cooker. My wallet simply wouldn’t allow me that luxury.
Mother Earth News readers may have made their own cookers described in past issues, particularly the parabolic dish cooker, and the “breadbox” design made from wood or sheet metal. But there’s an even simpler — and cheaper — way of making a solar cooker: use cardboard boxes.
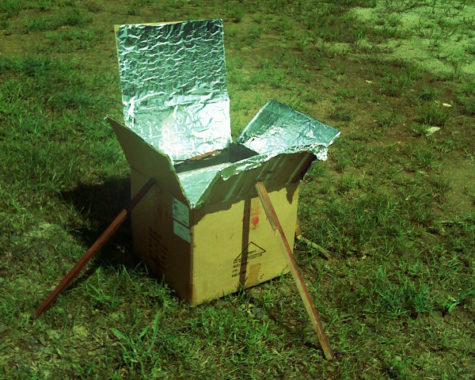
First, get two boxes. One should be able to fit into the other, with ideally an inch of space all around. (If you can’t find boxes, you can cut and fit your own). Now, cover both inside and outside of the little box with aluminum foil, and cover the inside of the big box with aluminum foil. A water-based glue works fine for this.
Now, placing the little box into the bigger box, the tops of each box should be at the same level. To accomplish this you need to support the inner box so that it is off the floor of the bigger box. This is done by placing small pieces of flat wood inside the big box. Generally, four small pieces of wood will serve as four “legs” to support the inner box. You can also use several pieces of cardboard to raise up the inner box.
Once you’ve placed and glued these four legs, you pack all the space between the two boxes with crumpled newspapers. Though most people have no problem obtaining old newspapers for the insulation, you can use many other substances too: old cotton rags, straw, dried grass, coconut fibers, etc. Though you might be tempted to use white blown foam packing chips for insulation, DON’T! At high temperatures, they often melt and/or give off undesirable fumes.
Now that you have one box inside another, with both of their tops level, and with the insulation packed between the boxes, you are ready to seal the insulation. This is done simply by taping or gluing pieces of cardboard over the top open section between the two boxes.
Next, make a lid for your cooker. If you were lucky enough to find a large cardboard box with a tight-fitting lid, you can now proceed with that lid. However, you may need to cut a lid from cardboard.
Once you have made your secure-fitting lid, you are ready to cut an opening for a sheet of glass or heavy-duty plastic.
You now want to cut an opening in the lid that is just as big as the opening of the inner box. But only cut the lid on three sides so you can bend up the opening and create a reflector out of it.
The opening of the lid will need to be covered with a single pane of glass or with a sheet of plastic. The plastic will be easiest to install, though glass will retain the heat better. The glass or plastic must be secured to the inside of the lid by glue or silicone caulking. Make certain that the glass is secure before proceeding.
Now, note that the flap that you cut on the lid for the glass can open and close. Line the inside of this lid flap with aluminum foil, and you have an automatic reflector. When the solar cooker is in use, you prop up the lid with a stick. Presto! Your solar cooker is complete!
An outer box with dimensions of 28″ x 24″ x 10″ and an inner box with dimensions of 23″ x 19″ x 9″ work well, but that’s only a recommendation. The design can be modified depending upon the supplies you have on hand. You may have a good pane of glass, and so you should adjust the cooker’s size based upon the glass. There’s room for flexibility.
Before you cook, you should place a black metal cookie tray, or an aluminum foil tray, on the inside of the cooker. To absorb the heat effectively, all cooking pots should be black and should be covered.
Though anyone handy with making things should have no difficulty, some of you may want more details. An organization called Solar Cookers International has been actively promoting the solar cookers concept worldwide. They sell detailed plans for making a solar cooker and other useful gear.
Eight Cooking Speed Factors
- Sun’s angle (determined by season and time of day).
- Cloud cover.
- Wind. A strong wind will slow the cooking process somewhat.
- Cooker’s orientation to sun. For meals that need to be cooked several hours, adjust cooker’s position to maximize sunlight at approximately 1 1/2-hour intervals.
- Cooker size. Boxes should be as small and shallow as required to avoid substantial heat loss and shadows on food.
- Size and color of pots. Again, use the smallest pot possible and, ideally, exterior should be black to facilitate the absorption of heat. Thinner pots will allow for faster cooking.
- Food-piece size and quantity. Cut up portions as small as possible. Smaller quantities of food will cook faster.
- Water content. Use as little water as possible. Boiling in a large pot of water takes much cooking time.
- Air temperature is not as important as sun exposure, but should be above freezing.
Cooking Time On A Sunny Day
- 1-2 hours: Eggs, rice, fruit, vegetables (above ground), fish, chicken
- 3-4 hours: Potatoes, vegetables (roots), most beans and lentils, red meat, bread
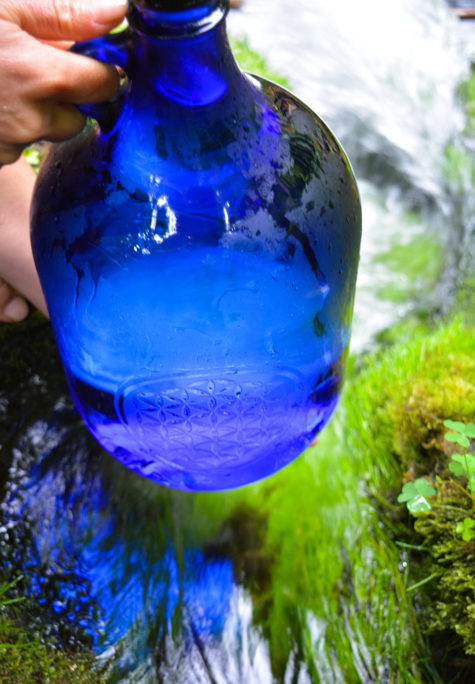
Blue Solar Water
Blue Solar Water is easy to make, delicious to drink and is very a powerful tool for healing the body and spirit.

As we know, water carries vibrations, energy frequency, crystals, colors… Blue solar water provides the best: the powerful energy of the sun, the source of all life, and the fascinating properties of the healing and calming blue color. This water has become a favorite and popular after the book Zero Limits by Dr. Hew Len and above all through Ho’oponopono, an ancient Hawaiian healing technique.
In addition to being extremely healthy, this water helps cleanse the deep negative subconscious programs that we automatically repeat over and over again. Blue solar water heals emotional wounds and blockages, takes them to the surface and relieves us from them so that we get reset back to zero, in a pure state, to a clean start, without the background noise of negative thoughts. This water meets positivity, peace and love. And everyone can drink it, children, sick with cancer, especially those on chemotherapy. It is even tastier than plain water. And it is very easy to make.

Why blue?
Blue is the color of the fifth chakra, the so-called power center or the throat chakra (Vishuddha). The throat chakra is extremely important because it is the way through which energy from the higher energy centers can move to the lower ones and vice versa. It is the first center of higher frequencies and only when it is completely clean and open, we can reach higher states of consciousness. It is a bridge between the physical and the spiritual world, between the heart and the mind. It separates the secular from the sacred and transmitters the intention of the soul.
And it has been scientifically proven that the color blue has a tremendously powerful impact on our brains, decision-making and behavior.
Blue sky means a nice, relaxing day. Clean calm blue sea means calmness and serenity. In fact, everything blue symbolizes trust, loyalty, wisdom, confidence, intelligence, faith, truth, and heaven. Krishna is blue.
Science says it’s no coincidence these blue things make all of us us feel so good. After all, blue is the only color spectrum that can effectively prevent people from committing suicide.
It is proven that the color blue has a calming effect on people, and that is why it is used in different ways. In 2000, police in Glasgow, Scotland, installed blue lights in areas with a high crime rate. Since then, crime in those infamous neighborhoods decreased by 9%.
In Japan, several major railway companies switched to only blue lights at all railway crossings. To date they have a stunning success: In 2007, a year before the blue lights were installed, they had 640 suicides. In 2008, after the lights were installed, there were zero suicides!
If this is all strange and you do not believe in the incredible efficiency of blue, read on.
One theory says that the color itself has a tangible, biological effect on our brain chemistry. Harold Wohlfarth, president of the German Academy of Color Science, conducted a study in which he found that blue color lighting actually had a psychological impact on children and adults, and what is particularly bizarre in all things is the fact that it had the same effect even on blind people.
Wohlfarth believes that traces of electromagnetic energy from the blue light affects certain neurotransmitters in the brain. When light of a certain color falls on the eye, even if the eye is blind, it affects the gland that produces melatonin, which creates a chain reaction that elevates mood and calms emotions.
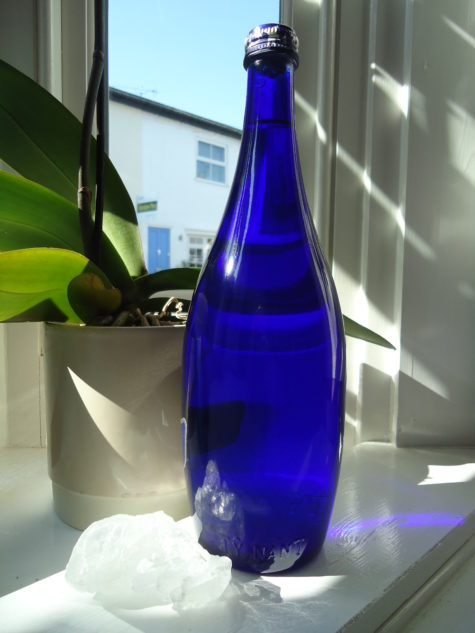
How to make Blue solar water?
All you need is a blue glass bottle (the shade of blue is not important) and fill it up with filtered, spring or plain tap water. You also need to make sure that the cap you seal the bottle with is not made of metal. It can be glass or plastic, but never use metal. The cap only serves as a protection against dust or insects that are very fond of this water.
This water bottle should be then kept on the sun for 1-12 hours. The longer you keep it on the sun, the sweeter its taste will get. But remember not to keep it longer than 12 hours.
How to drink it?
Drink this water as much as possible, it is very tasty and drinkable. Somehow, our body recognizes it, so even those who don’t drink so much water will have no problem drinking a few liters.
In addition to drinking it, you can use this water for cooking, watering flowers, for your animals, add it in the washing machine, dishwasher, put in a sprayer and refresh the rooms, add it to your bath…
Once you have made your Blue Solar Water you can transfer it into another container, plastic or glass, doesn’t matter. It can be kept in the refrigerator or at room temperature.
If you get really excited about the solar water, here are some other uses:
- Add some to your coffee, tea, cocoa, juice, etc
- Use it to “wash your hands” of a given situation
- Add Blue Solar Water to everything you cook, pasta, soup, oatmeal, etc.
- Add some Blue Solar Water to your washing machine when washing clothes
- Spray some in your dryer
- Pour it over your head to clear yourself of bad vibes and negative energy
- Add it to your radiator to make your car hummmm
- Add it to your bath water
- Spray yourself with Blue Solar water after showering
- Spray rooms with Blue Solar Water
- Gargle with it.
- Wash floors with it
- Wash your car with Blue Solar Water
Found at: Color Therapy
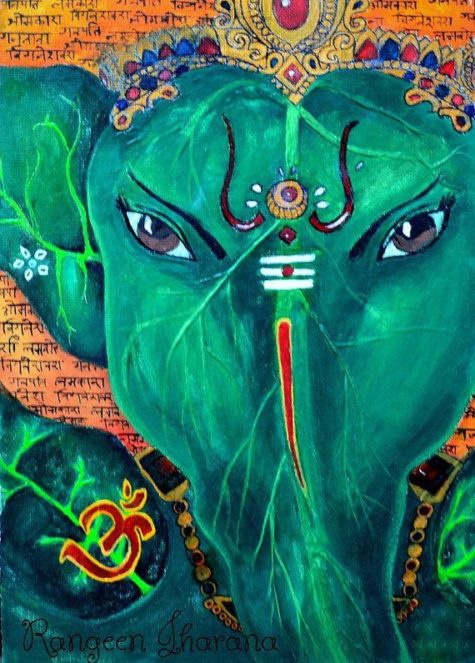
Ganesh Road Opener Oil Blend
Fill a small bottle with equal parts of the following essential oils:
- Sandalwood
- Honeysuckle
- Hibiscus
Add a few drops of Gardenia essential oil.
Consider all obstacles in your way being removed from your path as you blend this oil, and invoke Ganesh, the remover of obstacles to give his blessings to your blend so that it may be the best oil you use to open all roads to success.
You can use Ganesh Road Opener Oil in a variety of ways. It can be worn on the body, dabbed into the bath, anointed on important documents, dropped in the heel of your shoe, dabbed on charms and talismans, rubbed on the front door, burned in a diffuser or simply worn during prayer or meditation. You may also petition Ganesh by placing out sweets, fresh flowers and a bowl of water with a bit of this oil blend mixed in.
This oil blend should be a basic staple in your collection, and I strongly suggest you keep it on hand to be used whenever needed. Anytime you must clear your way through physical obstacles, this is the oil for the job. Add Road Opener to any magick or impossible task you wish to accomplish.
Add this oil to liquid body soap, and every time you wash your hands, you will be imbuing them with the power to open roads in all that they encounter. Writing letters, doing chores and being involved in all manner of communications – we use our hands one way or another.
Adapted from a recipe in the Enchanted Formulary
Recipe For Modaka
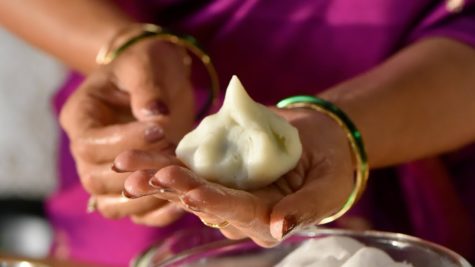
The following recipe will make approximately 20 lime-sized modakas, a treat for the children, and a traditional offering to Lord Ganesha. It takes about two hours to make them.
Ingredients and Utensils:
- 1 lb rice flour
- 2 cups jaggery (or 2 cups brown sugar with 4 tbsp dark molasses added)
- 2 cups raw sesame seeds
- 2 grated coconuts (optional)
- 2 cups melted ghee (melted butter will also work)
- 1 tsp salt
- Banana leaf or waxed paper
- A flour sifter or fine sieve
- An iddli or vegetable steamer
Directions:
Roast the sesame seeds in a pan, without oil, until golden brown (5 to 10 minutes). Crack the seeds by rolling with a rolling pin or pounding. Add 4 tbsp ghee to the jaggery to soften it, and then mix in the sesame seeds and coconut thoroughly. (This mix may be refrigerated in jars for making quick sweets simply by adding a bit of ghee and shaping the dough into balls).
Next sift the rice flour and toast it without oil until it browns slightly – about 5 to 7 minutes. Spread it out on a tray or table top when done, and allow cooling completely.
While the rice flour is cooling, bring approximately a half-gallon of water, with a tsp of salt, to a rolling boil. Put the cooled, toasted rice flour in a bow. And make a well in the middle. Slowly pour a small amount of the hot water into the well and begin working it into the rice flour with your hands.
Keep adding small amounts of the hot water, and work the flour into a ball of dough. It should be moist but not wet when you put it out on the table or breadboard. Knead the dough thoroughly so it is even in moisture and texture.
Next, place water in the bottom of the steamer and bring to a full boil. Spread a thin coating of ghee or oil on a piece of banana leaf or waxed paper. Take a lump of dough half the size of a lime and work it in your hands for a moment to remove the air and then pat it out flat and round on the leaf, about as wide across as your palm. Make it a uniform thickness so it will cook evenly.
Place a lump of the sesame-jaggery-coconut mixture into the center and wrap the dough up around the mixture. Pinch the dough into a cone-shape over the stuffing and wrap the leaf or paper up around it. (The modakas can also be round if desired.) Repeat until you have enough to fill your steamer.
Place the assembled modakas in the steamer, spaced so as to not touch one another. Cover and steam until done (15 to 20 minutes). While they cook you can prepare the next batch. When cool enough to handle, dip the modakas in melted ghee. Now they are ready to offer.
from Loving Ganesa
by Satguru Sivaya Subramuniyaswam
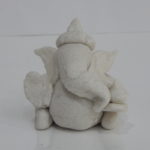
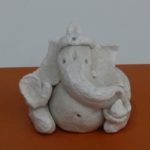
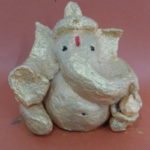
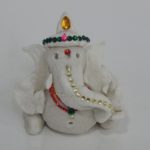
Make a Papier Mache Ganesh

A simple method for a paper mache Ganesh. Some artistic ability is helpful, but if you are willing to simply get in there and have fun, it might surprise you how easy it could turn out to be!
The materials needed are:
- Paper mache
- Latex or other water-based paint in a variety of colors
- Gold-leaf or metallic gold paint
- Paint brushes
- Sand paper
- Putty or joint compound
- Miscellaneous ornaments and cloth for dressing the image
- Replicas of the various implements he will be holding
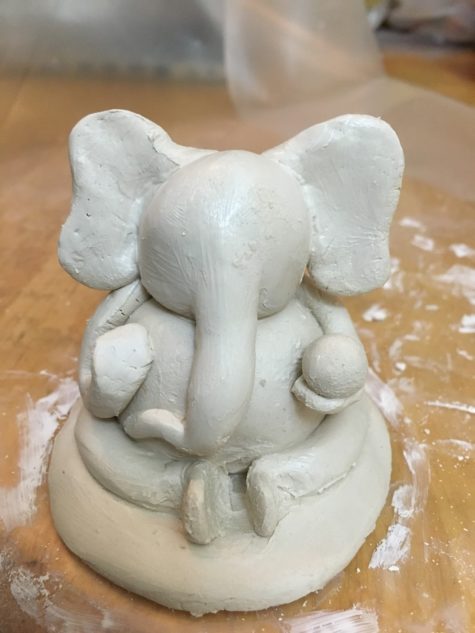 Instructions:
- Mix paper mache to a firm but homogeneously wet consistency.
- Make an armature (skeleton) of wood, Styrofoam, or similar material.
- Create the image by covering the armature with paper mache.
- Make implements for each hand and make sure they can be inserted and glued later when the image is dry
- Brush the exterior smooth with a wet brush.
- Let the image dry in a cool place, away from the sunlight. (Drying time is usually one month for every foot in height for a clay image, three weeks for paper mache.)
- When dry, sand with coarse, then fine sandpaper
- Fill cracks with putty or joint compound.
- Sand again
- Apply a white primer and sand with very fine sandpaper.
- Make the image dust-free.
- Paint the torso, head, trunk, and limbs
- Use red paint and a fine brush for the Aum, swastika, and other – symbols.
- Paint, decorate, and/or assemble the various implements
- Place appropriate dress (traditionally white or red silk) upon the image.
- Glue the implements into the hands
- Decorate the image with ornaments, flowers, etc.
adapted from Loving Ganesa
by Satguru Sivaya Subramuniyaswami
An alternative method can be explored with this visual tutorial from Hobby Ideas:

Making A Shrine For Ganesh
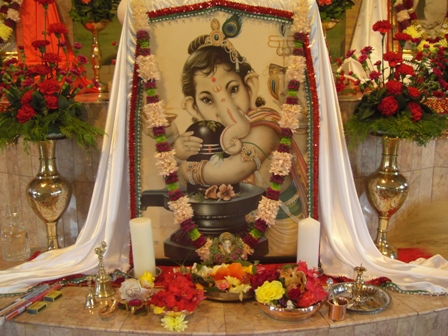
Creating a home shrine is not difficult. The altar should be close to the floor if you plan to use it for puja and/or meditation. However when there are small children in the home it is often best to have it higher and out of reach.
For a Ganesha shrine, an image, or murti, of Lord Ganesha is placed at the center of the altar. A metal or stone image is best, but if not available there are two traditional alternatives:
- A framed picture, preferably with a sheet of copper on the back.
- A kumbha, which is a symbol of Ganesha made by placing a coconut on a brass pot of water with five mango leaves inserted between the coconut and the pot. The coconut should be husked but still have the fibers on the top.
Bathing the God’s image (murti) is a part of a puja and other ceremonies. For this, special arrangements may need to be made. Most simply, the murti may be placed in a deep tray to catch the water. After the bath, the tray is removed and the murti dried off, and then dressed and decorated.
Various items for the altar can include:
- Water cups and a small spoon for offering water
- A brass vessel of unbroken, uncooked rice mixed with enough turmeric to turn the rice yellow
- A tray or basket of freshly picked flowers (without stems) or loose flower petals
- A lamp
- Small metal bell
- Incense burner and a few sticks of incense
- Fresh fruit
Give Yourself Permission
Here is a nifty little creative project that I think would make a great addition to any morning routine. I found it in the book Living Out Loud, and it looks pretty easy. The premise is to live your life on purpose daily. Here’s what she has to say about it: “Permission Cards take the frenzy out of your hectic existence and give you permission to do what you REALLY want.”

The book has a tear out page with lots of little “permission slips,” but I thought it would be really fun to make our own. You can use 3 x 5 cards and cut them into quarters, thirds, or whatever shape you like. On one side write an activity that appeals to you.
Here is a list of the permission slips from the book. Feel free to make up a bunch more of your own:
Meditate * Nap * Heal * Vent * Forgive * Play * Change * Try * Recharge * Inspire * Begin * Embrace * Simplify * Create * Receive * Trust * Dream * Invent * Smile * Wish * Bloom * Grow * Love * Transform * Dance * Choose * Express * Empower * Contribute * Investigate * Let Go * Accept * Laugh
You don’t have to stick to one word permissions. Here are some other ideas:
Hurry slowly * Make mistakes * Go back to bed * Be outrageous
Make a mess * Whine and Complain * Say what I think * Play all day
Leave them plain and simple, or decorate each one with markers or stickers. If you enjoy creative projects, you can go all out with these, but if you just want something and utilitarian, it doesn’t have to be fancy at all.
Directions:
- Make the cards
- Place the cards in a bowl
- Close your eyes and pick one. (The one that you need will stick to your fingers.)
- Say out loud, “I now have permission to _____________.”
Easy peasy… be a fun way to start the day, don’t you think?
- Radical Self Care Project Overview by shirleytwofeathers - No Comment
- Radical Self Care Image Gallery by shirleytwofeathers - No Comment
- It’s A Wrap by shirleytwofeathers - 3 Comments
- Something To Consider by shirleytwofeathers - 1 Comment
- Nurturing Your Precious Self by shirleytwofeathers - 3 Comments
Liana: A Prosperity Prayer
B. Joy Barrett: beautiful-turquoise-upholstered-accent-chair-for-living-room-with-within-colorful-accent-chairs-colorful-accent-chairs-transforms-the-look-of-a-room
Claudette Losier: Why Does It Work?
me: Make Your Own Violet Fire
Abdulrahman: Money Chant – Very Fast
Our current project began on July 4. We are exploring the concept and practice of Radical Self Care . Feel free to join in at any time!

Interested? You can visit our current project page, or you can take a look at the About The Project page if you are curious about the concept.
.
Please feel free to join in at any time! No experience necessary.

- Money Chant - Fast
- Money Chant - Slow
- Prosperity Plan
- Amazing Creator
- Cause and Effect
- I Am That I Am
- Spirit Rap
- Lakshmi Spirit Rap
- PowWow Spirit Rap
 Enter your question and receive the wisdom of the Occulatum. You may pose your question in any way that feels appropriate. The answer will come in the form of a small pop up. Try it - your life just might change for the better!

I think it's time to go shopping... maybe even buy some really cool stuff at my online shops!!