DIY
Out of the Closet
So now that we’re ready to tackle our closets, we need (I need) some good incentives to sort through our piles of jeans… t shirts… shoes… socks… clothes I’ll never wear again… clothes I love that are so past their prime I can’t wear them any more…
I found so many fun and creative ideas for old or discarded clothing that I had a hard time figuring out where to start! So let’s start with those old T shirts.
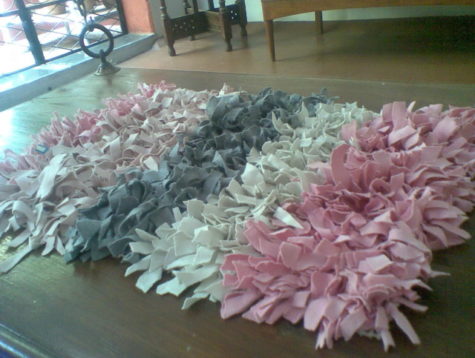
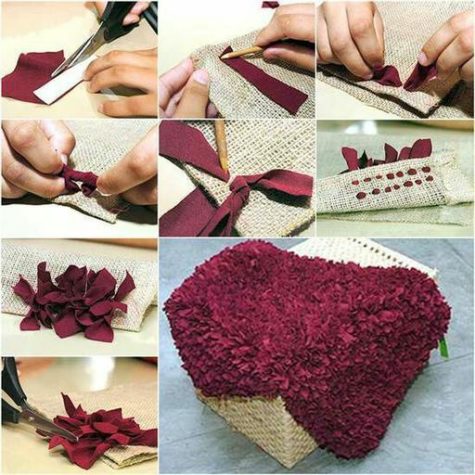
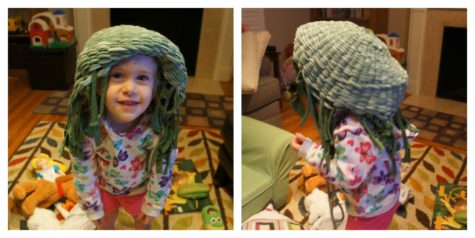
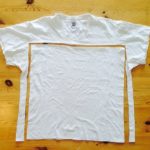
Did you know that old T shirts can be made into really cool rugs that require no sewing skills?


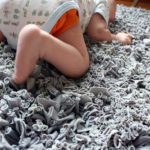
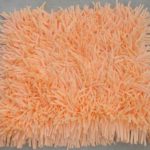

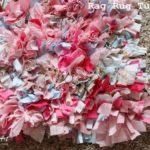
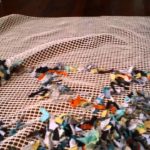
It looks pretty easy. All you need is some kind of backing with holes in it that are large enough to stuff a strip of T shirt into. This could be burlap or even the mesh that laundry bags are made from. I absolutely love this idea, and am really disappointed to discover that I don’t have nearly enough old T shirts!
Here’s a visual tutorial of rug made with burlap as the backing.
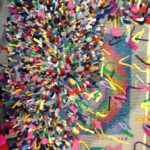
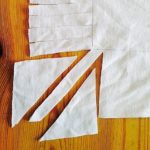
And here are some pics of work in progress:

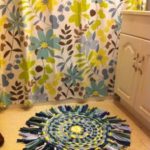
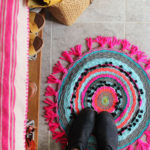
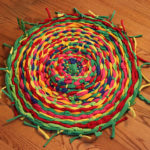
Not big on shaggy rag rugs? How about a round woven rug? Check this one out:
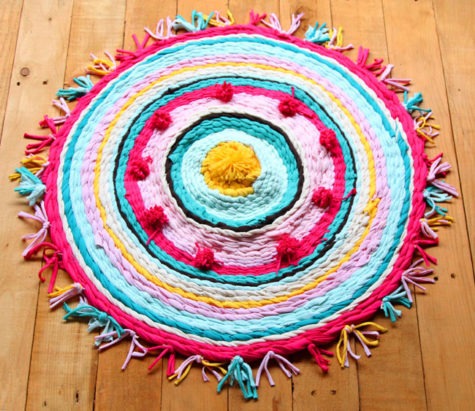
Pretty cute, huh? It’s not hard to make. Here are some pics that show how rugs like this can be made. It looks like a hula hoop is used as the frame.
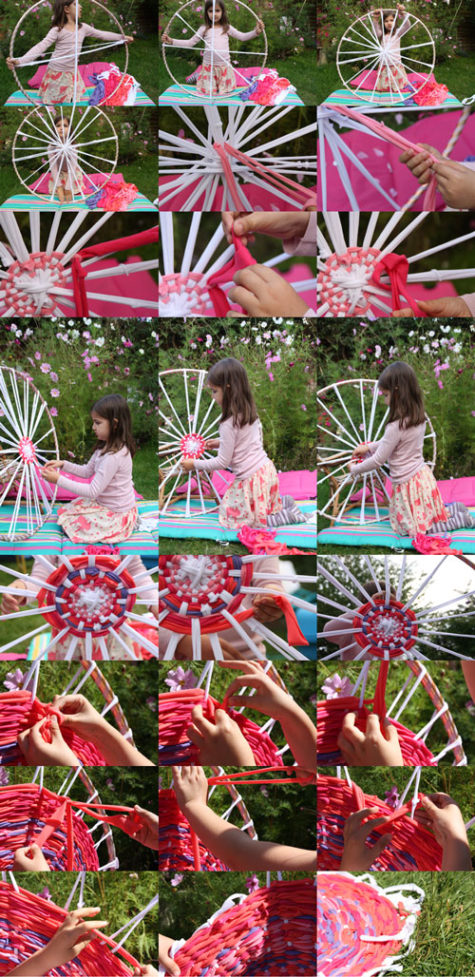
This may not be as easy as it looks. If you weave it too tightly, or if you use stretchy fabrics in strips that are too narrow, you may end up with a sort of limp basket. I found a post about this and a cute picture of a hula hoop rug fail. Here’s the link Project Hula Hoop Rug Fail and a pic:
I did find success story pics though, so I think it’s a matter of making sure that the weave isn’t too tight, and that the cross pieces are sturdy and thick. I think old towels might lend themselves to a project like this as well. Be interesting to try. Here are more pics:
Rugs aren’t the only things that can be made from old T shirts. Here’s a clever idea for making bags from T shirts. It requires no sewing skills whatsoever. I found it at Mommypotamus
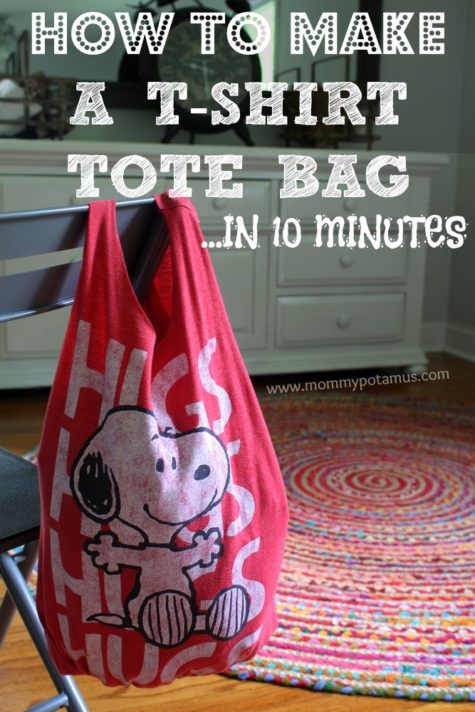
I’ve been looking for an easy-to-carry, washable alternative for the kids to use, and over the weekend I came across the perfect solution. My local thrift shop was selling cute t-shirts for 99 cents apiece that were practically begging to be upcycled into a farmer’s market tote. They’re 100% washable, and when they’re no longer useful as bags I can cut them into rags to clean with.
There was just one problem: I can’t sew. At all.
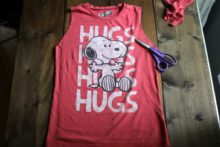
Fortunately, I came across some no-sew ideas that Katie and I adapted to fit our style (which, if you’re curious, generally favors the color red and anything Snoopy). The took no more than 10 minutes from start to finish, and I love how they turned out.
Supplies:
- Old t-shirt – The thicker the fabric, the sturdier the bag
- Sharp scissors, preferably fabric scissors
- Washable marker (optional)
 Step 1: Cut the sleeves off
If you’d like to fold the t-shirt in half you can cut both sleeves at once so that they are identical.
Or, if your material is too thick to cut them both at once, you can cut one, then fold it in half and use the cut side as a guide for the next sleeve.
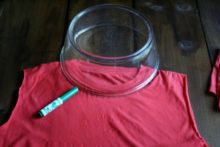 Step 2: Cut the neckline area
If you’d like, you can turn the shirt inside out and trace the outline of a bowl before cutting.
I used both methods and personally, I like free-hand cutting better because I prefer a slightly oval shape to a perfectly round one.
I ended up trimming this one a bit to make it more oval.
 Step 3: Determine how deep you want the bag to be
If you haven’t already turned your t-shirt inside out, do it now. Determine where you want the bottom of the bag to be and trace a line across.
Keep in mind that depending on the fabric used, your tote is likely stretch and become longer when it’s filled with stuff.
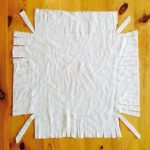
 Step 4: Cut fringe
Now grab your scissors and cut slits from the bottom of the shirt up to the line marking the bottom of your bag.
You’ll want to cut both the front and back layers together because they need to match up for the next step.
I cut my slits about 3/4 to 1 inch apart.
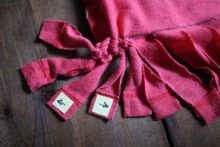 Step 5: Tie Fringe
Okay, this is going to sound really complicated, but it’s NOT, promise. Take your first pair of fringe and tie it into a knot, then tie two more pairs.
Now if you lift your bag you’ll see that although the pairs are pulling the bag together, there’s a hole between each pair. This next step will close those holes.
In the photo above you see three sets of fringe that have been tied in knots. What I do next is grab one strand from the middle set (the one with the arrow pointing left) and tie it in a knot with one of the strands on the left set. Then I take the other strand from the middle set (the one with the arrow pointing right) and tie it in a knot with one of the strands on the right set.
Then I take the remaining strand on the right set and tie it to the next set of strands, and so on and so forth until all the strands are tied. Now turn your t-shirt right side out again and voila, you’re done!
A Couple Of Fun Variations
- Turn the bag right side out when tying the fringe so that it hangs from the bottom.
- Tie the straps in knots, or tie bits of t-shirt scrap to the top as embellishments
More T Shirt Ideas
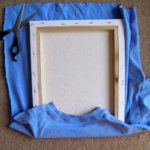
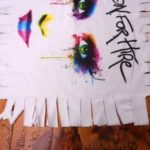
So totes are fun, and easy but maybe you really love that old T shirt. No problem. It’s really easy to turn T shirts into wall art. All you need is a blank canvas a pair of scissors, and a staple gun. Now staple gun? Thumb tacks will also work:


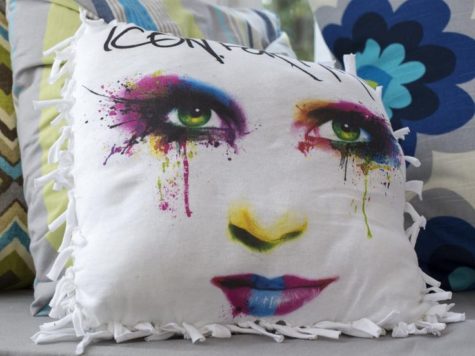
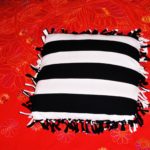
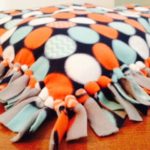
Pillows
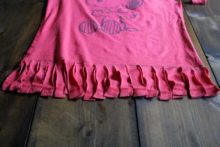
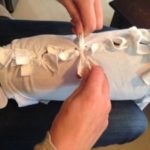
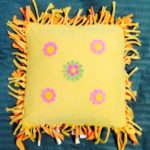
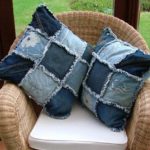
Because T shirt material doesn’t fray or unravel, it makes a for a very easy customized throw pillow. Old fleece blankets make a nice pillow as well. These pillows are so easy to make that I don’t think we even need an extensive step by step tutorial.
Simply cut the T shirt into as large of a square or rectangle as possible, then cut fringe around the edges. Tie the fringe together, and when you have 3 sides finished, stuff it with batting or insert a plain pillow. Then tie the last side up.
Here’s a series of pics that show how it works:
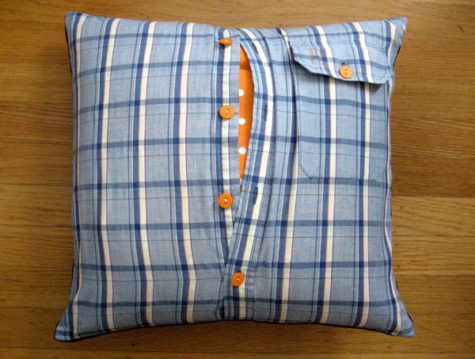
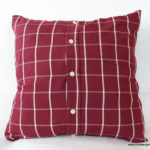
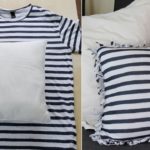
If you prefer a finished edge, you’ll need to do some sewing. Button down shirts can be made into pillow covers, and then unbuttoned and tossed into the washing machine. Simply button the shirt, turn it inside out and lay it on a flat surface. Smooth out the wrinkles and pin it together. Then cut it into whatever shape you like. Once it’s cut, sew the edges, flip it right side out… and Voila!! How fun is that?
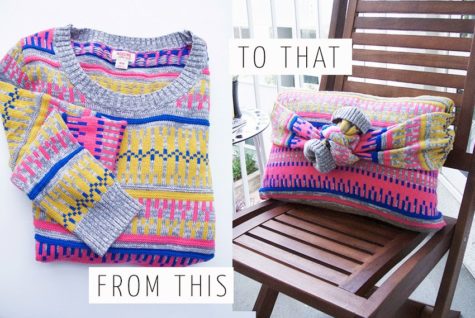
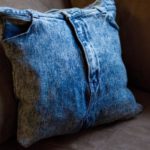
There is a boatload of cool ways to make pillows from shirts and T’s. You could also use old pajama tops and bottoms. The legs from old pajama bottoms would be super easy since two sides are already sewn. I even found a tutorial at Creme de la Craft for turning old sweaters into cool pillow covers. No sewing, no cutting. Here it is:
You don’t need to toss out your favorite sweater just because it’s got a hole! Instead, you can upcycle old or damaged sweaters into cozy pillows. This no-sew tutorial is so easy that it’ll take you less than five minutes to complete. Plus, it doesn’t require any cutting so you can use your sweaters as pillow covers during the summer and wear them again in the winter!
Steps:
- Stuff the pillow inside the sweater, stopping an inch below the underarm seam.
- Pull the sleeves from the back of the pillow and wrap them around the front of the pillow, knotting them together in the center. Fold back the cuffs if desired.
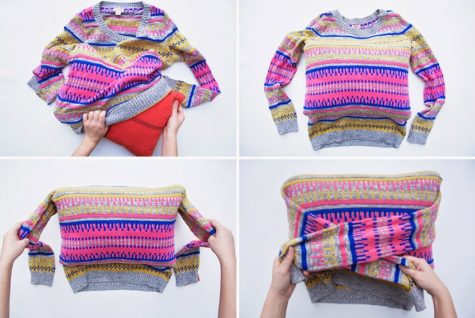
- Turn the pillow upside down to expose the bottom hem of the sweater.
- Tuck in one side of the bottom hem. Tuck in the other side to form a little pocket.
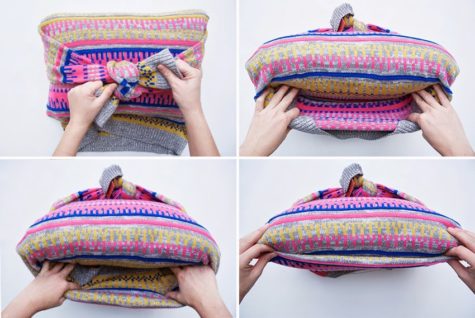
- Turn the pillow on its opposite side to expose the neckline of the sweater.
- There should be a little pocket that was formed on the back of the pillow after you knotted the sleeves in the front. Tuck the neckline of the sweater inside this little pocket so that it is hidden.
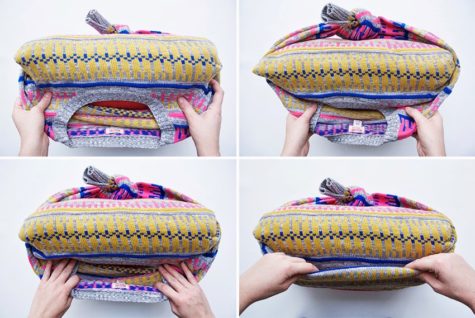
This technique can be used with any long sleeved shirt. I’m not sure if the knot on the back would bother me, and I am also unsure how well it holds up to continued use.

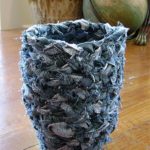
And just in case you’re still thirsty for pillow ideas, here is a nifty collection of a variety of pillows to get your creative juices churning:


Alright, that’s enough of that… what about all those jeans you have that you can’t wear, but still love?
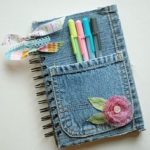
Jeans
Most of the ideas for jeans that I found require a bit of skill, but these coasters looked pretty easy:
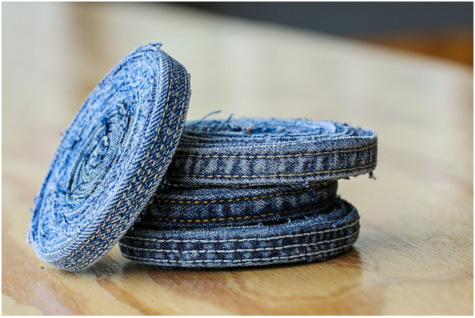
Cut out seams from the legs of old jeans and use them to create gorgeous looking coasters. All you need to do is tightly roll the seam into a spiral and keep gluing it on the inside to ensure it sticks well. Try and create a 3.5” spiral. If you do have a cork lying at home, cut it out and stick that to the bottom of your spiral seam coaster. This one’s just an addition; the coaster is good to be used without it too.
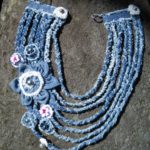
You could also use the jean pockets. Simply remove the pocket from the jean, and decorate the edges with lace, sequins, colorful buttons or anything else you fancy!
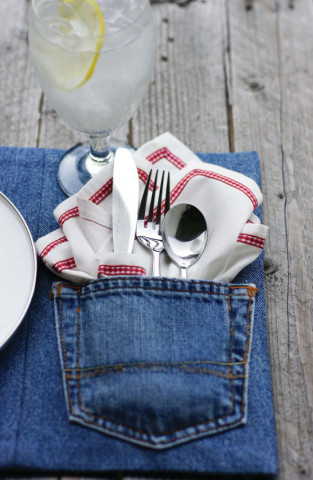 Placemats:
Make yourself an uber cool set of placemats using old denims. All you need is your old denim and some sewing skills. Basic hand sewing would also work/ alternatively you could look at using adhesives. Made from up cycled denims, these can include cute pockets to tuck away the cutlery too.
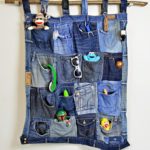
Workstation organizer:
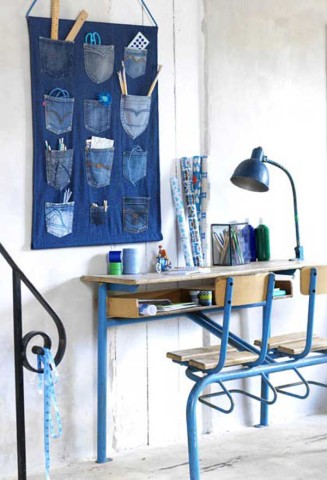
This project requires a bit of sewing. You need denim pockets, an old pair of jeans (use the same ones from which the pockets are being ripped off). A rod for the top and bottom of the organizer, and a cord to hang it with.
Cut open the denim legs and sew them together to get a flat piece of rectangular denim fabric (See image for reference). On this sew the various pockets. Ta da! Your organizer is ready.
An alternate to this could be to use any waste fabric lying at home as the base of the organizer. Another option is sticking the pockets onto a wooden panel.
But wait, there’s more!
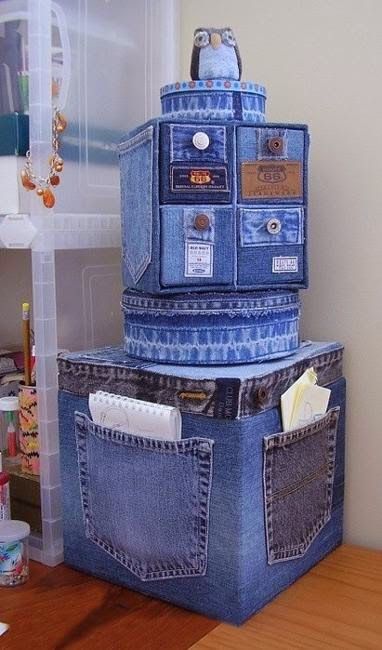
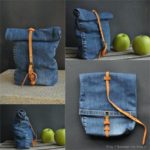
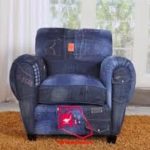
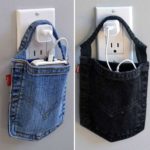
Jeans can be used to cover sturdy cardboard boxes. All you need is a supply of jeans, a sturdy cardboard box, a good idea, and glue. More ideas for how to turn those old jeans into something useful are as follows:


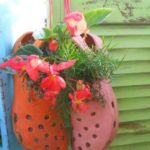
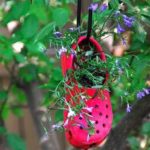
Crocs
Got some crocks that you no longer wear or that have lost their tread?
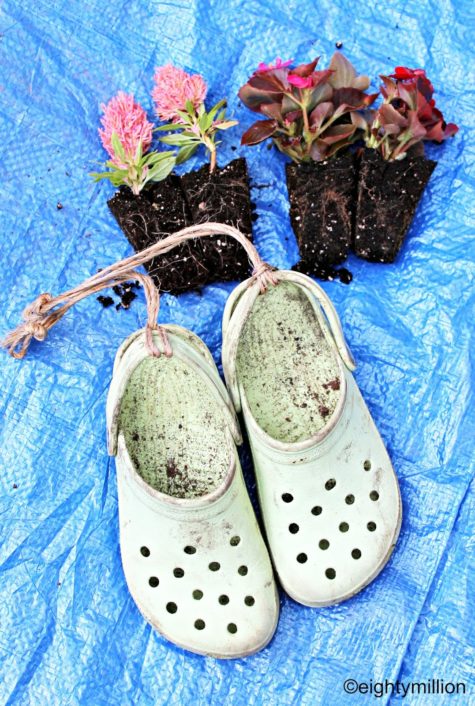
Crocks make great little planters. They have great drainage and they are easy to hang! Fill them with potting soil and plant flowers, hen and chicks or other sedums. If you are worried about the soil falling out through the holes, cover the inside with a piece of burlap. Keep them well watered and voila!
What a great way to grow a little mint garden, or maybe some small herbs like thyme… Here are some great ideas:


How fun! I wonder if I have crocks in my closet…
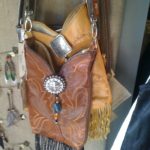
Western Boots
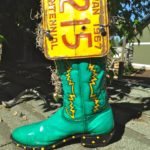
Western boots are super cool, and when the time comes to recycle them, there are a lot of options – some are easier than others.
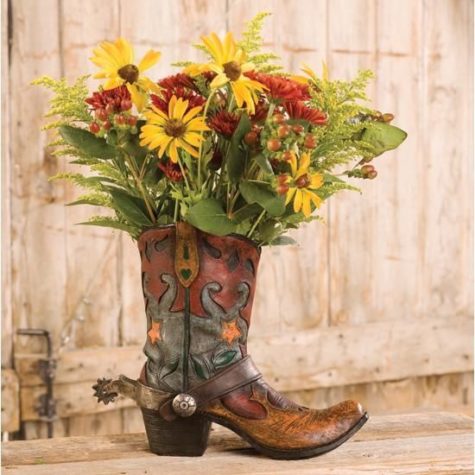
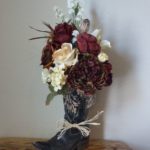
The easiest way to use a favorite boot that will never fit you again is to clean it up, paint it, and turn it into a flower holder. You can put a water filled vase inside the boot to display fresh flowers, which isn’t necessary if you are a lover of dried or silk flowers.


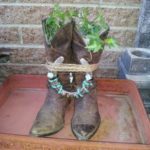
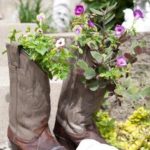
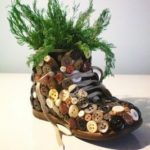
Old boots also make for cool planters. If you opt for the cool planters, don’t forget to make sure the boot has good drainage. If it already has holes in the sole, no worries. But if the boot is still in good shape, you’ll need to drill a drainage hole in the bottom.

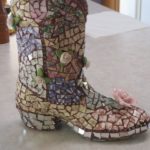
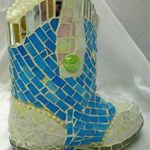
Mosaics on boots is a super nifty way to bling up your home. I’d use silicone caulking to attach the mosaic pieces because it allows for a bit of flexibility. You can use mosaic glass, beads, old jewelry… pretty much anything with sparkle and shine. The inside of the boot can be spray painted or covered with fabric or felt. Fun, huh? I love this idea, too bad I don’t have any old boots!

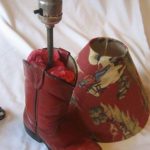
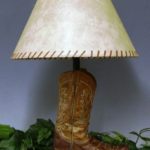
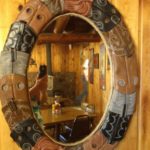
There are tons of other really cool uses for old western boots. Some of these ideas will require some skill and maybe a tutorial or two. You can make a lamp,a bird house, and a bunch of other cool stuff. Well worth the effort if you love western decor, or if you have access to a plethora of old western boots. Here are some pics:


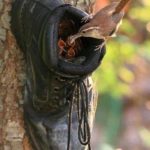
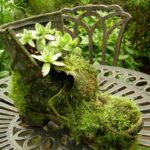
Work Boots and Mud Boots
Work boots, rubber boots, boots with heels, boots of all shapes and sizes are most often used as planters and flower holders. They can also be recycled into cute little fairy houses, of nifty bird houses. You can paint them, mosaic them, or let moss grow all over them. The possibilities seem endless:


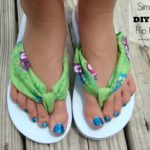
Flip Flops
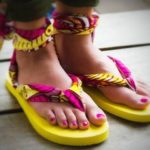
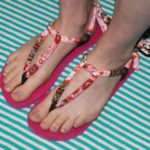
If you have an abundance of old flip flops and colorful scarves, you can turn them into a really cool pair of sandals! This visual tutorial simply wraps the scarf around the flip flop and the ankles.

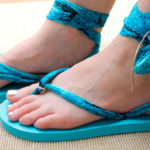
The following visual DIY tutorial for upgrading your flip flop fashion uses a braided strap to make the flip flops, but you can use colorful scarves and other fabrics as well.
There are so many possibilities on how you can add your favorite fabric to flip flops, but what I like most about this method is that you can make your flip flops fit perfectly so you don’t have to worry about doing the toe pinch every time you step to keep you flip flop on, or have your feet ache from flip-flops that are too tight.
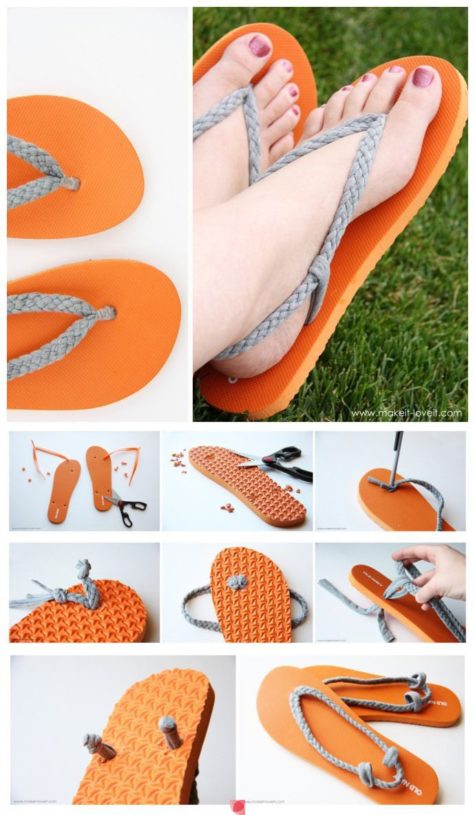
First of all, I found a very inexpensive pair of flip flops at Old Navy. (Or dig in your shoe stash. You know you have some in there.) Then, cut the plastic straps off of both flip flops.
Next, snip pieces of the flip flop away on the back of the flip flop, right around each hole of the flip flop. Don’t cut all the way through, making the hole bigger……..just make a bigger resting spot for your knot to lay (that you’ll be placing here in later steps). Cut about 1/3 of the way through the thickness of the sole.
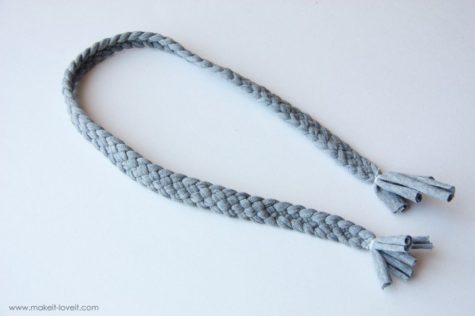 Then, create a long strand of braided knit material. T shirt fabric is great for this. Make sure you’re using a semi stretchy knit fabric so that the strap will fit snugly around your foot. This will help the sandal to stay in place.
To determine whether or not the braided section in long enough……wrap the braided knit around the back of your foot and then up over the top of your foot and down through your toes. And then make sure that there is enough to stick through the sandal and then tie in a knot. (Having a little more than you need helps.) At the ends of the braid, I just wrapped with thread really tightly, and then knotted it (the thread) in place.
Now, you need to shove the raw ends down into the hole by the toes of the sandal. I used a pen (in the “off” position) to shove the ends down in there. The hole will stretch so you can really shove a lot down in there with some effort.
You should have both ends coming out the bottom of the sandal. Be sure that the braid isn’t all twisted on the other side. Next, tie really tight knots into each end of the braid and then trim off the excess fabric. The trickiest part here is making sure that your braid is just the right length.
Then add a little hot glue beneath your knots and into the crevice of the flip-flop that you dug out earlier.
While the glue is still hot, press the knots into the foam sandal and as hard as you can, to really secure the knots in place…….and to force them into the sole of the sandal. (Depending on how big your knots are, depends on how much you should cut out of the sandal. You may feel the knots a bit while walking if you have bigger knots, so keep that in mind as well.)
Now, cut more strips of your knit fabric and make a loop of fabric on each side of the sandal, including the braided strap as you loop the side strap down in place.
After you have both side loops in place, make knots in the bottom and trim off the excess. Glue them in place the same way.
This next step is optional but it really helps make the section that goes between your toes, less bulky. I just wrapped some thread around the toe section over and over again as tight as I could (without breaking the thread) and knotted it in place.
And that’s it. Now your flip-flops are done and ready to wear.
Here are some variations on this theme:


Ok… I think that about does it! Time to get cracking on our closets.
And of course, anything that doesn’t inspire an idea or appeal in any way needs to go bye bye. Either drop it in a Planet Aid bin, the trash bin, or your local thrift store.
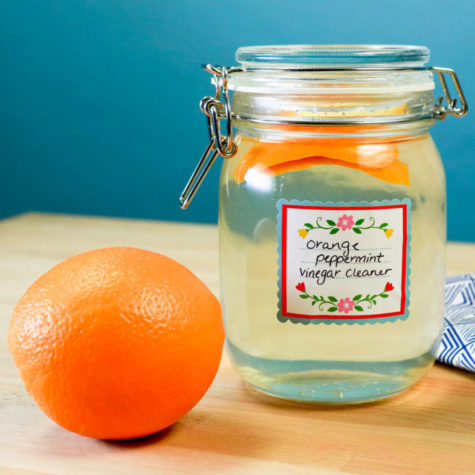
Deliciously Aromatic Cleaning Products
Here is a collection of recipes for some deliciously decadent wonderfully aromatic cleaning products that you can make yourself.

White vinegar is something of a super tool when it comes to cleaning. It’s non-toxic, inexpensive, easy to find, and cleans, oh, just about everything: It brightens windows, freshens laundry, banishes spots on carpeting, and much more. A spray-bottle of a vinegar solution is great to have around for pesky cleaning tasks (though, avoid using it on marble countertops and hardwood floors, since the acidity could damage them).
The most effective cleaning mixture is 50% white vinegar, 50% water, but you can also add fruit peels, herbs or essential oil to the bottle so your house will smell great, too. Just give it a shake and let it infuse for at least a week.
Here’s an all purpose recipe:
Get a spray bottle and fill it up. If you’re recycling a bottle from a previous cleaner make sure you rinse it out well before mixing your ingredients (duh).
You’ll need:
- Warm Water
- White Vinegar
- Isopropyl Alcohol
- Dish Soap (a drop)
- Fresh aromatic herbs and/or your favorite essential oil.
Put your leaves in the bottle and bruise them with a wooden spoon handle. You can also just twist them up or squeeze them in your hand. This activates the leaves to produce their natural oils. Make sure your herbs are very fresh so you get as much scent as possible from them. It’s really hard to completely mask the smell of vinegar but that’s just the price we pay for DIYing it. The smell quickly dissipates when it dries so it’s fiiiiine.
The mixture is easy:
- 1 part warm water,
- 1 part vinegar,
- 1/2 part alcohol.
- Add a DROP of dish soap and shake it up.
The herbs will permeate the mixture with their natural essential oils. Not only does it help cut the alcohol and vinegar scent some but herbs and essential oils also act as a natural antibacterial component.
There you go!
In summer I like to add orange or lemon peels. You can easily use essential oils to scent your spray as little or as much as you’d like. They work a little better since the scent is concentrated.
Note: You can refresh the scent with essential oils if and when your mixture begins to smell too much like vinegar.
Variations
1. A Balanced Blend: Two or three pieces of lemon rind and a few springs of rosemary blend together to create a clean, fresh scent. Plus, the fruit’s acid adds extra cleaning properties — perfect for stubborn stains.
2. A Hint of Citrus: A little bit of essential oil goes a long way, and 2-3 drops of peppermint are just enough to lend an energizing burst to the summery scent of orange rinds.
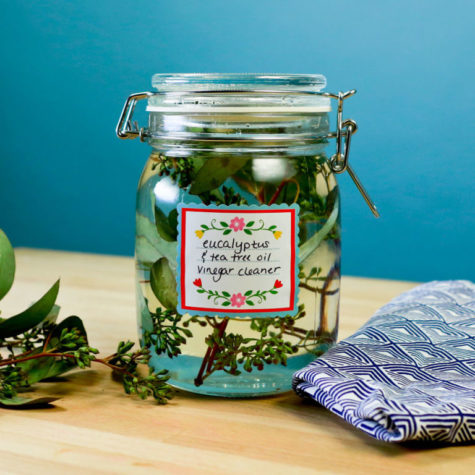
3. A Cool Burst: A few sprigs of eucalyptus and 2-3 drops of tea tree oil create a stench-absorbing powerhouse — and some people believe tea tree fights bacteria, too. Whether that’s true or not, this combination is incredibly invigorating.
4. An Earthy Option: Infuse your solution with fresh sage leaves.
5. Spicy and Sweet: This recipe adds interest with orange peels, cinnamon sticks and vanilla beans. You could also add cloves, allspice, and nutmeg for something a little more seasonal.
6. A Relaxing Aroma: Infuse your vinegar solution with fresh lavender, lemon balm, or even delightful spicy scented geranium leaves.
7. Play with Oils: Essential oils come in many fun scents (and some will kill bacteria and mold). Just be sure to shake to combine before using. Add about 10 drops of a pure essential oil (no synthetic fragrances or you’re defeating the purpose of non-toxic cleaning) to your half vinegar-half water spray bottle. Of all the essential oils I’ve tried, peppermint is one of the few that actually masks the odor of the acetic acid in vinegar. Not a mint fan, try clove or eucalyptus which are also strong oils.
Sources: Good Housekeeping and Melodrama
Getting Mugged

Yesterday, we explored a magickal cup of coffee, and it got me thinking about coffee mugs and so I went on a DIY search and found a bunch of tutorials on how to personalize and decorate coffee mugs. The first tutorial, found at Pop Sugar, features the use of sharpies. Here it is:
How to Make A Sharpie Mug
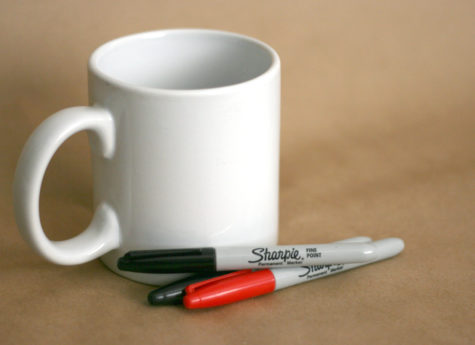
Do you have a plain, boring mug that needs a bit of spicing up? Personalize your cups and mugs by drawing on them! You can use them to add personality to your home or even give them as gifts to your loved ones. Here’s how to start:
- Buy some white cups or mugs. You can find them in superstores, thrift stores, dollar stores, and online. The cheaper the mug, the better this works.
- Pick a Sharpie. For long-lasting results, choose oil-based paint Sharpie markers. Regular Sharpie ink can come off even after baking. Pick a color to use on your mug. You can stay simple and choose one color, or be more ambitious and use multiple. If you’re sticking to one color, then black is usually a good choice, given its striking contrast to the white background of the mug.
- Wash the mug. Before applying the Sharpie, it’s important to get the mug completely clean and free of any oily residue from hands or fingers. Alcohol works well, after the mug has been washed with soap and water.
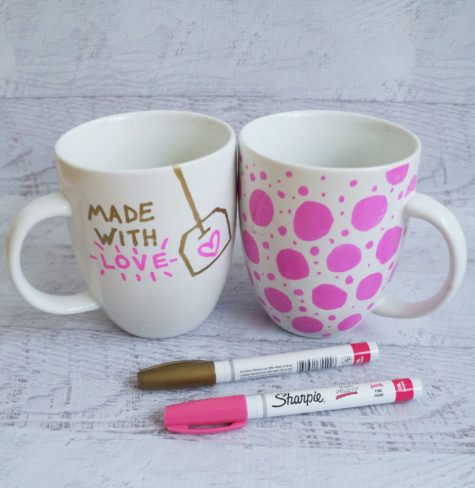
- Start drawing. Decide what you want to put on the cup, and maybe practice drawing it on a piece of paper before drawing on the mug. Pick a meaningful quote or a cute graphic to decorate the mug with, and get inspired by mugs being sold on Etsy or by googling examples of Sharpie mug projects online.
- Dry it out. For the best results, let the sharpie dry completely for 24 hours then bake at a low temp oven like 225° for 2 plus hours.
- Bake it. Remember to place the mug in the oven before it heats up and leave it in until the oven cools completely so there won’t be any cracks. You can choose to bake the mugs twice to really set in the Sharpie drawings. Baking the mug in the oven for 30 minutes at 350°F is what most tutorials recommend, but for best results, bake it at a lower temperature for a longer period of time (see above).
- Care and wash. If you use quality, oil-based sharpies, they should be dishwasher safe. All my pieces have gone through the dishwasher several times now, with no flaw. If you don’t feel sure about the dishwasher – hand washing is recommended.

Does it really work?
While Sharpie mugs are very popular right now, there doesn’t seem to be any consensus on how to best make the mugs. Some say that some of the colors change when baked, some say that they don’t stand up to dishwasher washing (or handwashing even…), and some say that the paint chips off the mugs after a couple uses.
I found an experiment using 14 colors of oil-based, fine point Sharpies and Dollar Tree mugs at Destination Decoration, and her results were as follows:
While decorating the mugs, I wore gloves so the oils from my skin did not affect the finished product. All parts of the mug were dried for 24 hours before baking.
Based on my experiment, baking a Dollar Tree mug at 250 degrees for 2 hours provided the best results. The color of the paint remained largely the same and paint on the mug did not chip at all (except for the minor top chipping).
Tips from other tutorials and crafters:
- I used Pebeo Porcelaine 150 Paint Markers and they work great and do not come off. You can find them at Michaels or Amazon.com. I have even put them in the dishwasher. Stayed on great.
- It didn’t work for me! I just got a paint pen. They work perfectly fine and not any more expensive than sharpies.
- I monogrammed plates and cups with Sharpie oil based markers and did not bake. Let dry for 48 hours been in dishwasher many times and none of mine have come off at all.
- Here is what I find that works. Cheap Walmart mugs are best. Regular sharpies. Wipe first with alcohol to remove any residue. Careful not to touch drawing area with hands. After putting design on, wait 24 hours. Then put in cold oven. Turn temp to 425 and set timer for 30 minutes. At 30 minutes turn off oven, leaving project in until it’s completely cool. Hand wash then do a test run in the dishwasher.
- “I read an extensive article about this somewhere. First, cheap mugs work best due to the inexpensive glaze used. Put mugs in COLD oven, turn oven to 450 (not 350). The glaze needs to re-melt to incorporate the marker into it!! AFTER oven reaches temp, bake for 30 minutes. Turn oven off.. LEAVE MUGS IN CLOSED OVEN (not yelling, just important). Cool for 15 min, slightly crack oven open and let cool over night. This should properly incorporate the ink with the glaze.
- My aunt did it one year, I think she used car paint for scratch fixes. Not sure about the baking part. They lasted for years!
- You can get enamel/glass clear medium and paint over it with that and re-bake. That may help if that doesn’t work, then probably nothing will.
- Clean glass with rubbing alcohol first. Oil base isn’t for glass. Use Folk Art enamels paint applying with a brush or paint pens for glass only! You still have to bake for 30 minutes but let sit for 1 hour before you bake.
Design Ideas


- Radical Self Care Project Overview by shirleytwofeathers - No Comment
- Radical Self Care Image Gallery by shirleytwofeathers - No Comment
- It’s A Wrap by shirleytwofeathers - 3 Comments
- Something To Consider by shirleytwofeathers - 1 Comment
- Nurturing Your Precious Self by shirleytwofeathers - 3 Comments
Liana: A Prosperity Prayer
B. Joy Barrett: beautiful-turquoise-upholstered-accent-chair-for-living-room-with-within-colorful-accent-chairs-colorful-accent-chairs-transforms-the-look-of-a-room
Claudette Losier: Why Does It Work?
me: Make Your Own Violet Fire
Abdulrahman: Money Chant – Very Fast
Our current project began on July 4. We are exploring the concept and practice of Radical Self Care . Feel free to join in at any time!

Interested? You can visit our current project page, or you can take a look at the About The Project page if you are curious about the concept.
.
Please feel free to join in at any time! No experience necessary.
- Money Chant - Fast
- Money Chant - Slow
- Prosperity Plan
- Amazing Creator
- Cause and Effect
- I Am That I Am
- Spirit Rap
- Lakshmi Spirit Rap
- PowWow Spirit Rap
 Enter your question and receive the wisdom of the Occulatum. You may pose your question in any way that feels appropriate. The answer will come in the form of a small pop up. Try it - your life just might change for the better!

I think it's time to go shopping... maybe even buy some really cool stuff at my online shops!!