Daily Archives: August 30, 2017
For A Well Organized Kitchen
Now that we’ve completed Feng Shui in the bathroom, I think it might be a good idea to head on into the kitchen and make sure it’s ready for all the cool stuff we’re going to make for our luxuriously delicious baths.
And even if you aren’t planning to make a bunch of cool bath products, a well-organized kitchen will help you cook as efficiently as possible and waste less food. Here are 10 great tips for organizing the heart of your home.
- Declutter Your Kitchen
Decluttering is the first step to organizing any room, and kitchens tend to have more unique kinds of clutter than other rooms: ice cream makers and other wedding-registry items, gadgets you were suckered into buying from TV infomercials, useless knife sets, and so on.Weed out the kitchen tools you never use, reevaluate whether you really need more than the essential kitchen items in your kitchen, get rid of the bulk spices that have already expired, reboot a junk food-filled pantry, and use up food in your freezer at least twice a year.
It’s easy to tell when you need to purge a few items from your kitchen—the overflowing drawers will tip you off to that. What’s harder is knowing what should stay and what should go. Unlike other rooms in your home, most things in the kitchen actually have a function and therefore feel like they should remain on hand (even when they’re jammed in the back of your cupboards). To begin your purge, Hello Kitchen recommends that you:
- Lay a queen-size quilt on the floor, somewhere near your kitchen (move some furniture if necessary).
- Referencing the list below, remove items from your kitchen one by one, coloring in each circle as you go. Place the items on the quilt.
The idea behind placing things on a queen size quilt is that the remaining items should all be things that can now be donated or given away.
This checklist can help you decide which kitchen tools to purge or not.
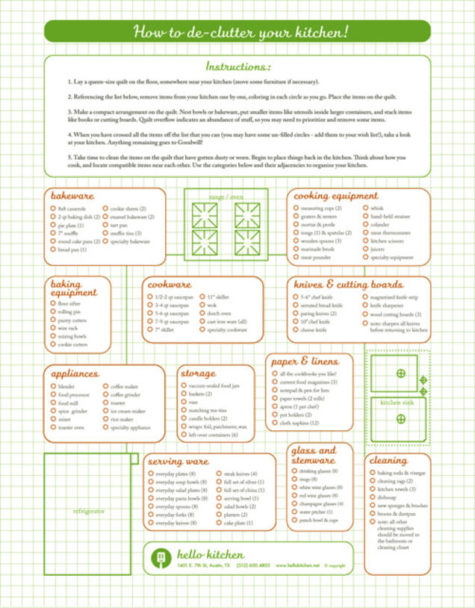
You can grab the free, printable PDF (kitchen_clean_out) from Hello Kitchen to get started on your kitchen audit. Just click on the link, and then click on the attachment to open the PDF file. Or, follow this link: How To Declutter Your Kitchen.
And just in case you want to be sure that you really do keep everything you might need, scroll down to the bottom of this post for a list of the top 5 must have tools for any kitchen
- Opt for Space-Saving, Uniform, See-Through Containers
One of the main contributors to kitchen chaos: Mountains of mismatched food storage containers. You only need a few types of food storage containers to maximize the amount of space you have in your cupboards. We prefer square or rectangular containers that stack up well. If possible, use containers that can go from fridge to microwave to dinner table to dishwasher. We also recommend organizing your spices with cleanly labeled, identical containers, perhaps on a magnetic spice rack or arranged in jars in a drawer with the tops labeled for easy identification.
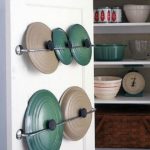
- Make Use of the Back of Your Cabinet Doors
The inside of your cabinet door is wasted space. Instead of leaving that surface blank, organize your measuring cups and spoons there, store pot covers on the back with inexpensive hooks, build a knife block into the back of the door, hold cutting boards in a magazine rack on the door, and pretty much mount anything to the back for easy access. You can also just paint the inside of the doors with blackboard or whiteboard paint to keep a running grocery list and weekly meal plan.
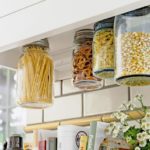
- Create Sections with Tension Rods
Tension rods are a surprisingly awesome organization tool throughout the kitchen. You can use it for hidden paper towel storage, organizing cleaning bottles under the sink, creating an extra shelf for spices, and creating pantry dividers or lid organizers in drawers.
- Get Rid of Wasted Dead Space
Got a kitchen with awkward, unusable spaces? Yeah, me too. If you have trouble seeing or reaching items at the back of a space, such as the cabinet under the sink, the inner depths of your fridge, or the corner of your pantry, a Lazy Susan could help. For that weird space between your fridge and the wall next to it, build a roll-out pantry or a sliding spice rack (you might be able to use an IKEA shelf to create your own). If you’re desperate for more space in your kitchen, turn those false drawers in your kitchen into usable storage space. You can also create a secret toekick drawer at the bottom of a kitchen cabinet on the cheap.
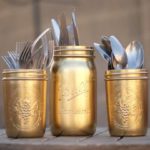
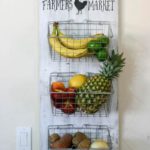
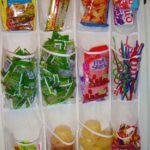
- On The Fly Kitchen Organizers
Here we have a number of ideas for kitchen organizers that you may not have thought of. I didn’t include the tutorials, because I think they are easy enough to figure out:

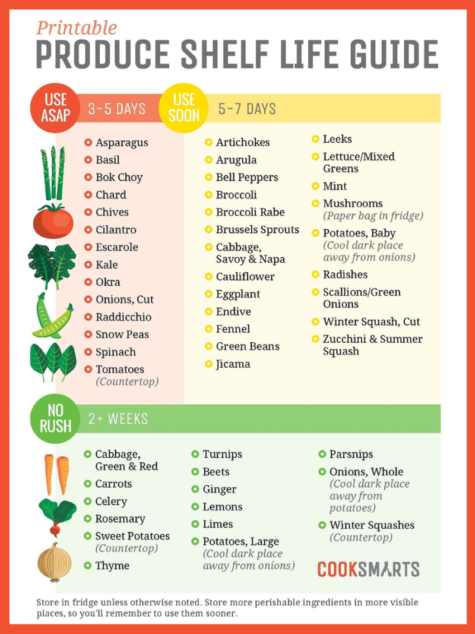
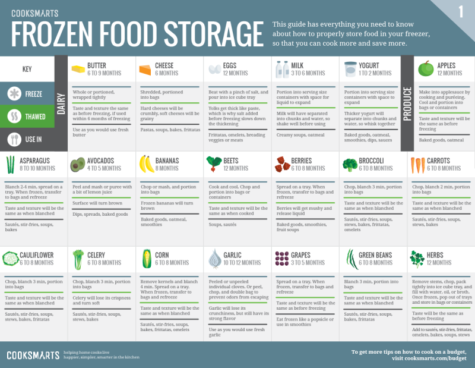
- Know Which Foods Go in the Fridge, Freezer, or Pantry
Part of having an organized kitchen is having your ingredients stored properly. It wastes less food and it makes it easier to inventory what you have before you go grocery shopping. Here are our general guidelines for storing foods so they last longer in the fridge or freezer and which foods you don’t need to refrigerate. Don’t want to memorize them? Print out these charts and hang on your fridge to keep track of your food inventory and also know when foods are about to expire. Likewise, this graphic illustrates how long essential pantry foods will last.
- Store Food in the Fridge Properly
It’s not just a matter of keeping foods in or out of the fridge, however. Within the refrigerator there are ideal spots for different types of foods. Dairy, for example, is best kept on the upper shelf where the temperature is most constant, while meat should be in the bottom of the fridge, where it’s coldest and any leaks wouldn’t contaminate other foods. Check out more fridge storage guidelines here or this infographic.

You might also want to organize your fridge with a first-in-first-out (FIFO) method, like grocery stores do or use an “eat me first box” in your fridge to make sure you don’t waste food.
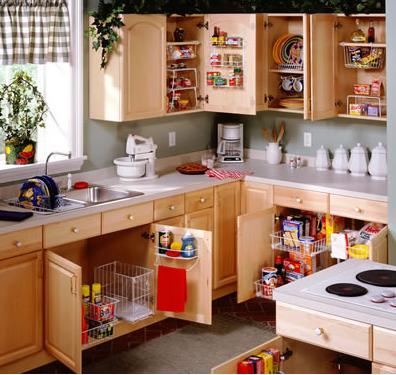
- Maximize Pantry Space So You Can See and Reach Everything
Out of sight really is out of mind when it comes to food storage. In the cupboard and pantry, make sure you can see and reach everything with things like stacking shelves, Lazy Susans, and clear storage containers. You can also group items in your pantry by meal (e.g., pastas next to tomato sauces) so you remember what to cook. For hard-to-stack cans of food, create a can holder using a magazine rack or organize canned goods in your cabinet with a closet rack. The back of your pantry door is a perfect spot to hang an over-the-door shoe holder to gather snacks, seasoning mixes, and more.
- Create Kitchen Work Zones
You’ve probably heard about the kitchen work triangle, the triangular layout between fridge, oven, and sink that makes it easy for a cook to move about the kitchen. Whether or not your kitchen conforms to this ideal, it’s helpful to think of your kitchen in terms of work zones: food storage, dishware storage, cleanup (sink and dishwasher), prep, and cooking zone. Store items according to their related zone. If you tend to have more than one person cooking the meal with you, you might create a second prep zone. Alternatively, you might want to add a baking zone or other specialty zones so everything is organized and kept in the proper places.
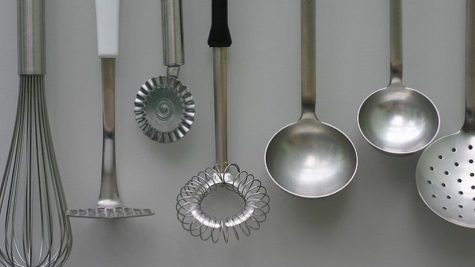
- Store Items Logically
That leads us to the last and most important point: Have a place for everything and everything in its place. Julia Child’s kitchen had a place for everything, with pots and pans hung on pegboards with their outlines drawn around them so she could put everything back in its place. Items you use most often should be easiest to reach, while you can put items you hardly use (e.g., turkey carving tools) higher up in the cabinets. Group your items next to the tools you use most with them (e.g., can opener by the cupboard you store cans in, baking ingredients with the baking pans).
For Maximum Cooking and Cleaning Efficiency
Whether you’ve just moved into a new space, are settling into a summer rental, or are just frustrated with your kitchen, here are some ideas to help you arrange your kitchen for maximum cooking and cleaning efficiency that will making mucking about in the space a lot more fun.
- Start with what you have:
You may love them, you may hate them, but unless you’ve got the money for a full scale renovation, your sink, stove and refrigerator aren’t going anywhere. Their position will dictate where everything else goes. Cleaning them up inside and out, can go a long way towards making them presentable.
- Create stations:
Taking a cue from restaurant kitchens, mentally assign stations for all of the tasks that you do in your kitchen: cleaning, storage, prepping, cooking, putting food away. If you bake a lot, you might also want a baking station.
- Organize items according to task:
The point is to organize the kitchen so that there’s as little unnecessary movement as possible. If, after you’ve washed the cutlery from tonight’s dinner at the sink, putting it away means walking across the kitchen to do so, chances are it will never get put away, no matter how pretty the cutlery drawer organizer is.
Move things around so that what you need is in arm’s reach: Cutlery and dishes should be near the sink; spices and cooking implements, whether rubber spatula or skillet, should be near the stove; put knives and chopping boards near your prep area; store sugar, flour, rolling pins, cookie sheets and standing mixer near your baking area.
- Out of reach:
Put things you rarely use — the turkey platter you pull out at Thanksgiving, the holiday-themed cookie cutters — higher up or lower down. Having to get on a ladder, or even bend your knees, means you’ll use something less frequently.
- If necessary, buy two:
I use cinnamon for cooking and for baking, so I’ve got one canister near the stove and one in my baking area. While I’m not suggesting you buy two food prep machines, consider doubling up on little items like spices and spatulas.
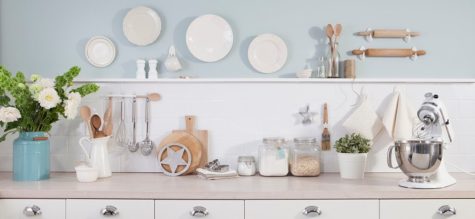
- Merchandise your storage:
Yes, I confess, my kitchen is always ready for its close up. I like my kitchen organized, I also like it pretty. Arranging items by size and color as well as by how often you use them can go a long way towards making your time in this room pleasant.
- Pretty but also useful:
If the canister that you use to store flour is hard to open, it’s not useful. Before you buy something, try it out in the store and consider how you’ll use it. Does it feel substantial in your hand but also light enough that it’s easy to use? Can you open a container with one hand? I’ve removed rubber sealant rings from many a flour container in order to make them easier to open.
- Stick with the place you’ve given for things:
With everything in my kitchen assigned a spot, it’s easy to see what I have and what’s missing. With a quick glance into my refrigerator, I can tell that I’m out of butter or milk or low on veggies. Since I always keep these things in the same place, a glance at my kitchen cupboards tells me I’m out of glasses and I’d better get washing!
An efficient set up based on what type of cooking you do can be very helpful.
For the Daily Cook
For you, an efficient setup is all about access and speed―quick in, quick out.
- The Strategies
Keep necessities within easy reach to save time. Make a place in the zone around the stove and the sink for essentials: oil, vinegar, knives, cutting board. Put ingredients and tools near where you will be using them: Keep the basket of garlic near the cutting board, sugar and flour near the stand mixer, and your best-loved pan on the front burner.
Use under-cabinet space and exposed shelving. A battery-operated under-cabinet lighting strip won’t dangle a cord or steal an outlet from the microwave, while an under-shelf cookbook holder pulls down when you need it and folds back up when you don’t. Things get lost on deep shelves. Put them in baskets that you can pull out and inspect at eye level.
Put the walls to work. Hang racks or pegs to keep utensils, pot holders, and dish towels in sight. Oversize Post-it notes or hanging rolls of paper (found at stationery and art-supply stores) are useful for reminders.
Make recycling efficient, too. Streamline end-of-meal cleanup by putting a bin for bottles and cans next to the one for regular trash (pull-out recycler, instead of out in the garage or in the mudroom.
For the Sunday Cook
When you’re too busy to cook, one weekend session―making dinners to freeze―reduces daily stress. Your kitchen setup should facilitate that.
- The Strategies
Keep essentials front and center. Stackable storage containers, large plastic mixing bowls, and other tools left on the counter won’t be in the way during the week and will be ready to go on Sunday.
Invest in equipment. A food sealer is just the thing for turning blanched green beans, fish fillets, and muffins into future instant meals. A scale is useful for weighing ingredients, which some cooks consider a faster and more reliable way to measure for bulk recipes. A calculator speeds the doubling and tripling of recipes.
Organize the freezer. When food items get crammed in willy-nilly, you won’t know what you have on hand. Instead, make designated sections (prepared meals, vegetables, desserts). Use dividers, baskets, or multilayer ice caddies to keep containers neat and accessible. And be sure to label everything with both what’s in the container, and when you cooked it up.
For the Come-on-in Cook
You like to share conversation―and kitchen prep―with a friend, a mate, your kids. Your goal: to arrange things so that two (or five) can work as efficiently as one.
- The Strategies
Make things easy for helpers to find. Bring things into the open with a wall-mounted utensil rack. Rachel Siegel, owner of Spruce, an organizing company in Berkeley, California, suggests storing tools by function.
Create parallel work stations. Set up separate work areas with equal access to commonly used tools and ingredients. A trash bin with a wide foot pedal can be moved about easily to serve cooks on both sides of an island or a counter.
Make the room kid-friendly. Create a zone where kids will feel welcome to help or just visit. For safety, move cleaning products and knives to adult heights. Stock up on kitchen tools made for kids and plastic bowls. Twin cutting boards let you chop the onions on your side of the island while your friend preps the apples on hers.
For the Entertainer
If you’re a cook who enjoys an audience, all the kitchen’s a stage. Create an illusion of effortlessness that belies a tightly organized support system.
- The Strategies
Set a mood. Clear vases of fresh herbs or beautiful bowls of picture-perfect produce will whet guests’ appetites. Install a dimmer to bring down the lighting, and if you entertain regularly, consider built-in speakers to keep the music flowing through the kitchen.
Use glass cupboard doors for display. Use glass-front cabinets to showcase what you love most, whether it’s your best china, an antique-pitcher collection, or even canisters filled with pastas in different shapes and colors.
Keep party gear handy. Create a place for platters and trays―with tray dividers to maintain order―so you don’t have to hunt for them. Give candles, place mats, and other table toppers a dedicated drawer. Use an index-card box to store recipes, past menus, friends’ food preferences, or wine labels. (Soak a bottle to remove the label, let it dry, paste it onto an index card, and jot down tasting notes.)
Five Must-Have Tools for Any Kitchen
Here are five kitchen-related things you really need and how to use them efficiently. These items do not represent everything you’ll need for all your cooking, in any kitchen, for every recipe, throughout your entire life. What we’re listing here are five core purchases that any kitchen should have, along with the best advice we’ve seen on how to get the most for your money out of them.
The tips and research for these items are pulled from one editor’s experience growing from a single dude who calls his mom to make mashed potatoes to a fairly reliable home cook who makes the big dinners, along with a few great reads:
- Three decent knives, sharpener for two of them
If we were crazed minimalists, we’d say you only truly need an eight-inch, plastic-handled stainless alloy chef’s knife, one you can find at a restaurant supply store for $10 (more on that later). You should test out any chef’s knife you’re looking at, and consider santoku-shaped blades if you do a lot of mincing or fine chopping. The key is making sure any knife feels right in your hand. The handle and weight in your hand are just as important as the blade, since proper use and sharpening should take care of that. Other than that, a sharp, sturdy paring knife and a cheap-as-you-can-get serrated bread knife have you covered for everything else. Skip the boning/fileting and utility knives, because you definitely don’t filet fish or slice giant mozzarella wheels that often.
How do you keep your knife sharp? Popular Mechanics has a good two-paragraph primer. Using a two-sided sharpening stone:
Lubricate the coarse side of the stone with mineral oil or water; then push the blade (at a 22- to 25-degree angle) across in a sweeping motion, like you’re cutting a thin slice off the stone. “Flip the knife and work the other side until a slight burr forms along the edge,” Montagno says. “Switch to the fine side of the stone, lift the blade to a slightly higher angle and hone off the burr to create a razor-sharp micro bevel.”
Obviously you can skip this process with the serrated bread knife, which can probably cut through loaves of bread long after you’re dead.
- Five pots and pans
How you save money here depends on how you cook. Unless you make a lot of meat dishes with reduction sauces containing browned bits, you really need just one cheap medium-sized nonstick skillet for your day-to-day cooking, small and larger-sized metal saucepan, a pasta-sized pot with a lid, and one serious, large (12- or 14-inch) steel pan with steep sides for your grander culinary ambitions, stir-frys, and bigger meat meals. We’re serious on the nonstick skillet being cheap, if safe-looking, because even the most expensive kind inevitably flake off, chip, and lose their egg-repelling properties over time.
Note: We don’t intend to imply you should completely cheap out on your pots and pans. Good cast iron pans, treated well, can last a lifetime. We’re just suggesting the multi-piece sets with every single size of pan, pot, and boiler, with three different lids, aren’t really necessary for cooking.
Everything else? That’s where it gets discretionary. One doesn’t spend three months’ salary at Sears to make sure they’ve got every tool for any imaginable home project, but instead builds a tool set over time. Roasting pans, springform cake pans, loaf pans, double boilers—try to borrow them for rare occasions, make do with makeshift versions, or possibly get lucky at your local Goodwill. Otherwise, another trip to the restaurant supply store is in your future.
- A restaurant supply store, or an Asian market
If you’re thinking about buying your cookware from a store in a mall, strip or otherwise, don’t do it. Similarly, don’t buy multi-pot sets, especially the kind signed by a chef you’ve seen on television. The best value for your dollar is found at your local or regional restaurant supply store. That’s where the restaurants you recommend to friends buy their stuff, and they make their money on volume. For certain kinds of cooking hardware, Asian food markets and “trading companies” often stock a lot of really cheap goods. For recipes that require random equipment you’re not sure you might use again, they’re often the smart buy.
- Serious instant read thermometer
You don’t have to spend a lot on this, but it’s crucial to buy quality instead of cheap. That’s spoken as someone who loves to grill, and whose wife does not like to eat on the bleeding edge of food safety. Go too cheap and you end up with unreadable LCD screens, melted plastic, and seriously slow updates that leave your food overcooked and the chef overworked.
- Reliable, small kitchen scale
When you’re new to stove-top cooking, you’ll want to get precise with your meat, vegetable, and starch measurements to ensure everything stays flavored in proportion. When you start dipping your toes into baking, that’s when you’ll really be glad you have a scale. The way you pack flour, the moisture in the air, and the random sizes of ingredients like eggs or fruits can seriously impact the outcome of a baking recipe—unless you’re weighing things in proportion. You don’t have to spend a lot, but you do want something digital, that holds up to 10 pounds, and which can “tare,” or set itself to zero, when you’ve got a container on it that doesn’t count in the measurement.
Sources:
- Radical Self Care Project Overview by shirleytwofeathers - No Comment
- Radical Self Care Image Gallery by shirleytwofeathers - No Comment
- It’s A Wrap by shirleytwofeathers - 3 Comments
- Something To Consider by shirleytwofeathers - 1 Comment
- Nurturing Your Precious Self by shirleytwofeathers - 3 Comments
me: Make Your Own Violet Fire
Abdulrahman: Money Chant – Very Fast
Shirley Twofeathers: It’s A Wrap
Daniel Knirs: It’s A Wrap
Our current project began on July 4. We are exploring the concept and practice of Radical Self Care . Feel free to join in at any time!

Interested? You can visit our current project page, or you can take a look at the About The Project page if you are curious about the concept.
.
Please feel free to join in at any time! No experience necessary.

- Money Chant - Fast
- Money Chant - Slow
- Prosperity Plan
- Amazing Creator
- Cause and Effect
- I Am That I Am
- Spirit Rap
- Lakshmi Spirit Rap
- PowWow Spirit Rap
 Enter your question and receive the wisdom of the Occulatum. You may pose your question in any way that feels appropriate. The answer will come in the form of a small pop up. Try it - your life just might change for the better!


I think it's time to go shopping... maybe even buy some really cool stuff at my online shops!!