Come On In And Have A Seat

Today, it’s all about the seating. My living room furniture is the most poverty stricken area in my house with the exception of the bathtub with the missing faucet. I have been looking forward to exploring what can be done about it ever since the beginning of this particular project.
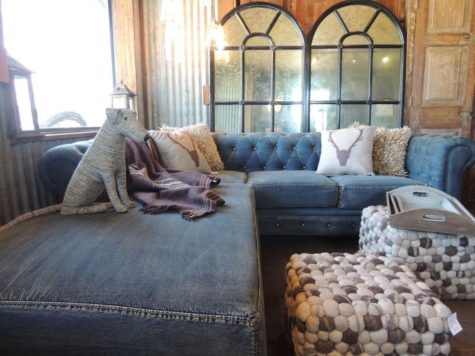
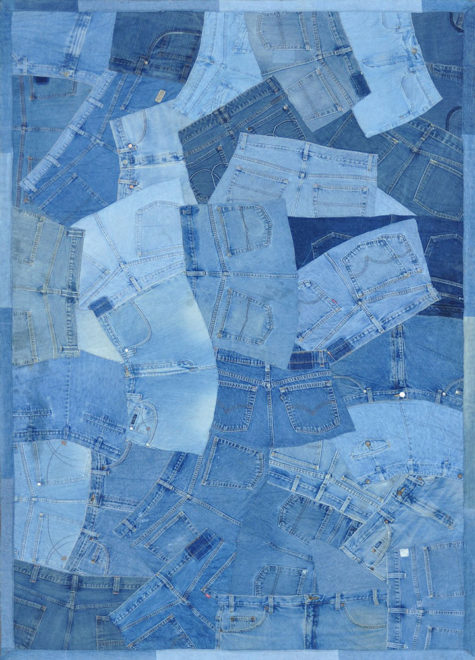
When we cleaned out our closets, I got really excited about all the cool stuff that could be done with blue jeans, and it occurred to me that it would be really fun to recover my sofa and chair with old blue jeans. For example:


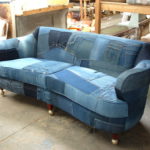
Pretty cool, huh? And, sadly, it’s going to be complicated… and require courage, a sewing machine, plus a learning curve of unknown proportions. But it’s something that I want to try to do, so with that in mind, here are a variety of tutorials on how to recover sofas and chairs.
Let’s start with the easy stuff first. There are a number of tutorials for covering sofas and chairs with drop cloths. The biggest expense here is the drop cloth. On the up side, drop clothes can be dyed in a variety of cool ways, and if you were so inclined, you could even make curtains to match. Doesn’t look too difficult.
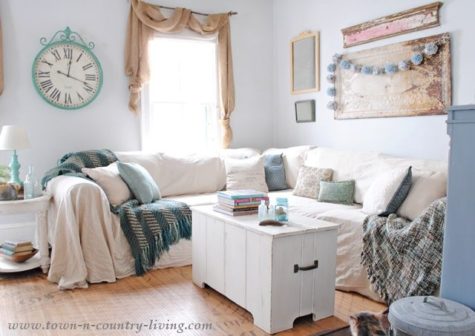
The simplest way is to just do a simple cover up by tossing the drop cloth over the couch. Voila! Even better if it has been dyed and decorated and looks super cool. The following tutorial is from Home Talk, and it shows how to stencil and dye a drop cloth to make curtains. I don’t see why this method couldn’t also be used on a throw for your couch.
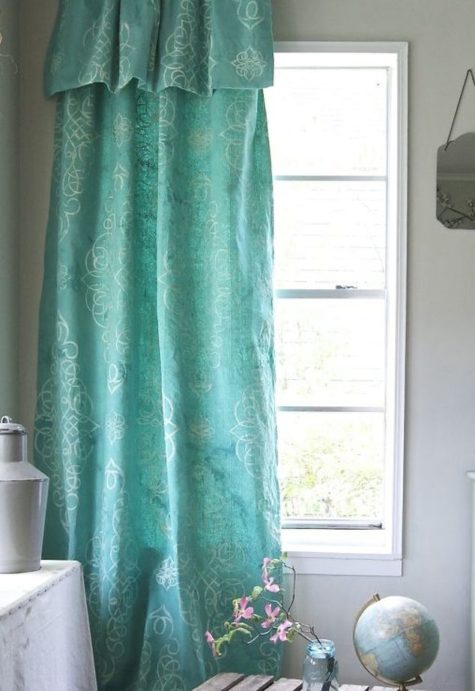
Stencil and Dye Your Own Drop Cloth Curtain
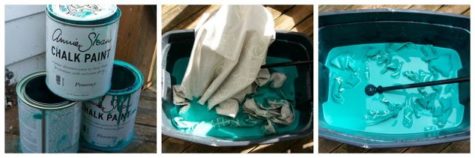
We take a look at a wonderful DIY project by Stephanie Jones. She shares how she took a regular canvas drop cloth and gave it some stenciled style and color with Chalk Paint® decorative paint by Annie Sloan. She says: “I wanted to add a little softness, warmth and boho pizazz to a less-than-lovely window at our studio.”
Stephanie started by washing and drying her 4×15 canvas drop cloth. You can easily find one at your local hardware store. This step helped soften up the fabric, which allowed it to more easily take the Chalk Paint dye she would use later on.
Using Old White Chalk Paint, a roller and a large Moroccan-inspired stencil, Stephanie, along with her team of helpers, stenciled an allover pattern onto the drop cloth. To help everything stay in place as they worked, they smoothed the drop cloth onto a flattened-out box that had been spritzed with low-tack adhesive.

“To avoid seepage, don’t forget to off-load excess paint from the roller onto folded paper towels before rolling,” notes Stephanie.
Since the look she was going for was a bit faded, she chose to stencil before dyeing; however, if you’re looking for a crisper, brighter look, you’ll want to stencil after dyeing.
Next, she mixed Florence Chalk Paint® with a little bit of Provence Chalk Paint® and poured it into a large plastic tub filled with water. Stephanie used a mix ratio of 1 part paint to 20 parts water and let the loosely bunched drop cloth soak for about an hour.
Once finished soaking, Stephanie hung the drop cloth on a clothesline outside to drip-dry overnight. She then used a steam iron to soften it.
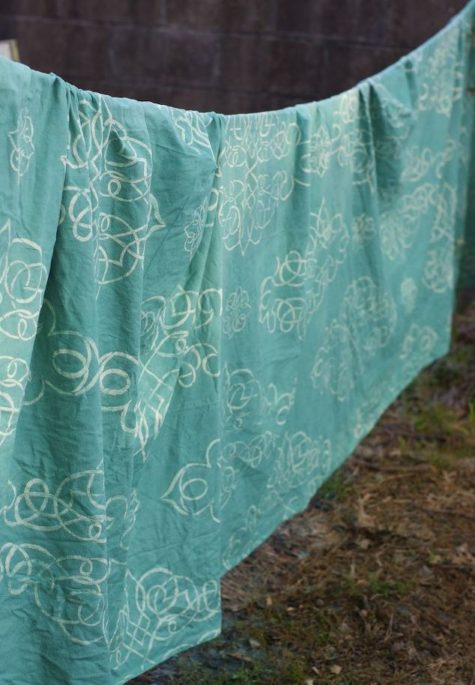
When all was dry and ready to hang, Stephanie draped the finished drop cloth over a plumbing-pipe curtain rod and scooted it to the side to hide an awkward corner in her studio. Voilà – hardware store chic!
If you don’t like that loose look, or if you’re already covering up your sofa like this, and want something a little more permanent looking, here’s a tutorial on how to make a loosely fitted slip cover (once again using a drop cloth).
Cover A Sofa With No Sew Drop Cloths

Here’s a simple tutorial from A Beach Cottage:
- Buy the biggest drop cloths you can find and then cut them up, you get more bang for your buck this way
- Take all the cushions that you can off of the sofa
- Lay your drop cloth over the sofa seat area only and roughly estimate what’s the best way to cut the drop cloth fabric to best fit the seat area of the sofa double folded and with a big enough overhang to tuck and fold into the crevices of the sofa
For example: With the drop cloth I had I simply folded it down the middle and cut it in half giving me two pieces of double folded fabric
Important note: You want the fabric double folded because a single piece of fabric will slip around much more (ask me how I know this or ask a Beach Cottage kiddo if they sat on a sofa with a single piece of drop cloth and promptly the whole lot slid to the floor)
The amount of fabric you have to tuck in is key to it not slipping and sliding around when you actually want to sit on the thing.
- Cut your fabric – don’t worry about edging you won’t see that
- Fold your drop cloth piece so it is double folded, lay it on a table or floor and smooth it out and line up the edges…trust me do this bit.
- Lay this piece of fabric over the seat of the sofa, smooth, smooth, smooth
- Push and tuck, push and tuck- all the over-hang fabric needs to be squeezed tightly into the crevices of the sofa.
Note: this tight pushing and squeezing is what will stop the ‘cover’ slipping around and falling off when you sit on it
- Lay the other piece of fabric out and put the cushions on it, now wrap up the cushions like a parcel, leaving the bottom of the cushions with the opening of the fabric
- Place cushions on the sofa and then put your hands underneath and again squeeze and push the excess fabric in tightly so the fabric won’t move around too much when you sit down.
- Add texture to the arms of the sofa with crochet, knit or stripe, smooth and tuck this tightly into the sofa too
- Add lots of pillows and cushions in different shapes and patterns for interest and depth.
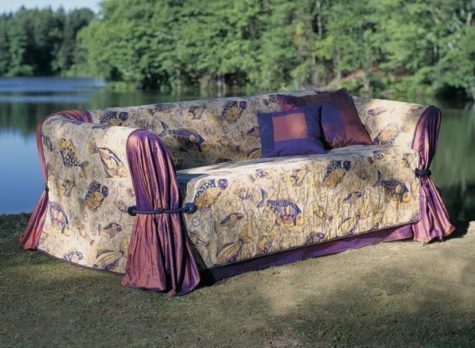
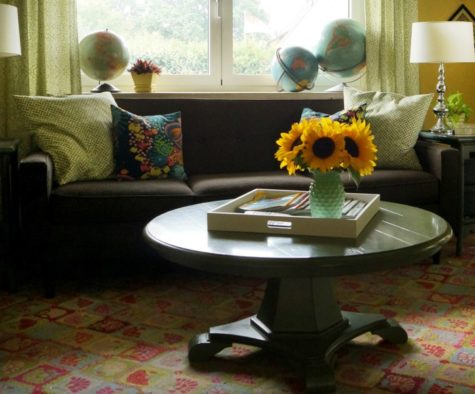
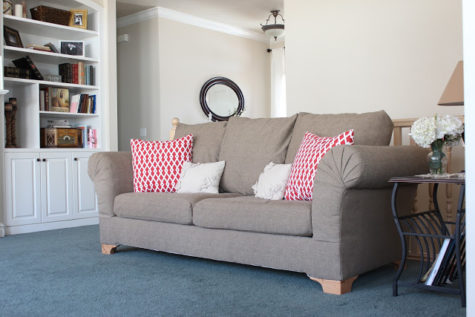
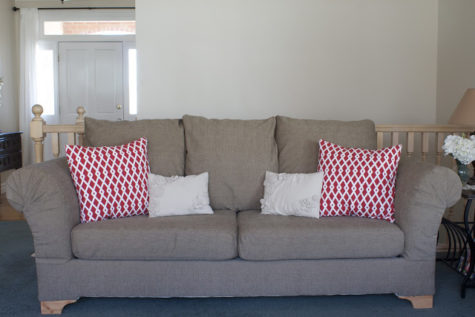
Your couch or chair will look better, and hold up longer under normal wear and tear if you put the cushions on top of the couch cover. Like this one from In My Own Style:
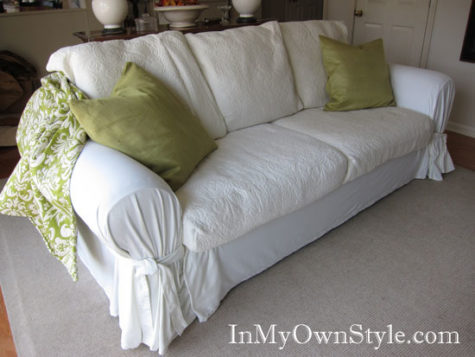
You can also add ties at the arms to give a more finished look. I don’t think it would be too hard to figure out how to add the ties, and the cushion covers are pretty easy too. The ones in the picture are made from a bed spread, and tied underneath.
- Here’s what she had to say about the cushions
“I am all about easy and a believer in what you can’t see can easily be faked. I found white quilts on clearance at the store I used to work at. I used them to make cushion covers. I sewed covers for the bottom cushions that are semi – boxed covers that are tied on with ribbon on the bottom.”
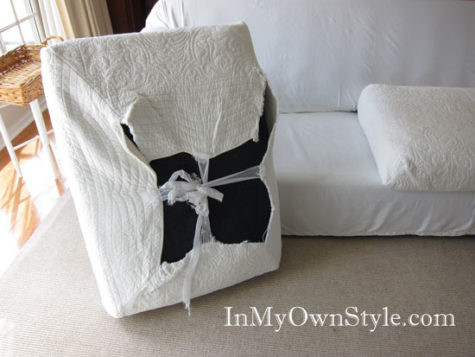
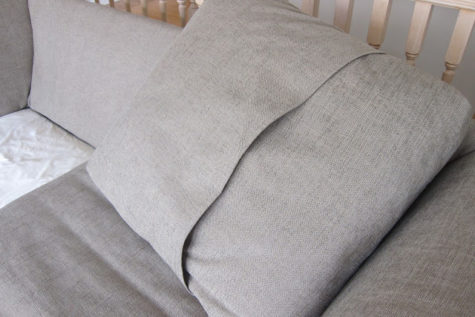
“Here is the underside of the cushion. The cover is more like a gently fitted wrap around cover. You can see I had to really scrimp on the amount of quilt fabric I had. I was determined to make it work. It is uneven, but no one sees it. I used these same covers with the old slipcovers I had on this sofa/chair. I have washed them many times and the ribbons and uneven edges don’t matter one bit.”
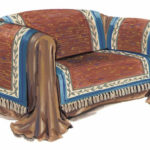
Alternatively, you could also make a “couch wrap.” This is a cool idea and a great way to keep a loose couch covering in place and looking good.
This is really super simple. The hardest part will be to figure out what to use for the heaver covering. Here’s a visual tutorial:

Keeping that pesky slip cover tucked in:
To keep a one-piece slipcover from moving and getting un-tucked, push cardboard tubes into the crevices to hold the extra fabric down. Here I used a long tube that fabric came on and a tube from a roll of foil. Both are more rigid than a paper towel tube. You may have to use different size tubes depending on how big your crevices are.

Push the tubes back into the crevice as far as they will go. If slippage is still a problem, you can wrap rubber bands around the tubes. The rubber helps to keep the fabric from slipping. You could also use PVC pipe.
To hold pleats in place or any part of the slipcover that won’t stay the way you want it – use twist pins. You can find them at any sewing store or online. These are clear plastic, but they also come in decorative shapes and finishes that look like nail-heads.
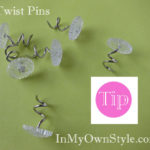


You just screw it into the pleat or fabric you want to stay in place.
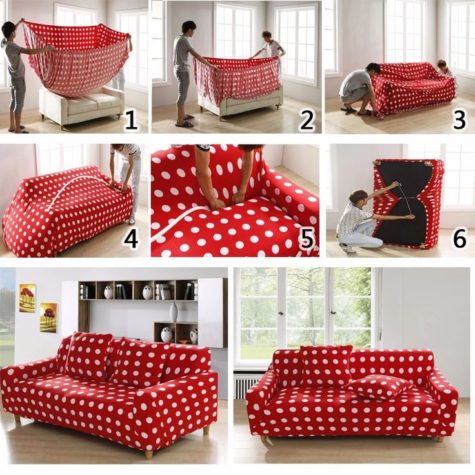
If you have a small couch and a large fitted sheet, you could opt for this method. I like how simple it looks, and after a bit of research, I realize that it’s actually a stretchy pre-made couch cover. 🙁
That being said, I don’t see why a person couldn’t use a stretchy knit fabric, or even a sturdy fitted sheet and do the same thing. It would probably work even better if the bottom cushions were on top of the couch cover.
If you like this tailored look, you could make a fitted slip cover yourself. I have a great tutorial for that as well. It’s from Maggie Overby Studios.
A Blue Velvet Sofa!
It is no secret that I have a thing for blue velvet sofas. I have been drooling over them for a while now but guess what? I finally got my own, well sort of…

My blue velvet sofa is actually an Ikea Hack!
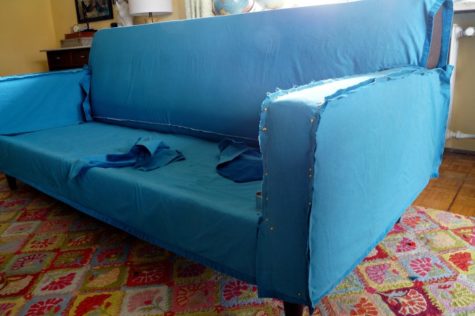
Here is what I started with, my 8-year-old mid-century style sofa with brown tweed upholstery. I love the straight lines of this sofa but what was I thinking buying a brown sofa? Oh yeah, that was 8 years ago when I had small children with grubby hands… Now I have big children with grubby hands but at least they understand when I say not to eat on the sofa. (If only I could get them to listen.)
After hemming a pair Ikea SANELA curtains for a client I had a bit of fabric left over, and I got the idea that this pretty blue velvety fabric might just work on my sofa. I ran a piece of scrap through the washing machine and was pleasantly surprised to find it washed beautifully.
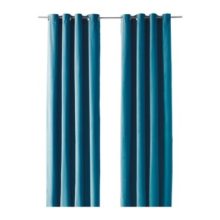 I’m sure your thinking why didn’t I just buy velvet fabric? Well, nice velvet is very expensive and the inexpensive options usually have a shine to them that just looks cheap. Also the nicer silk and cotton velvet (velveteen), needs to be dry cleaned. These curtains were machine washable, exactly what I needed.
So my blue velvet sofa is actually a slipcover made from curtains in dark turquoise. They cost only $70 for two 55″x 118″panels, minus the grommet tops one pack gives you over six yards of beautiful velvety fabric. For my slipcover I used four panels (two packages) and had quite a bit of fabric left over.
When I started working with the fabric I also noticed that it has a bit of stretch to it, perfect for the tight-fitting slipcover I was looking to make.
This is not a slipcover sewing tutorial but I will give you a few personal pointers if you are considering sewing our own but have never sewn a slipcover before.
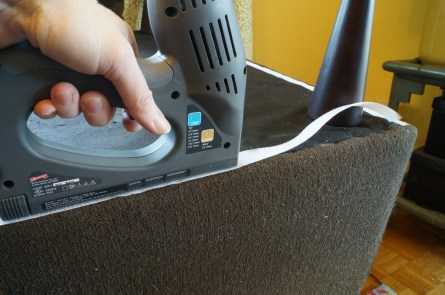
1. When fitting your slipcover, pin you fabric on the sofa inside out ( I like a tight upholstered look so I pin mine tightly.) Once pinned remove the slipcover and sew right along the pin line, removing the pins as you go. I do this in sections and keep adding on, usually taking the slipcover on and off several times as I sew.
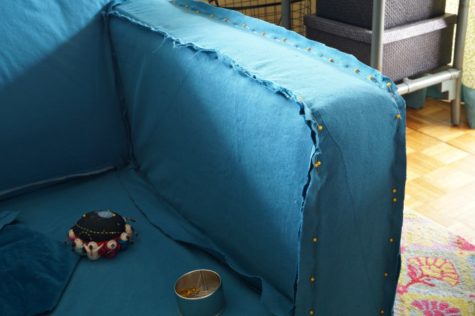
Since I was using curtains I tried to take advantage of the hemmed edges. I ran the finished edges of the curtains along the bottom of the sofa it saved me the step of hemming the slipcover at the end.
If you want to take an extra step towards an upholstered look, add a strip of Velcro along the bottom edge of your sofa and slipcover so you can tuck the edges under for a tight fit.
This last tip is specifically for sewing velvet. Watch that you keep the direction of the velvet going in the same way whenever possible. Velvet will look dark in one direction and lighter in another. If you are not careful you may have one cushion looking like it is a different color than the rest.
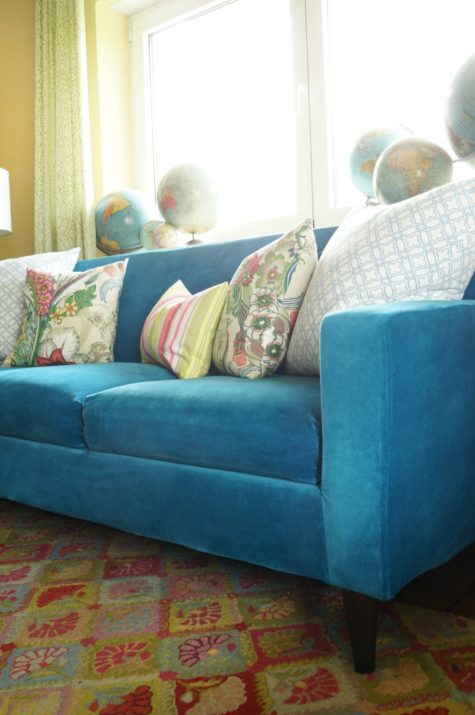
The end results look like this… After a days work and $140 investment in fabric, I have my very own blue velvet sofa. Add few new pillow covers and I have a whole new look.
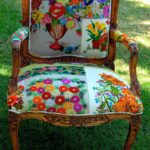
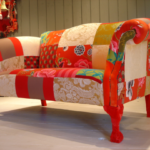
This seems like a fair amount of work, and would require a sewing machine, and I thought it might be fun to share a vision of the possibilities:
![]()
Ok, yes, that chair isn’t covered with a slip cover, but I think a person could make one that was similar. But what if your couch or your chair is a total mess and needs to actually be reupholstered? Then what? Well, if a trip to Craig’s List isn’t in your future, or if you’ve always wanted to know how to reupholster a couch or chair… hang on to your hats, because I have a tutorial.
It probably isn’t as hard as it looks. But it does have a certain fear factor, and I’m sure there’s a learning curve. So, before I share the tutorial, I’m going to share a gallery of some super cool upholstered couches and chairs. Hopefully this will get us over the hump and inspired to take on a challenge.

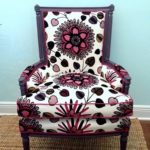


I love these, and with my idea for a blue jean covered couch in mind, I thought I might figure out what size the individual pieces would need to be, and then sew blue jean pieces and parts into appropriately sized squares of “upholstery” material. Here’s an example of what it might look like:
So, are we ready for the tutorial? I’m sure it’s way easier than it looks. The scariest part is that you have to take your furniture down to the bare bones… After that it’s just a matter of measuring, cutting, layering, and attaching it. Here’s a step by step tutorial from Do It Yourself Divas.
DIY Strip Fabric From A Couch and Reupholster It
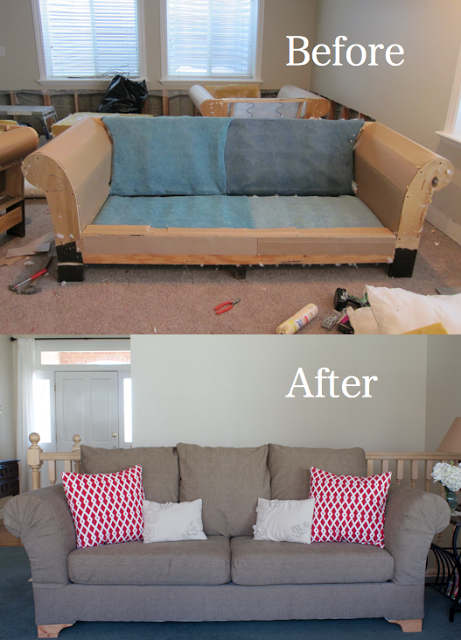
I don’t exactly have $$ right now to buy the couch of my dreams, but lucky for me, my husband and I were able to reupholster this beauty. We found a living room set that included a large sofa, love seat, chair and a half, and an ottoman for $50. Engineer hubby and I totally transformed the sofa AND an ottoman for $200. We are going to go through the steps of stripping the fabric off of the couch and reupholstering the couch.
This proves that almost anything can become something new.
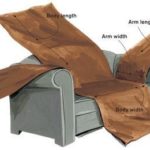
Use your imagination when finding the right couch. The diamond in the rough is usually really rough at first. So, look past dingy, pastel colored, floral fabrics and look at the general shape and structure of the piece to find the right candidate for reupholstering. Here are some things to consider when looking for the right couch:
Step back and look at the couch to determine how many “sections” you will be reupholstering. The “visible” sections for my couch were arms, back of back rest, front of back rest, sides (under arms), front bottom, pillows, and cushions. There were two “hidden” sections which included under the couch and under the seat cushions.
Typical upholstery fabric is sold on a large bolt that is about 54″ wide. Knowing this may help you estimate how much fabric you will need per section.
- Cost to reupholster.
A sofa can take anywhere between 12-20 yards of fabric depending on its size and shape. Keep that in mind when choosing fabric; things can get pricey. We used 16 yards on our couch.
- Is the structure sound?
Can I reuse the tack strips or any upholstery hardware? Will the feet need to be replaced or renovated? Are the foam cushions worn out or do they have plenty of body left? Is this couch more comfortable than a $200 couch I could buy new? Will any odors remain once the fabric and batting have been removed?
Our couch was easy to reupholster because the seat cushions and the pillows were detached. I imagine it would be harder to reupholster a couch that had cushions and pillows sewn onto the body of the couch, but I’m sure it can be done with a little determination.
You will need:
- Couch
- Heavy Duty Upholstery Fabric
- Inexpensive fabric to use in “unseen” places, i.e. muslin
- Staple Gun/ Staples
- Cereal Box Cardboard (we will explain later)
- Batting
- Spray Glue
- Zippers, thread, or anything else needed to sew cushion covers
- Any replacement items for worn out material, i.e. foam or feet
- Pliers
- Hammer
- Sewing Machine or a friend who has one
- Fabric Scissors (hands down, the best fabric scissors.)
- Measuring Tape
- Any other job specific tools
Here’s the criteria we used to find the right fabric…
No continuous pattern. Patterns, such as stripes, can be difficult to line up during reupholstering and may require more material to make patterns align.
Fabric with a sturdy weave. This may go without saying, but make sure to get a durable fabric that is meant for furniture if you want your legacy to last.
How much? Remember the sections I talked about? Measure the length of each section and add a few inches extra on each end so you have enough fabric to work with. It would be bad to not have enough, so measure a little generously. We didn’t have to worry about the width since 54″ wide fabric fit each section on our couch perfectly. As I mentioned above, we used 16 yards on our large sofa.
- Price point.
We are on a budget and the fabric had to fit within that budget, so we didn’t waste time looking at fabric above a certain price point. Our fabric was about $9 a yard.
Strip it down
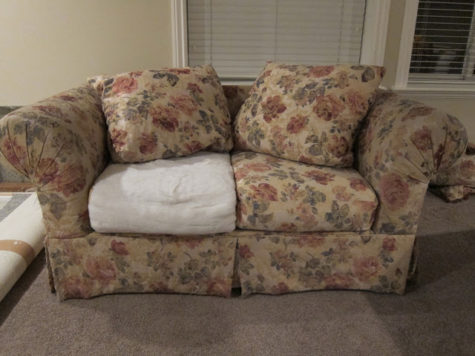
Unfortunately I didn’t take a picture of the fabric on the sofa before is was ripped off. Hubby was anxious to get going and started ripping off fabric, batting, and foam, so to give you an idea of what it looked like with it’s original fabric, here is the love seat.
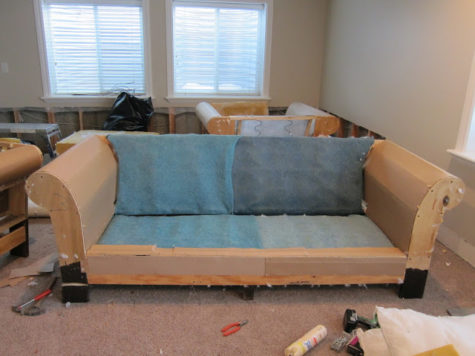
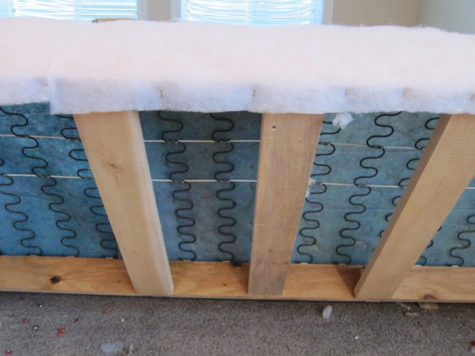
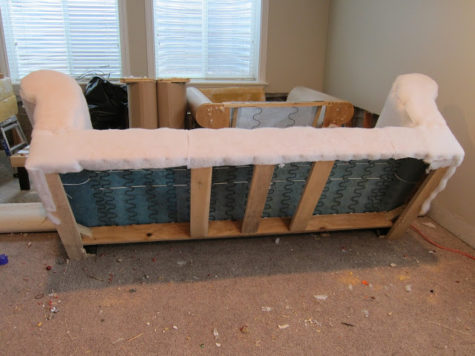
Here is the sofa all stripped down with the seat cushions and pillows set aside. Engineer hubby ripped off the fabric, the batting from the whole couch which he thought was holding in all the odors. He also removed the foam from the arms. When we realized that foam is really expensive, we salvaged the original foam and “Lysol-ed” it liberally 😉 All that remained of the couch when we were done stripping it, was the wood structure, cardboard on the arms, springs, the blue mesh material covering the springs, foam (foam not pictured), and metal tack strips.
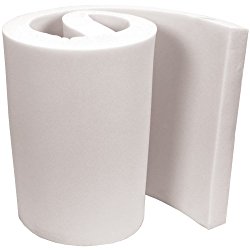
In our case, the next step was to put the foam back on the arms. Foam only covered the front, sides, and tops of the arms. Sadly, I don’t have a picture of this so just use your imagination. I did however attach a photo of a roll of foam you can purchase. It’s called High Density Urethane Foam 1″x24″x30″.
Remember, any staple dimples or irregular shapes in the foam may show through when you cover it with new batting and fabric, so use spray glue on the back and try to staple it nice and evenly on the edges.
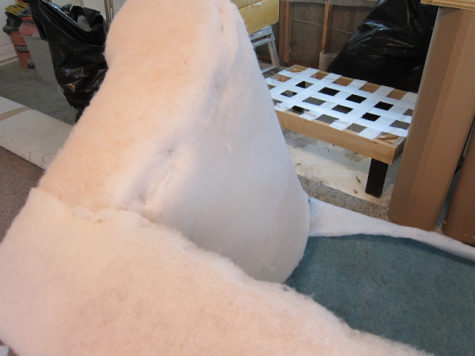
New batting stapled into place. You will notice some dimples caused by the staples, but these were not too severe and were easily smoothed out once the fabric was stretched over it. We used about 3 packages of 8oz batting that had been pre-cut for a queen size quilt. (10oz would have been better but it wasn’t in stock). You can buy it at Walmart.
Roughly cut it into pieces that cover each section of the couch. Sections meaning, front of arms, around each arm, front of couch, and back of couch. Just go for it, it doesn’t have to be perfect.
Notice the feet have been removed. Also notice all the yucky stuff that came out of the couch when it was stripped. Among the “treasure” was 75 cents, “the lost sock”, cocoa puffs, the top hat from a Monopoly game, and much more.
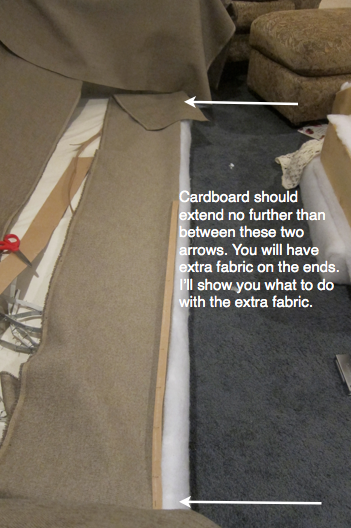
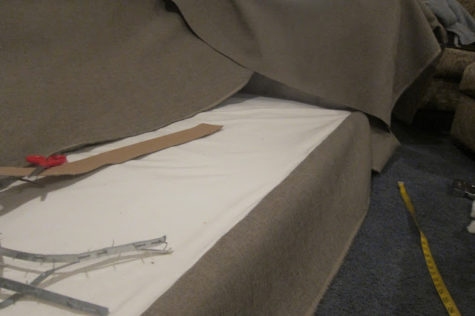
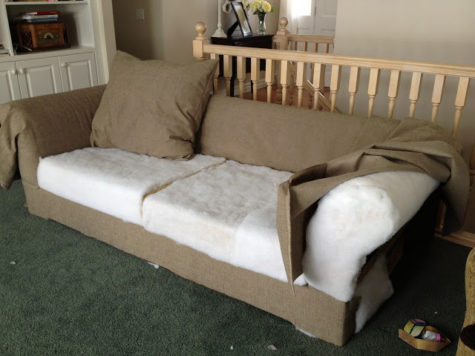
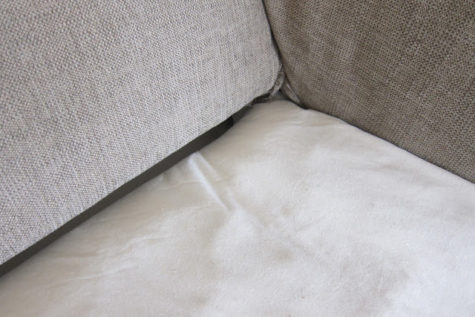
We first attached muslin over the seat cushion springs/base (see finished product below).
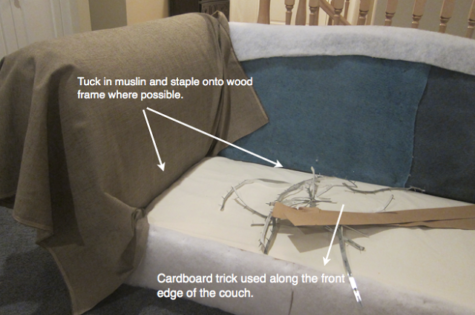
Locate areas on the frame of the couch where you can staple the muslin. Cut muslin to fit. Be generous and give yourself plenty of fabric to work with.
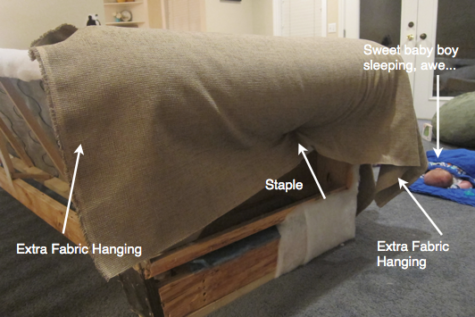
Use the cardboard trick, described two paragraphs below, along the front edge of the couch in order to hide staples and give a uniform edge.
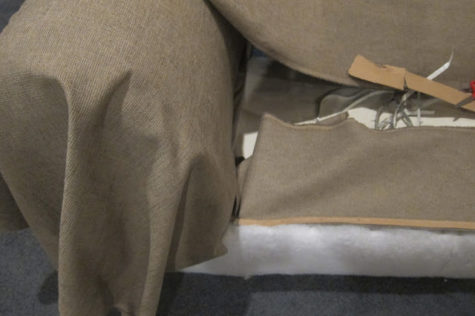
Fold the muslin over the stapled cardboard strip and tuck under the arm and back.
Pull the muslin tight and staple to the frame. You will be working under the couch at this point in order to staple the muslin to the frame.
Drape a large piece of fabric over the arm of the couch and staple in the joint. Notice how we have a lot of extra fabric hanging off the front and back of the arm. That fabric will be folded into a fan later on.
Use the cardboard trick to attach the fabric to the front of the couch. The cardboard makes it so you don’t see any staples and you will see how.
- Place the fabric “right side” to the muslin and a couple inches away from the edge of the couch.
- Cut a few strips of cardboard (cereal boxes work great) about 1/2″ wide and as long as the couch goes.
- Staple through the cardboard and the edge of the fabric into the wood frame.
Flip the fabric over and you have a nice, clean, finished look for the front part of your couch.
Staple the fabric to the bottom. Wrap and staple the fabric around the sides of the couch about 5 inches.
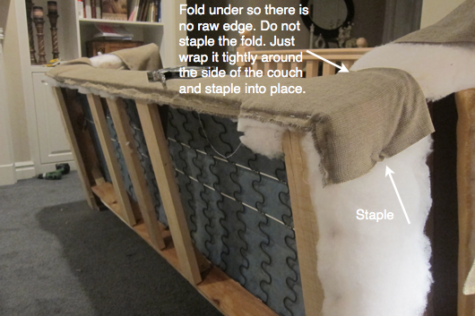
Notice the front bottom piece. It is tightly secured with staples, no raw edges showing. The back fabric piece is just draped over the back for fun at this point; the next step is to work on the arms again.
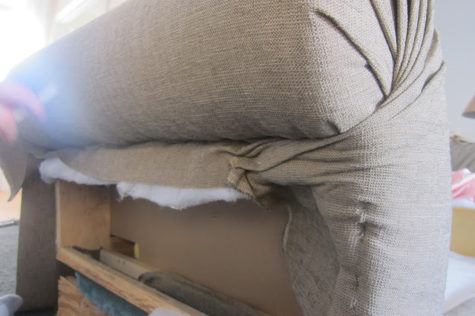
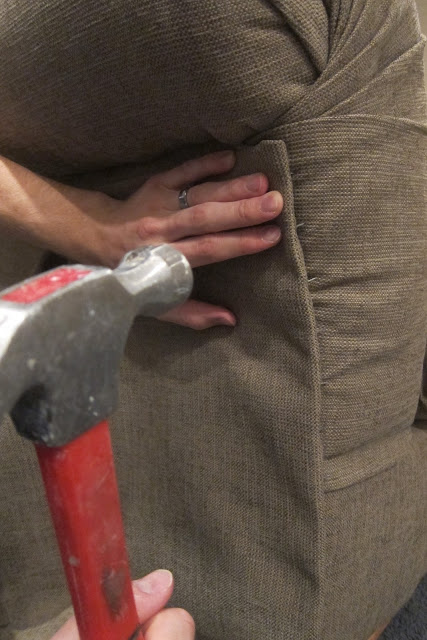
Arms. This is the trickiest part.
- Start from the outside of the arm and work your way up, around, and down creating small folds.
- Staple as you go; you can always pull the staples out and readjust.
- When you get close to the end, fold the fabric under to give it a clean finish and staple in place.
- Don’t staple on the front of the couch, just pull the fabric tight and staple it in place on the sides of the couch.
- The fold at the bottom of the arm should cover the fold you made earlier on the front bottom piece.
Trim away bulky fabric as needed. Notice where we stapled. All these staples will be covered by the side fabric piece.
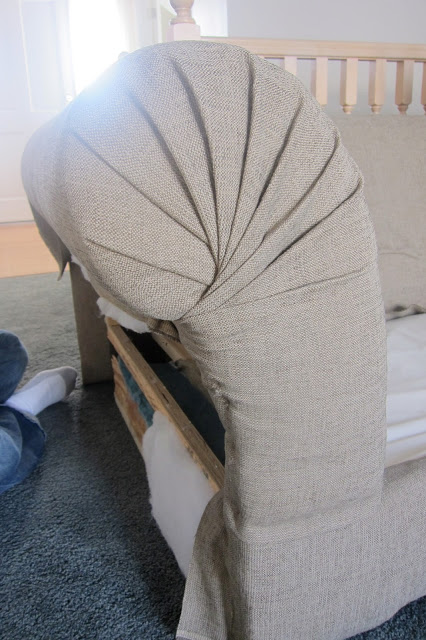
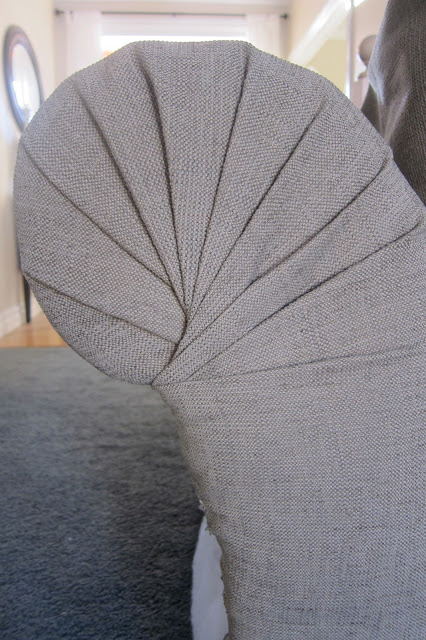
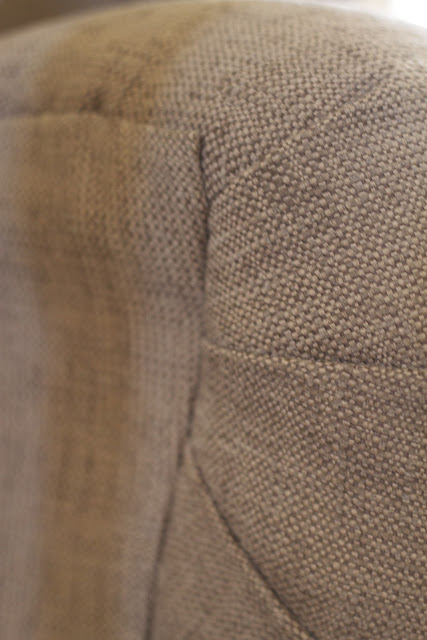
Move to the back of the arm and follow the same process creating a fan with the extra fabric.
We applied a little bit of super glue behind the small fan folds to keep them in place. So far so good four months and three kids later!
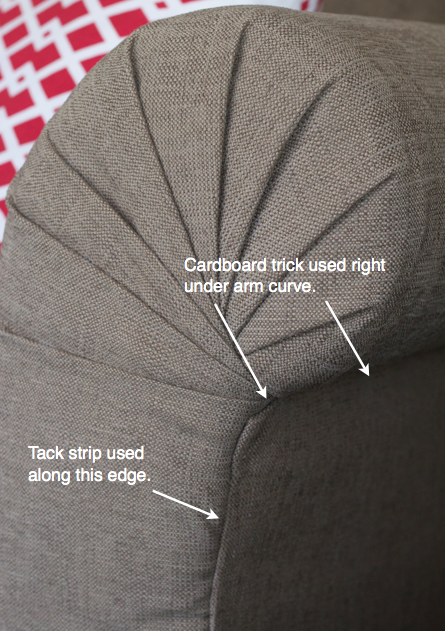
Here is an overview of what you will be doing to attach the side piece. Notice the order.
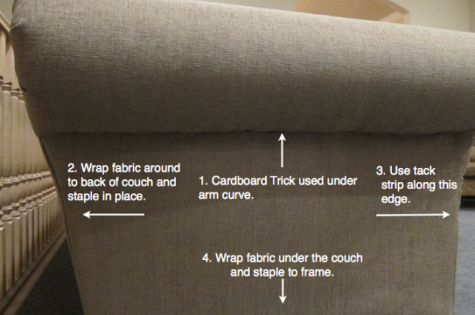
- First, use the cardboard trick to attach fabric under the arm curve.
- Second, staple fabric around the back of the couch and staple in place.
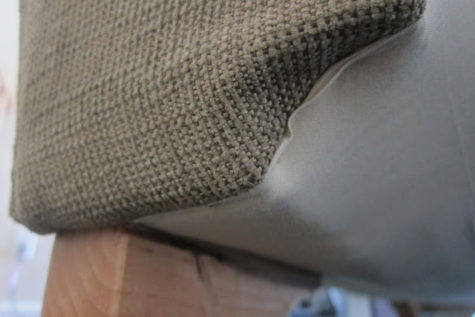
- Third, use a tack strip to secure fabric in place on opposite side. This little strip of metal allows us to create a finished edge much like the cardboard trick.
- Along the edge, push tack strip through the back of the fabric.
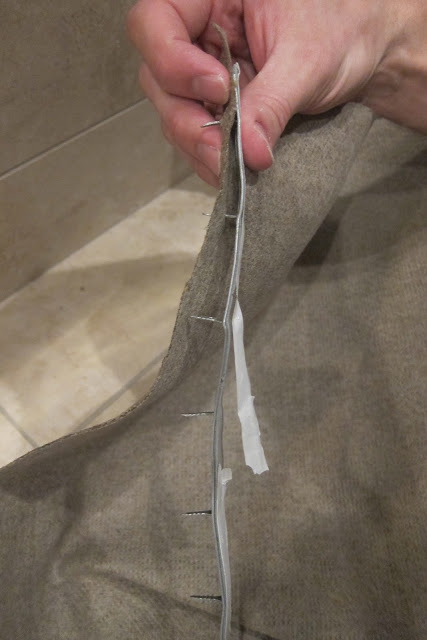
Fold it over so that the back of the tack strip is against the back of the fabric.
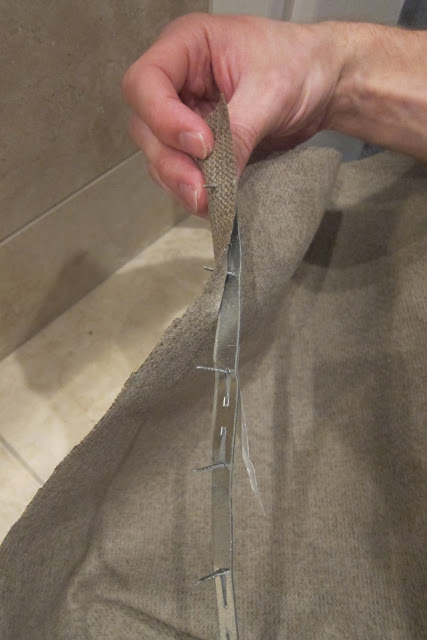
Hammer the fabric and tack strip into place along the side. Wrap and staple bottom edge of fabric onto the couch.
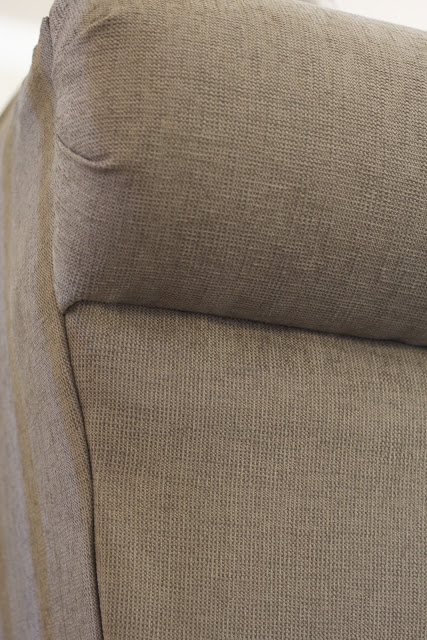
This is what the side should look like finished.
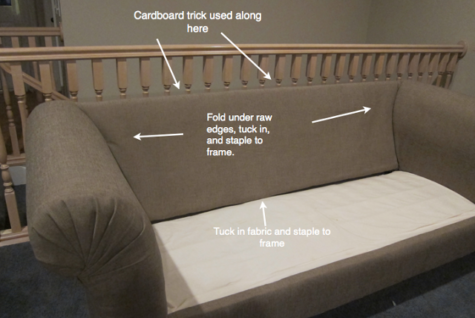
Attach fabric to the “front” of the back rest.
- Use cardboard trick to staple fabric in place along the top of the back frame.
- Flip fabric over to the front of the couch, pull it tight, tuck in bottom, and staple to frame. Make sure the “right side” of your fabric is showing once you flip it over.
- Fold under raw edges on the sides and staple to frame from behind the couch.
Add back piece.
- Use the cardboard trick along to top of the back. Flip fabric over.
- Begin working on the bottom.
- Wrap bottom fabric under couch and staple. The staples under the couch will be covered by muslin later.
- Then work on the sides of the back piece using tack strips. All staples should be hidden.
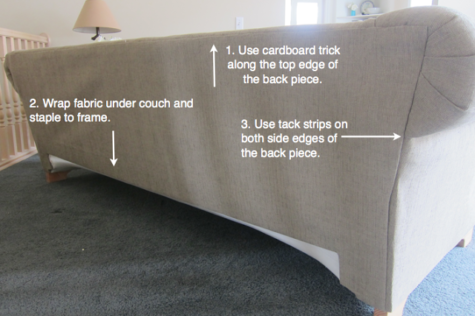
Here is a closer view of the back rest so you can see more clearly what we did and where we used the cardboard trick. Notice that the “front” back piece actually wraps over the top and down the back of the couch a few inches. Then the “back” back piece is stapled on top of the “front” back piece.

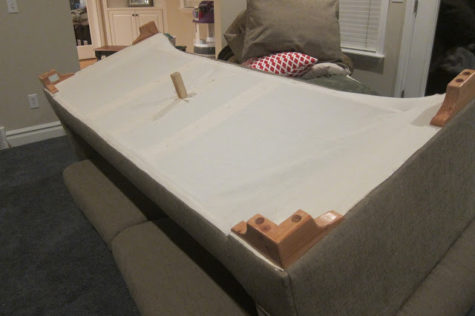
Attach the muslin to the “unseen” underside of the couch. No need to make it look pretty. Just cut a piece to fit the bottom and just staple it on. Start on one side and work your way around. Then attach the feet.
Here are the feet Engineer Hubby designed and made since we didn’t like the original feet. We really liked the blonde look, but you could always stain them.
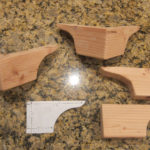
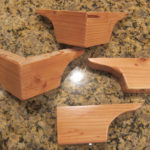
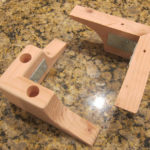
We added the center block for extra support.
Wrap cushions in new batting as pictured.
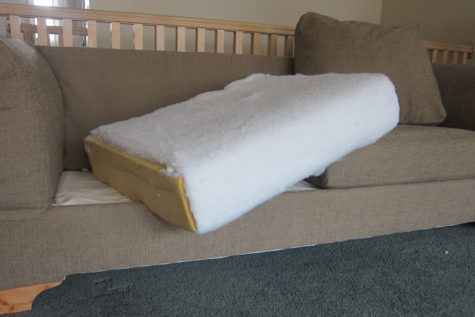
Use spray glue to secure the batting to the foam cushion. Now for the cushion cover… I used THIS tutorial.
How to Make a Cushion Cover
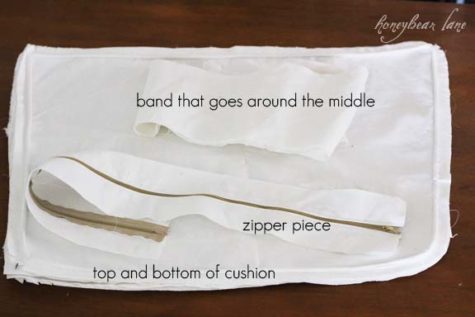
Start with these four pieces:
- The two main pieces-top and bottom of cushion
- The middle band
- The zipper piece you created from this zipper tutorial
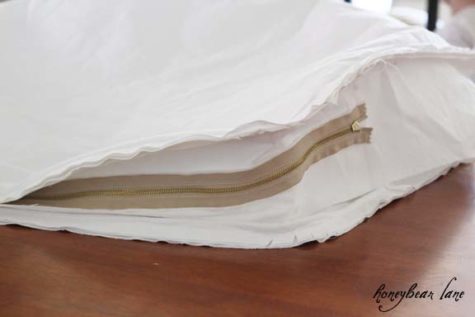
To get your top and bottom of your cushion, set your actual couch cushion on top of the fabric you want to use and trace around it with a fabric pen. Then cut it out, about a 1/2-1″ out from the line you drew (for your seam allowance and piping.) Cut two.
Note: If you are tracing an asymmetrical piece you will need to make sure that you keep the RIGHT sides opposite. To sew piping onto your fabric, follow this piping tutorial. The middle band you create by measuring the height of the cushion (for the width) and the perimeter around, minus the zipper length. Give yourself several (like 5-6) extra inches tacked onto the perimeter.
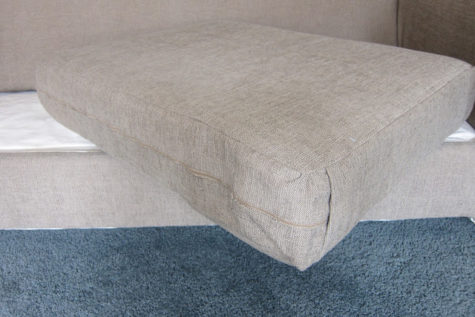
I’m not going to share the whole tutorial here, but I think this will give a basic idea of how to do it. The full tutorial can be found at Honey Bear Lane.
The finished product looked like this:
Make Pillow Covers.
I made simple envelope pillow covers so I didn’t have to sew on a zipper. I used this tutorial from Make It Love It.

I didn’t want the corners of my pillows to poke out, so I just sewed them down into the form.
All done! I promise this look isn’t too hard to achieve. Just have patience and always over estimate on your fabric so you have enough.
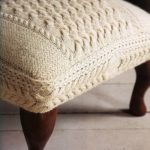
Wowsers! Well, if that looks too complicated, you could always knit something!
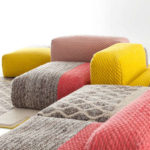
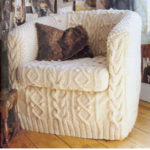
Knitted upholstery !!
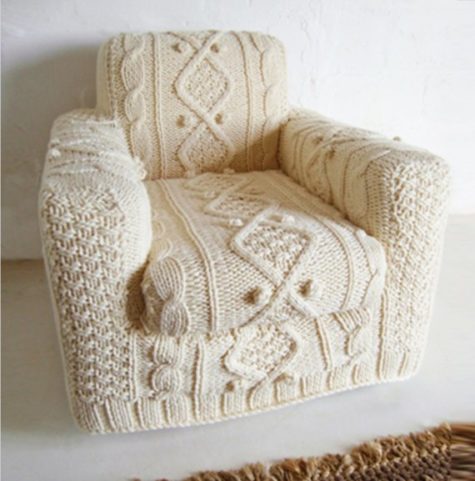
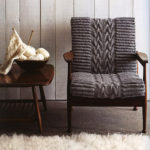
Your cat will love it, I promise! LOL! Here are some more knitted sofa and chair covers just for fun:

Or You Could Just Paint It!
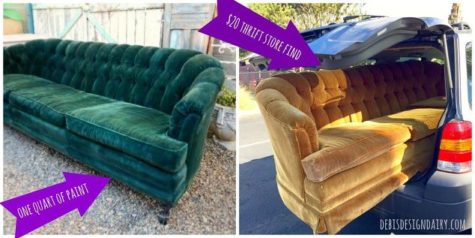
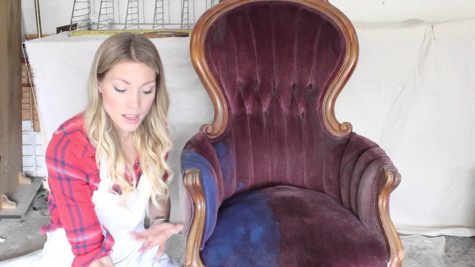
Here’s a video about how to paint a velvet sofa and keep it soft! If your sofa or chair is in decent shape, and still comfortable, maybe this is a viable option!
And yes… it’s true! You really can paint your upholstered furniture!
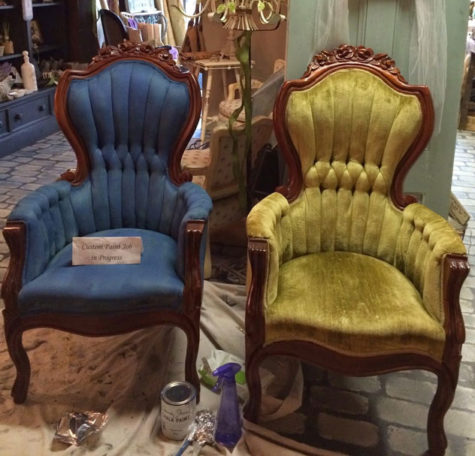
Painting velvet requires more patience than painting other fabrics. Maison Decor gave the chairs three coats of paint. They watered down the paint slightly by using a wet brush and spritzing the velvet lightly with a water bottle mister. Watering down the paint helped it spread evenly. Amy explains that watering also kept the fabric from soaking up too much paint, which can lead to cracking.
“The nap of the velvet needs to have the paint worked into it, but not so as to disturb the way it lies,” Amy adds.
Following the three coats of paint, with drying time in between coats, Amy and her team sanded the surface with 600 grit sandpaper, which helped restore the fabric’s smooth feel. Then they waxed the upholstery, which created a smoother finish and protected the chairs.
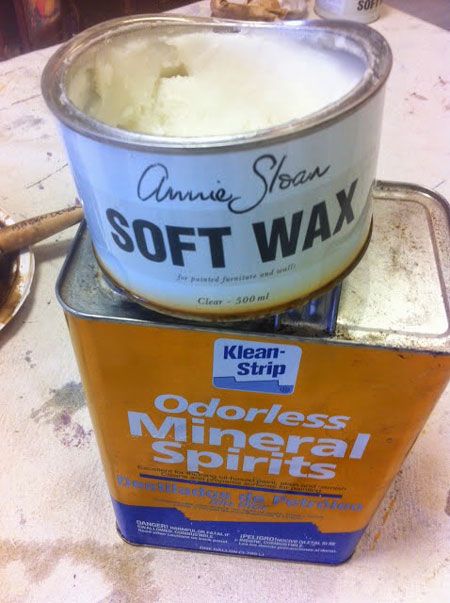
Amy explains that she used a 50/50 mix of Annie Sloan’s Soft Clear Wax and odorless mineral spirits, and applied the mixture with a wax brush. They waxed in the direction of the nap, wiping away excess. The key element was allowing the wax to dry completely, which required three weeks.

As for people skeptical of sitting on waxed velvet, Amy assuages any fears. “Often people ask, can you sit on a waxed chair? Won’t it come off on your bottom? The answer is no!” She attests, “In our house we have a pair of painted and waxed chairs in our dining room, and it’s been two years now of daily use with no wearing off of paint or wax. Now that’s something I can feel comfortable recommending to everyone.”

Ok… I think that’s about enough of that!
One Response to Come On In And Have A Seat
Leave a Reply to shirleytwofeathers Cancel reply
- Radical Self Care Project Overview by shirleytwofeathers - No Comment
- Radical Self Care Image Gallery by shirleytwofeathers - No Comment
- It’s A Wrap by shirleytwofeathers - 3 Comments
- Something To Consider by shirleytwofeathers - 1 Comment
- Nurturing Your Precious Self by shirleytwofeathers - 3 Comments
B. Joy Barrett: beautiful-turquoise-upholstered-accent-chair-for-living-room-with-within-colorful-accent-chairs-colorful-accent-chairs-transforms-the-look-of-a-room
Claudette Losier: Why Does It Work?
me: Make Your Own Violet Fire
Abdulrahman: Money Chant – Very Fast
Shirley Twofeathers: It’s A Wrap
Our current project began on July 4. We are exploring the concept and practice of Radical Self Care . Feel free to join in at any time!

Interested? You can visit our current project page, or you can take a look at the About The Project page if you are curious about the concept.
.
Please feel free to join in at any time! No experience necessary.

- Money Chant - Fast
- Money Chant - Slow
- Prosperity Plan
- Amazing Creator
- Cause and Effect
- I Am That I Am
- Spirit Rap
- Lakshmi Spirit Rap
- PowWow Spirit Rap
 Enter your question and receive the wisdom of the Occulatum. You may pose your question in any way that feels appropriate. The answer will come in the form of a small pop up. Try it - your life just might change for the better!


I think it's time to go shopping... maybe even buy some really cool stuff at my online shops!!

OMG! I really want to do this and I really don’t … at the same time… both things… Hopefully I’ll do the blue jean couch cover… but if worse comes to worse, I’m going to go for the drop cloth throw that’s been painted in a super cool way… whatever that means… sigh