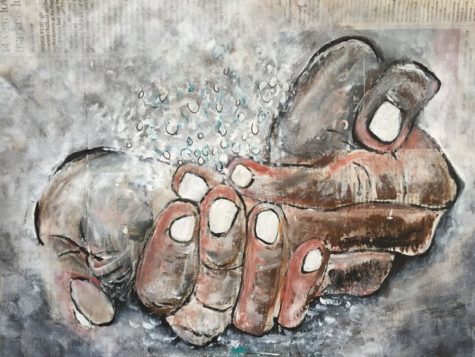
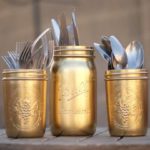
Clean and Clear
Wealth Dam Buster

You’ve heard it said that there are OCEANS of money all around us, right?
BILLIONS UPON BILLIONS just circulating EVERYWHERE.
So imagine for a moment that you are right here, and there are these OCEANS of money all around you – and what is stopping this from flowing right to you, through you and out again in a harmonious and highly profitable cycle?
Where’s the wall, the blockage, the dam that is stopping all this abundance from coming to you?
When you have found this, just take your intention like a laser and make a few small holes so that a little of that tasty nourishment can reach you today.
That’s often better than a flat out flood wave to begin with ☺ – but by all means, make these breaches larger and larger until you have an exciting flow and you can FEEL this coming to you!
A great exercise this, and a great way to start the day!
From:
- Dr Silvia Hartmann
- The 60 Second Wealth Creators
- Provided by www.DragonRising.com
Pour Out Old Limitations

Let’s make another “astral rubbish collection” using the Thought Flow technique.
- Hold your hands out.
- Imagine that you are holding a sphere in front of you.
- Today, we are going to pour into this sphere our old limitations.
Memories of failure, evil words of criticism, thoughts that undermine you, people who disrespected and hurt you, and all that rubbish from the past that belongs in its rightful time and space – and that ain’t here with us, right now!
- Let all of that stream from you and into the globe.
- Then raise it up, high up over your head, and throw it behind you.
There! Doesn’t THAT feel better!
From:
- Dr Silvia Hartmann
- The 60 Second Wealth Creators
- Provided by www.DragonRising.com
Pour Out Those Troubles
We’re going to make a thoughtfield!
In a moment, hold out your hands in front of you, as though you were holding a sphere the size of a small melon.
Into this sphere, I want you to pour all your troubles, all your cares, all your worries and all those things that swirl around in the back of our minds and make our thinking unclear and our motivation murky.
Let them all pour into this amazing container – thoughts, pictures, feelings, people, bills, the past, the future, all of it. It’s quick once it gets going.
When you have poured in all your current cares, take the sphere in both hands, lift it up high over your head and throw it behind you.
Take a deep breath and enjoy the clarity of forward vision that this brings.
From:
- Dr Silvia Hartmann
- The 60 Second Wealth Creators
- Provided by www.DragonRising.com
Sixty Second Stress Buster

This is a good technique to get you FLOWING – thinking better, breathing better, more energy and a whole lot less stress.
Ready?
- Put your attention on your body, on your physical feelings for a moment.
- Do you feel any tension, any discomfort anywhere?
- Slowly track through your body and breathe deeply as you do this.
Now, let your attention become like a soothing warm shower that gently massages and unlocks, loosens, makes these tensions simply dissolve and flow away.
Let them flow out and away, with gravity, down your legs, out of your fingertips, rushing down your spine and falling over your shoulders.
Now, and for the last ten seconds, change the water to be cooler, sparkling, revitalising, refreshing, charging through you and making you tingle all over. Ready for work!
From:
- Dr Silvia Hartmann
- The 60 Second Wealth Creators
- Provided by www.DragonRising.com
Clean and Clear
Everyone likes fresh, new and vibrant energy. When you understand the importance of space clearing for good feng shui energy in your house, you might wonder how can you actually space clear your home without too much time and hassle.
Space clearing is easy and very enjoyable, especially once you get into the habit of it. Ideally, you will have at least one major feng shui space clearing session a year, and then simpler versions of it weekly or monthly.
- Difficulty: Easy
- Time Required: 15-20 min
Find a window of time when you will not be disturbed, ideally right after the house has been cleaned. Be sure you have easy access to all the required space clearing materials.
- Candle or candles
- Natural Incense
- Essential Oils Mist
- Sage Smudge Stick (optional)
- Music (optional)
Gather your materials on your dining room, or any other suitable space, ideally in the center of the house. Light the candle and the incense.

Use the essential oils airspray, or the sage smudge stick to go around the house in a clockwise motion and purify the energy. Pay special attention to the energy in the corners.
When finished, come back to the center and purify your own energy a bit by either misting your body with essential oils or letting the sage smoke purify your field.
Let the candle and the incense go out on their own. Take a moment to connect to your home and feel the difference in its energy. Yes, it is that easy.
- Tips
At times, consider adding some elements of the deeper feng shui space clearing session to your daily or weekly routine.
It is always good to do the feng shui space clearing sessions in a calm and clear state of mind, so as to be able to perceive the subtle energy shifts in your home.
Feel free to modify and change your space clearing sessions, and make absolutely sure you enjoy them! Once you start enjoying the space clearing process, you will use it more often; your efforts will result in fresh and clear energy for you and your home.
At the beginning, you might have to schedule specific times for your space clearing sessions. However, as you get more comfortable and skilled at doing space clearing, you will notice you can just do these sessions “on the fly”, so to speak.
Whenever the energy in your space feels stagnant, low, or even negative, you can quickly reach for your space clearing supplies and refresh the energy in no time!
Major space clearing ritual
In feng shui, it is recommended to do a deep space clearing at least once a year. It is also recommended to do space clearing after an intense negative event, such as a divorce, for example, or before moving into a house that might have many negative energies (as in a foreclosure house.)
Don’t let the word “major” scare you. Just read to understand the principles and basic methodology of a deep space clearing session and see if you can do it. Maybe you would like to change some elements, or modify and omit some steps. Experiment and see what works, but do not avoid the process completely.
- Difficulty: Average
- Time Required: 45 min to 1 hour
Step # 1. Think of best timing, plan and prepare for your feng shui and space clearing session. Find the best day and time when you will not be rushed or disturbed. The optimum time for a feng shui space clearing session is in between 11 am and 1 pm. Do not start later than 3 pm.
Step # 2. Be sure you have all the materials you need (listed below). Also be sure to prepare a spot that will center the energies – an altar – on which you will place all the needed space clearing tools. This can be your dining table, or the fireplace mantel, or something similar with easy access to it.
- CANDLES: Several (at least one for each room plus the altar)
- SOUND/MUSIC: Uplifting, healing
- BELL(S): Ideally two or three with different resonance
- SAGE: A smudge stick is ideal
- INCENSE: Frankincense, or Nag Champa, or Sandalwood
- ESSENTIAL OILS: Lavender and/or Mint, Lemongrass
- HIGH ENERGY ITEMS: Fresh flowers, crystals, specific images, etc.
Step # 3. Be sure you feel balanced, be sure your energy is calm and clear. See what works best to put you into the right frame of mind: it might be an early morning walk in the woods or maybe a yoga class. You decide.
Take a shower right before the space clearing session, and be sure to wear fresh clean clothes.
Step # 4. Do your best to set up your altar as a beautiful, inspiring energy spot. The very minimum for a feng shui space clearing altar are candles and incense (purifying Fire element) and fresh flowers (Wood element).
The other three feng shui elements can be presented as following:
- Water as a small bowl with pure water;
- Metal as a clear glass candleholder, plus the metal bells used for space clearing;
- Earth as natural rock crystals.
Use your sense of beauty while creating your energy spot – the feng shui space clearing altar. Do not fret over the rules, experiment and see what works for you.
Step # 5. Turn on the music and place at least one candle in each room. Try to sense the energy in each room and connect to it. You can also go into each room with your incense stick to spread the gentle sweet scent in preparation for the session. Be sure to have at least one window open to allow stale energy to leave and fresh energy to enter.
Now you are ready to start!
Step # 6. Roll up your sleeves (you will sense the energy better this way) and do the following: starting at the main door and moving clockwise, clap strongly into each corner of your house. A clap from the lowest level to as high as you can reach to the ceiling. You will feel a huge difference in the quality of energy as the sound of clapping will be different depending on the accumulated energy.
![]()
Be sure not to omit any corners in your house, and be sure to clap as much as necessary; some house corners will require more time.
Continue clapping until you feel a clear difference in the sound (it will feel more crisp and clear when the energy is cleansed). When finished, be sure to wash your hands up to elbows in cool water.
Step # 7. Use your sage smudge stick on the same pathway around the house to purify any energy residues. Be careful not to stain your furniture or flooring, be mindful that the sage ashes can burn fabric or slightly damage the floors.
If you prefer not to do smudging/use the smudge stick, use an essential oil spray with sage or any other purifying essential oils, such as lemongrass, for example, or sandalwood and cedar.
Choose the best oils from what is available to you. Spray the essential oils around the house, especially in the corners. Personally, I like to do both the smudging and the essential oil steps.
Step # 8. If you decided to use bells, now is the time to ring the deepest sound/vibration bell into each corner, and wait slowly for the sound to really penetrate the space. You can ring a couple times in each corner, going in the same clockwise fashion. Then use the next, higher vibration bell(s) in the same way, waiting for the sound to completely dissolve until you ring again.
![]()
Take several deep breaths and do it slowly. The lightest vibration bell will feel like the sweet sound of faeries; this is the time to focus on spreading the good wishes for your home and infusing it with positive energy.
Step # 9. Technically, this is it! You’ve done the basic steps of a deeper feng shui space clearing session. There might be a lot of information about the house coming to you during space clearing, take the time to process and honor the info. Do not rush to finish the session, let the music still play for a while and let the candles and the incense burn on their own accord.
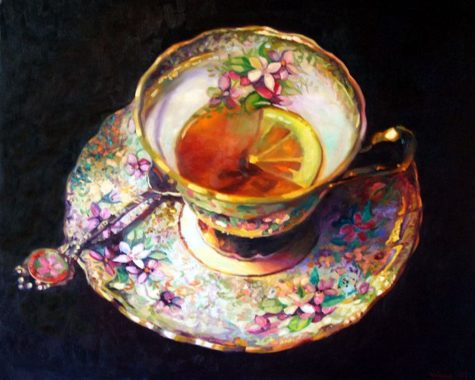
Just be in that clear space and see what else comes up. Maybe your living room needs more attention, or maybe it’s your front door. Pay attention. If all is well, then make yourself a nice cup of tea and enjoy a job well done!
I hope you enjoy the process of space clearing, and I know you will definitely enjoy the results!
Feng Shui Energy Tips for A Successful Space Clearing Session:
- Do not overdo the session and do not try too hard.
Your goal is to feel out the energies and purify your home. You might not do it perfect for the first time, but you will sure gain a greater awareness of the energies in your home. Be honest, be real and enjoy it; it is a beginning of a whole new level of awareness for you.
- It is Ok if you feel you have to do another session soon
There is no such thing as “too much” of space clearing. Again, feel free to experiment and try it as many times as you think it is necessary to purify the space; until you find your style and everything clicks, so to speak. You will have more confidence after you have done space clearing several times, as well as a know how often your house needs to be space cleared.
Source: The Spruce
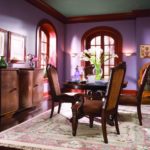
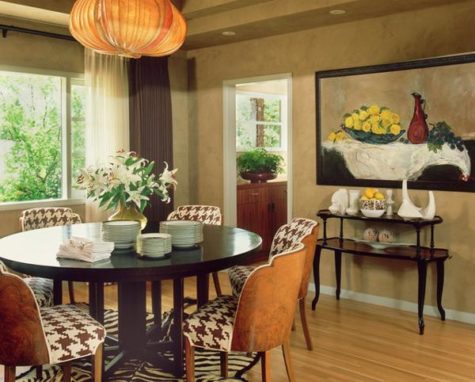
Dining Room Feng Shui
A feng shui dining room is one that arouses hunger, brings harmony, strengthens the bond among family members, attracts prosperity, enhances wealth and a whole lot more.
In feng shui, dining rooms are given a very high degree of importance and that’s because it’s “The Room” where a family is “supposed to” dine and spend a real quality time together.
I said “supposed to” because in most houses dining rooms are seldom used (for dining) and they – tend to – become “dumping rooms” for all sorts of things that can’t find a place elsewhere in the home; here’s a list of few – really few – items that are usually dumped in dining rooms:
- kid’s toys
- old cabinets
- seldom used travel bags
- laundry clothes
and the list goes on and on…
However, you must understand that piling all these items – that don’t actually belong – to the dining room has a very negative effect on feng shui of the dining room. In fact, piling clutter in any area of a home or office is bound to deteriorate feng shui for that area because they restrict the free flow of Qi energy in the house.
For good feng shui in the dining room:
- Make sure that the dining room is inviting, comfortable, hunger arousing and calm.
- Maintain balance of colors in dining room; don’t make it too bright or overly dull.
- Dining room must be well ventilated and it should receive plenty of sunlight.
- Hang a mirror in dining area such that it reflects the dining table; this’ll bring in more prosperity.
- You can provide a wash basin in North or East of dining area.
- Keep the dining room as near as possible to kitchen.
- Have kitchen and dining on the same floor.
- If your kitchen is really huge then utilize an area of the kitchen as dining area.
- If the dining room in your home is a part of living room (a common case nowadays) then put curtains or potted plants as a line of demarcation.
- Go for a square/rectangular or oval/circular dining table.
- Make sure that the dining table is of high quality wood.
- The dining table must be big enough to provide space for everyone.
- Keep the number of chairs even.
- Keep sitting arrangement such that no one’s back is towards a door or window as it causes a sense of insecurity.
- East facing is good for head of the family; other members can face North, East or West while dining.
- Be polite and gentle to family member while dining; be gentle and polite always.
- Be relaxed, calm, happy and stress-free while dining; in fact be this way always.
- Always keep something on the dining table; you can keep fruits on it; apples help develop friendship, pears are good to attract positive energy, peaches aid in good health and oranges symbolize richness and prosperity.
- If fruits aren’t your choice then you can keep flowers on dining table. Just make sure not to use dried flowers, they imply deterioration.
- Make sure to have meals with your family daily; however, if that’s not possible then at least have a meal together once a week.
- Images of mouthwatering and lip smacking dishes in dining room arouses hunger.
- Always thank God before you start eating.
Here’s What to Avoid:
- No toilet doors in front of dining table or dining room.
- Make sure that dining room door and house entrance doesn’t face each other.
- Make sure that the dining room doesn’t become a room of dining etiquette for anyone; else they’ll lose interest in eating.
- Never sit under a beam while eating.
- Please avoid TV and other electrical instruments in the dining room; this’ll make the family to spend some quality time together.
- Avoid low ceiling in dining room.
- Avoid negative paintings such as weeping girl, war, crime etc. in dining room; in fact avoid them everywhere.
- Avoid hanging clocks in dining room; they tend to create haste while eating.
- Never eat in dark.
- Avoid eating alone; that increases loneliness. Put on some soothing music if you’re alone.
- Avoid irregular shaped dining tables such as, diamond or hexagonal shaped ones.
- Avoid glass top dining tables as they’ll bring in nervous energy.
- Avoid dining tables that have cushions on top; go for hard top dining tables as they represent solid foundation.
- Never place the dining table touching a wall; it must be away from any wall so that everyone can sit comfortably.
- Avoid rocking chairs in dining room.
- Avoid facing south while eating.
- Don’t allow kids to sit in the South-West corner of dining table.
- Never use or even keep broken or chipped utensils or glass wares.

The Dining Room Table – Shapes and Sizes
There are two criteria to look at when choosing the best shape for your dining table.
- Best visual choice. What is your dining room asking for? What table shape will look and work there the best?
- Best bagua area match. If most shapes would work, then decide based on the feng shui bagua area of your dining room.
From a general feng shui perspective, a round or oval table is considered better than a square or a rectangle one. The reason for it being the flowing shape that contributes to a more even distribution of energy, so to speak. In simple terms, sitting at a round or oval table will make everyone feel more welcome, at ease and equal in their relating to each other.
However, the first criteria to look at is your dining room size and shape. If your space is asking for a square or rectangular shape and you insist on having a round table, you will not be creating a good feng shui dining room.
Good feng shui always starts by listening to your home, and then applying the best feng shui guidelines to it.
So, if you feel that a square or rectangle table would work better for the of your dining room, go for it because it is also good feng shui, just be sure to buy one that has rounded corners. Sharp corners are always best avoided as they create bad feng shui energy called Sha Chi.
Here are the best shapes for each bagua area of a dining room:
- East – Rectangular or Square
- Southeast – Rectangular or Square
- South – Rectangular
- Southwest – Square
- West – Square or Round
- Northwest – Square or Round
- North – Round
- Northeast – Square
- Center – Square
This selection is based on the play of the five feng shui elements and how they either support the energy in a specific bagua area or weaken it.
A couple more details to look at while selecting a good dining room table are as follows:
- The table should be in proportion to the room
- It is considered best to have an even number of chairs (unless you go for a round table).
- Best feng shui chairs are the ones with a solid back.
As the dining table is one of the most versatile and functional furniture pieces in your home, I would suggest taking your time and doing some good research. Ask where the table is made and who made it.
Buying locally, whenever possible; this is always a good idea and excellent feng shui, too. Invest in good quality wood and try to avoid a glass top dining table.

Dining Room Size for Chi Flow
The best feng shui dining room is spacious. There should be enough empty space to allow the chi energy to move about the room freely. Avoid blocking doorways, windows and the natural flow of traffic in and out of the room.
This free flowing chi energy will usher in abundance both in the health and wealth areas of your life. A minimum of 2.5 feet should be given around the table to allow guests to move their chair away from the table. If you can afford more space, all the better.
In traditional Chinese feng shui a dining room relates to wealth. In Chinese culture there is a straight correlation between the size of the dining room and wealth: the more people we can feed the wealthier we are!
Location and Feng Shui Design Aspects
The best location for the dining room is near the kitchen. This is a practical location as well as a feng shui one to maximize the benefit of chi energy.
Ideally, the dining room should be in the corner of your home. This location, like high-pitched ceilings, allows for the chi energy to collect and circulate in this space.
The most auspicious location of a dining room within a house is considered to be southeast and south. Not surprisingly these two directions relate to wealth and fame.
Dining Rooms Close to Front Doors
If your dining room is located too close the front door, try to separate it as much as possible. Keep the dining room door closed or use a decorative screen to block the front door from view. In feng shui, a dining room too close to the front door means chi energy can leave too easily and won’t fully enter the room.
Choosing and positioning the table
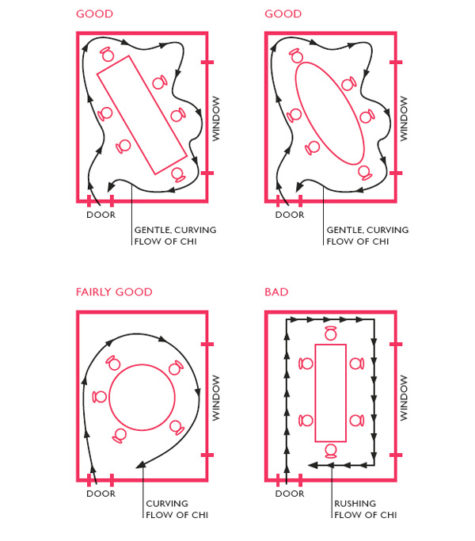 Your dining table should be large but fit comfortably in the room. Oval or round shapes are best, but if your table is rectangular, you can balance it with rounded shapes such as rugs in the rest of the room. It’s best to place the table at the center of the dining room and turn it at a slight angle in relation to the walls, so the chi will flow in a gentle, curving path around the room. If you put the table straight and parallel with the walls, the chi will be channeled in a straight line through the room or around the edges, and may get trapped in the corners.
Seating arrangements
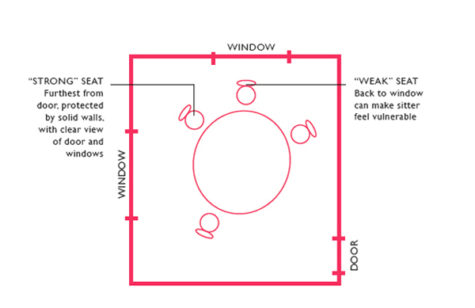
In feng shui, it’s good practice to seat the oldest family member or an important guest in the “honoured guest” position at the table. This is the seat furthest from the door, with solid walls behind it and offering a good view of the door and windows. If possible, place all the seats so that no one has his or her back to a door or large window, because this “weak” position may leave that person feeling insecure. This problem is especially likely with round tables.
Setting your table
In general, plain colours and simple shapes are best to promote the calming energy you need around the table. If you prefer a pattern, opt for one based on just one or two main colours. Vertical stripes are ideal because they symbolize uplifting energy. However, busy patterns splinter the chi. To get the most benefit from your tableware, keep items in good condition and discard any chipped plates, bowls or glasses.
Table displays
A rounded bowl filled with rounded fruit, in the centre of the table, is excellent feng shui; the more food you show, the more “richness of life” you possess. Many fruits have special significance: you could choose apples to boost friendship, pears for energy, peaches for health and oranges for richness. You can include other favourite fruits as well. Flowers are also a lovely decoration. Yellow ones are ideal to enhance communication. Silk, paper or plastic flowers are also fine. However, don’t use dried flowers because they represent decay and stagnation.
Lucky energy
The table and the area around it need to be “loaded with luck” (chuang ho hsing yun). Healthy, beautiful plants are a must in the dining room! They bring vitality, freshness and color., and nurture goodness in the chi. I especially like using larger plants with rounded leaves and flowers. Cut flower arrangements are fun to make and are also great in the dining room.
Keep electrical items, including TVs and stereos, out of the dining room; their energy is too yang. In addition, remove any clocks, because they are unwelcome reminders of the passing of time. A dining room should be “eternal” (yung yuan te).
The best material for a dining room table is wood. I do not recommend metal or glass tables since they are cold and do not hold energy.
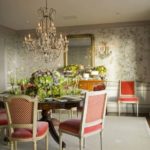
Here’s an example of a beautiful but very cold dining room:
Lighting
Lighting needs to be soft and calming. Wall-mounted lights equipped with dimmer switches are a good idea, because you can alter the lighting levels to suit your mood or a special occasion.
- Use Lighting to Attract Yang Energy
In feng shui, the chi energy is comprised of the negative and positive energies of yin and yang respectively. The yin (female) chi energy is passive/restive while the yang (male) chi is active/energetic. Lights attract yang energy and you want to activate this dynamic energy for this room.


Recessed lighting is subtle and can also be used as direct lighting for wall art and paintings or simply placed on a dimmer switch for ambient lighting options. Torchiere floor and table lamps are great for uplighting to attract chi energy toward the ceiling and allow more energy to flow into the dining room.
A chandelier above the dining room table is the ideal choice of lighting. A crystal chandelier will activate the energy in the room and create an uplifting sparkling feeling. I love to dim the overhead light and use a lot of candles during family and guests gatherings. It always seems to slow down the time and have a magical, relaxing and mood enhancing effect.
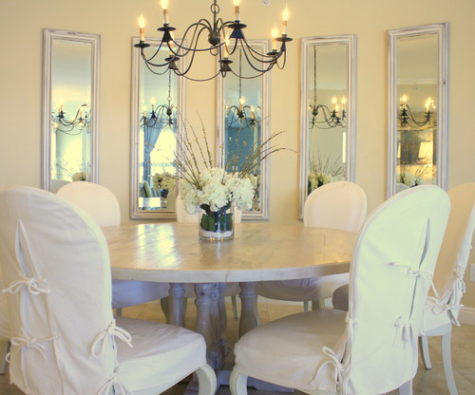
Generate Abundance with Mirrors
One of the best kept secrets of a feng shui dining room is the use of mirrors. The mirror should be placed to reflect the dining room table top. This placement doubles the food (abundance, health and wealth) and is considered one of the most auspicious element in a dining room design. However, a mirror should never reflect a kitchen or bathroom or it will double bad energy from these areas.
A mirror will also soften the light. Choose one with a suitable frame for that sector, or with beveled edges.
Mirrors are also great to use in the dining room if they can be hung in a way that reflects the outside. Try to position a mirror to reflect a garden, tree, or anything special to you from outside. You can also use the mirror to reflect a beautiful piece of art or a flower arrangement from the center piece on a dining room table.
- Mirror Height
Be careful not to hang the mirror so that it cuts off the heads of dinner guests’ reflections. This placement is considered inauspicious and brings ill health.
- Floor Mirrors
A floor mirror that extends well beyond chair height is a good choice. Just be sure that it isn’t placed opposite the dining room door or reflects the front door, kitchen or bathroom.
If you’re brave and want to add walls of mirrors, don’t use mirror tiles. Instead opt for full length large mirrors.
- Mirror Placements to Avoid
A mirror opposite a front door will bounce all chi entering your home right out the door, never allowing it to enter your home. In feng shui, if the mirror is opposite the door leading into the dining room, chi energy will never reach inside the room and can mean inauspicious results for family health and wealth.
The water of life
Clean, flowing water symbolizes luck, energy, health and “richness of life”. A small water feature or aquarium will benefit most locations. Alternatively, you could have one or two water symbols, such as shells, or a picture of flowing water.
If you have a southeastern wall in your dining room you can use water to enhance your wealth by placing a wall fountain or a fish tank. However, don’t use water items in the northeast, south or southwest; they clash with the chi of these sectors.
Goldfish signify luck, and are ideal for an aquarium. Three or nine are the most beneficial numbers; include one black fish to represent protection. If you like tropical fish, have golden platys and a black mollie.
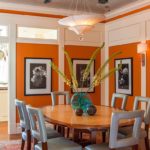
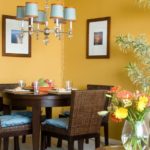
Good Feng Shui colors for dining room
Dining room wall colors should be warm, earthy and have a nourishing vibe. For example, yellow stimulates conversation and digestion, red stimulates appetite, and sage green brings freshness and vitality. A cold blue color would is the least appropriate for the dining room walls and décor.
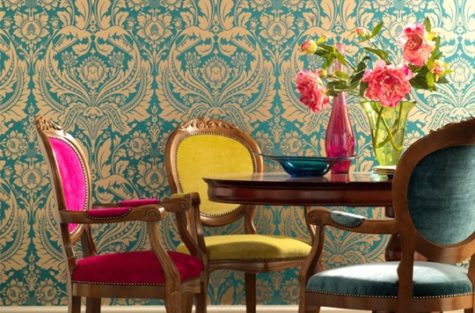
- Here is a collection of colorful dining room ideas:
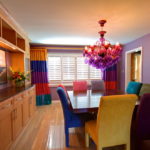


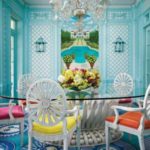


You can add colors to jazz up your dining room decorating with fabrics, bright tableware, crystal glasses and accessories. Napkins and table cloth designs and colors should be selected in accordance with the dining room table position. Feng Shui room decorating guide suggests blue color for the table in the northern zone of the dining room. Greens are Feng Shui colors for the eastern parts of the room and the house.
For large areas such as walls, single colors are best. You can always use ornaments and pictures, or a display area with items that suit the location, to add splashes of brighter colors. Try to avoid having highly patterned wallpaper, which can splinter the chi. If you already have this problem, remedy it by putting up abstract pictures in strong, plain colors appropriate for the location.
If you prefer neutral colors or like stylish dark or elegant white table cloth, try to add more Feng Shui colors with napkins, flowers, candles, napkin rings, tableware and vases to spice up your dining room decorating design.
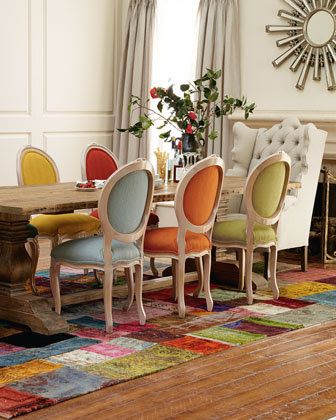
I love the way the chairs and the rug in the above photo provide a nice burst of color while the rest of the dining area is pleasantly neutral.
There is another important Feng Shui room decorating detail, – coasters should correspond to the shape of the table in Feng Shui home. If you have a round dining room table, use round coasters and get oval for the oval dining room table, and so on.
One of the most important and easy to follow Feng Shui tips for dining room decorating: never use cracked or chipped plates and glasses. Ancient Feng-Shui teachers say that it brings troubles into the house. Also they suggest to serve glasses with transparent liquids for dinner. Shiny glasses make attractive table decoration and can play the role of individual Feng Shui crystals that stimulate the positive energy flow and attract wealth.
Dining room usage:
Ideally, the dining room should be used often and free of clutter. You may want to say goodbye to those projects and piles of papers that have been residing on a dining room table for several months.. If you don’t use the room and it’s cluttered, the energy stagnates which can cause stagnation in your finances.
Art in the dining room:
Choose art for your dining room that gives you a feeling of wealth and abundance. It’s personal but some examples that work for me are landscapes, seascapes, fruit or flowers. Your choice of art should also reflect the elements needed to enhance wealth in the particular space.
Pictures that give you feelings of pleasure and abundance will also help; good subjects include bright flowers, rounded fruit and sunny landscapes.
Sources:
For A Well Organized Kitchen
Now that we’ve completed Feng Shui in the bathroom, I think it might be a good idea to head on into the kitchen and make sure it’s ready for all the cool stuff we’re going to make for our luxuriously delicious baths.
And even if you aren’t planning to make a bunch of cool bath products, a well-organized kitchen will help you cook as efficiently as possible and waste less food. Here are 10 great tips for organizing the heart of your home.
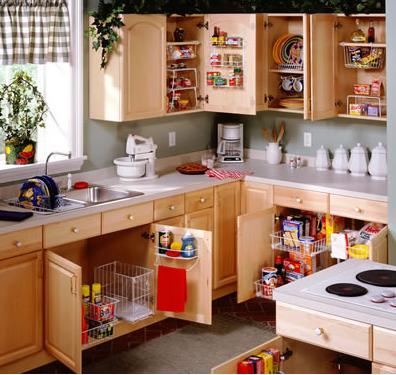
- Declutter Your Kitchen
Decluttering is the first step to organizing any room, and kitchens tend to have more unique kinds of clutter than other rooms: ice cream makers and other wedding-registry items, gadgets you were suckered into buying from TV infomercials, useless knife sets, and so on.Weed out the kitchen tools you never use, reevaluate whether you really need more than the essential kitchen items in your kitchen, get rid of the bulk spices that have already expired, reboot a junk food-filled pantry, and use up food in your freezer at least twice a year.
It’s easy to tell when you need to purge a few items from your kitchen—the overflowing drawers will tip you off to that. What’s harder is knowing what should stay and what should go. Unlike other rooms in your home, most things in the kitchen actually have a function and therefore feel like they should remain on hand (even when they’re jammed in the back of your cupboards). To begin your purge, Hello Kitchen recommends that you:
- Lay a queen-size quilt on the floor, somewhere near your kitchen (move some furniture if necessary).
- Referencing the list below, remove items from your kitchen one by one, coloring in each circle as you go. Place the items on the quilt.
The idea behind placing things on a queen size quilt is that the remaining items should all be things that can now be donated or given away.
This checklist can help you decide which kitchen tools to purge or not.
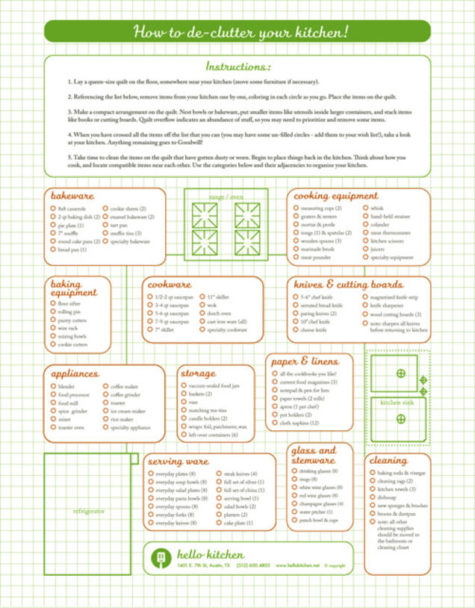
You can grab the free, printable PDF (kitchen_clean_out) from Hello Kitchen to get started on your kitchen audit. Just click on the link, and then click on the attachment to open the PDF file. Or, follow this link: How To Declutter Your Kitchen.
And just in case you want to be sure that you really do keep everything you might need, scroll down to the bottom of this post for a list of the top 5 must have tools for any kitchen
- Opt for Space-Saving, Uniform, See-Through Containers
One of the main contributors to kitchen chaos: Mountains of mismatched food storage containers. You only need a few types of food storage containers to maximize the amount of space you have in your cupboards. We prefer square or rectangular containers that stack up well. If possible, use containers that can go from fridge to microwave to dinner table to dishwasher. We also recommend organizing your spices with cleanly labeled, identical containers, perhaps on a magnetic spice rack or arranged in jars in a drawer with the tops labeled for easy identification.
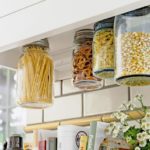
- Make Use of the Back of Your Cabinet Doors
The inside of your cabinet door is wasted space. Instead of leaving that surface blank, organize your measuring cups and spoons there, store pot covers on the back with inexpensive hooks, build a knife block into the back of the door, hold cutting boards in a magazine rack on the door, and pretty much mount anything to the back for easy access. You can also just paint the inside of the doors with blackboard or whiteboard paint to keep a running grocery list and weekly meal plan.
- Create Sections with Tension Rods
Tension rods are a surprisingly awesome organization tool throughout the kitchen. You can use it for hidden paper towel storage, organizing cleaning bottles under the sink, creating an extra shelf for spices, and creating pantry dividers or lid organizers in drawers.
- Get Rid of Wasted Dead Space
Got a kitchen with awkward, unusable spaces? Yeah, me too. If you have trouble seeing or reaching items at the back of a space, such as the cabinet under the sink, the inner depths of your fridge, or the corner of your pantry, a Lazy Susan could help. For that weird space between your fridge and the wall next to it, build a roll-out pantry or a sliding spice rack (you might be able to use an IKEA shelf to create your own). If you’re desperate for more space in your kitchen, turn those false drawers in your kitchen into usable storage space. You can also create a secret toekick drawer at the bottom of a kitchen cabinet on the cheap.
- On The Fly Kitchen Organizers
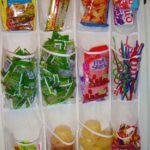
Here we have a number of ideas for kitchen organizers that you may not have thought of. I didn’t include the tutorials, because I think they are easy enough to figure out:

- Know Which Foods Go in the Fridge, Freezer, or Pantry
Part of having an organized kitchen is having your ingredients stored properly. It wastes less food and it makes it easier to inventory what you have before you go grocery shopping. Here are our general guidelines for storing foods so they last longer in the fridge or freezer and which foods you don’t need to refrigerate. Don’t want to memorize them? Print out these charts and hang on your fridge to keep track of your food inventory and also know when foods are about to expire. Likewise, this graphic illustrates how long essential pantry foods will last.
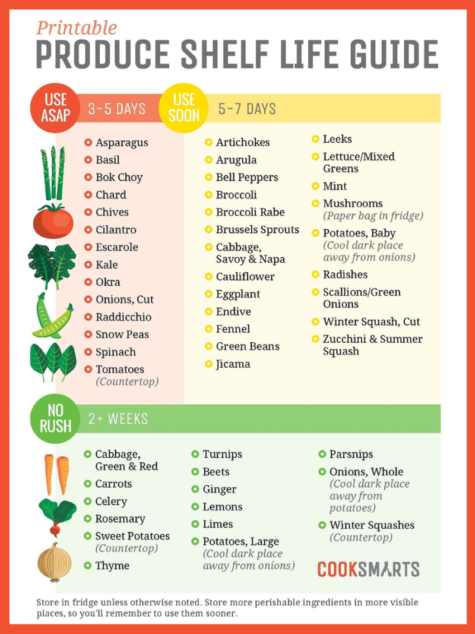

- Store Food in the Fridge Properly
It’s not just a matter of keeping foods in or out of the fridge, however. Within the refrigerator there are ideal spots for different types of foods. Dairy, for example, is best kept on the upper shelf where the temperature is most constant, while meat should be in the bottom of the fridge, where it’s coldest and any leaks wouldn’t contaminate other foods. Check out more fridge storage guidelines here or this infographic.

You might also want to organize your fridge with a first-in-first-out (FIFO) method, like grocery stores do or use an “eat me first box” in your fridge to make sure you don’t waste food.
- Maximize Pantry Space So You Can See and Reach Everything
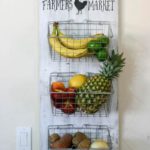
Out of sight really is out of mind when it comes to food storage. In the cupboard and pantry, make sure you can see and reach everything with things like stacking shelves, Lazy Susans, and clear storage containers. You can also group items in your pantry by meal (e.g., pastas next to tomato sauces) so you remember what to cook. For hard-to-stack cans of food, create a can holder using a magazine rack or organize canned goods in your cabinet with a closet rack. The back of your pantry door is a perfect spot to hang an over-the-door shoe holder to gather snacks, seasoning mixes, and more.
- Create Kitchen Work Zones
You’ve probably heard about the kitchen work triangle, the triangular layout between fridge, oven, and sink that makes it easy for a cook to move about the kitchen. Whether or not your kitchen conforms to this ideal, it’s helpful to think of your kitchen in terms of work zones: food storage, dishware storage, cleanup (sink and dishwasher), prep, and cooking zone. Store items according to their related zone. If you tend to have more than one person cooking the meal with you, you might create a second prep zone. Alternatively, you might want to add a baking zone or other specialty zones so everything is organized and kept in the proper places.
- Store Items Logically
That leads us to the last and most important point: Have a place for everything and everything in its place. Julia Child’s kitchen had a place for everything, with pots and pans hung on pegboards with their outlines drawn around them so she could put everything back in its place. Items you use most often should be easiest to reach, while you can put items you hardly use (e.g., turkey carving tools) higher up in the cabinets. Group your items next to the tools you use most with them (e.g., can opener by the cupboard you store cans in, baking ingredients with the baking pans).
For Maximum Cooking and Cleaning Efficiency
Whether you’ve just moved into a new space, are settling into a summer rental, or are just frustrated with your kitchen, here are some ideas to help you arrange your kitchen for maximum cooking and cleaning efficiency that will making mucking about in the space a lot more fun.
- Start with what you have:
You may love them, you may hate them, but unless you’ve got the money for a full scale renovation, your sink, stove and refrigerator aren’t going anywhere. Their position will dictate where everything else goes. Cleaning them up inside and out, can go a long way towards making them presentable.
- Create stations:
Taking a cue from restaurant kitchens, mentally assign stations for all of the tasks that you do in your kitchen: cleaning, storage, prepping, cooking, putting food away. If you bake a lot, you might also want a baking station.
- Organize items according to task:
The point is to organize the kitchen so that there’s as little unnecessary movement as possible. If, after you’ve washed the cutlery from tonight’s dinner at the sink, putting it away means walking across the kitchen to do so, chances are it will never get put away, no matter how pretty the cutlery drawer organizer is.
Move things around so that what you need is in arm’s reach: Cutlery and dishes should be near the sink; spices and cooking implements, whether rubber spatula or skillet, should be near the stove; put knives and chopping boards near your prep area; store sugar, flour, rolling pins, cookie sheets and standing mixer near your baking area.
- Out of reach:
Put things you rarely use — the turkey platter you pull out at Thanksgiving, the holiday-themed cookie cutters — higher up or lower down. Having to get on a ladder, or even bend your knees, means you’ll use something less frequently.
- If necessary, buy two:
I use cinnamon for cooking and for baking, so I’ve got one canister near the stove and one in my baking area. While I’m not suggesting you buy two food prep machines, consider doubling up on little items like spices and spatulas.
- Merchandise your storage:
Yes, I confess, my kitchen is always ready for its close up. I like my kitchen organized, I also like it pretty. Arranging items by size and color as well as by how often you use them can go a long way towards making your time in this room pleasant.
- Pretty but also useful:
If the canister that you use to store flour is hard to open, it’s not useful. Before you buy something, try it out in the store and consider how you’ll use it. Does it feel substantial in your hand but also light enough that it’s easy to use? Can you open a container with one hand? I’ve removed rubber sealant rings from many a flour container in order to make them easier to open.
- Stick with the place you’ve given for things:
With everything in my kitchen assigned a spot, it’s easy to see what I have and what’s missing. With a quick glance into my refrigerator, I can tell that I’m out of butter or milk or low on veggies. Since I always keep these things in the same place, a glance at my kitchen cupboards tells me I’m out of glasses and I’d better get washing!
An efficient set up based on what type of cooking you do can be very helpful.
For the Daily Cook
For you, an efficient setup is all about access and speed―quick in, quick out.
- The Strategies
Keep necessities within easy reach to save time. Make a place in the zone around the stove and the sink for essentials: oil, vinegar, knives, cutting board. Put ingredients and tools near where you will be using them: Keep the basket of garlic near the cutting board, sugar and flour near the stand mixer, and your best-loved pan on the front burner.
Use under-cabinet space and exposed shelving. A battery-operated under-cabinet lighting strip won’t dangle a cord or steal an outlet from the microwave, while an under-shelf cookbook holder pulls down when you need it and folds back up when you don’t. Things get lost on deep shelves. Put them in baskets that you can pull out and inspect at eye level.
Put the walls to work. Hang racks or pegs to keep utensils, pot holders, and dish towels in sight. Oversize Post-it notes or hanging rolls of paper (found at stationery and art-supply stores) are useful for reminders.
Make recycling efficient, too. Streamline end-of-meal cleanup by putting a bin for bottles and cans next to the one for regular trash (pull-out recycler, instead of out in the garage or in the mudroom.
For the Sunday Cook
When you’re too busy to cook, one weekend session―making dinners to freeze―reduces daily stress. Your kitchen setup should facilitate that.
- The Strategies
Keep essentials front and center. Stackable storage containers, large plastic mixing bowls, and other tools left on the counter won’t be in the way during the week and will be ready to go on Sunday.
Invest in equipment. A food sealer is just the thing for turning blanched green beans, fish fillets, and muffins into future instant meals. A scale is useful for weighing ingredients, which some cooks consider a faster and more reliable way to measure for bulk recipes. A calculator speeds the doubling and tripling of recipes.
Organize the freezer. When food items get crammed in willy-nilly, you won’t know what you have on hand. Instead, make designated sections (prepared meals, vegetables, desserts). Use dividers, baskets, or multilayer ice caddies to keep containers neat and accessible. And be sure to label everything with both what’s in the container, and when you cooked it up.
For the Come-on-in Cook
You like to share conversation―and kitchen prep―with a friend, a mate, your kids. Your goal: to arrange things so that two (or five) can work as efficiently as one.
- The Strategies
Make things easy for helpers to find. Bring things into the open with a wall-mounted utensil rack. Rachel Siegel, owner of Spruce, an organizing company in Berkeley, California, suggests storing tools by function.
Create parallel work stations. Set up separate work areas with equal access to commonly used tools and ingredients. A trash bin with a wide foot pedal can be moved about easily to serve cooks on both sides of an island or a counter.
Make the room kid-friendly. Create a zone where kids will feel welcome to help or just visit. For safety, move cleaning products and knives to adult heights. Stock up on kitchen tools made for kids and plastic bowls. Twin cutting boards let you chop the onions on your side of the island while your friend preps the apples on hers.
For the Entertainer
If you’re a cook who enjoys an audience, all the kitchen’s a stage. Create an illusion of effortlessness that belies a tightly organized support system.
- The Strategies
Set a mood. Clear vases of fresh herbs or beautiful bowls of picture-perfect produce will whet guests’ appetites. Install a dimmer to bring down the lighting, and if you entertain regularly, consider built-in speakers to keep the music flowing through the kitchen.
Use glass cupboard doors for display. Use glass-front cabinets to showcase what you love most, whether it’s your best china, an antique-pitcher collection, or even canisters filled with pastas in different shapes and colors.
Keep party gear handy. Create a place for platters and trays―with tray dividers to maintain order―so you don’t have to hunt for them. Give candles, place mats, and other table toppers a dedicated drawer. Use an index-card box to store recipes, past menus, friends’ food preferences, or wine labels. (Soak a bottle to remove the label, let it dry, paste it onto an index card, and jot down tasting notes.)
Five Must-Have Tools for Any Kitchen
Here are five kitchen-related things you really need and how to use them efficiently. These items do not represent everything you’ll need for all your cooking, in any kitchen, for every recipe, throughout your entire life. What we’re listing here are five core purchases that any kitchen should have, along with the best advice we’ve seen on how to get the most for your money out of them.
The tips and research for these items are pulled from one editor’s experience growing from a single dude who calls his mom to make mashed potatoes to a fairly reliable home cook who makes the big dinners, along with a few great reads:
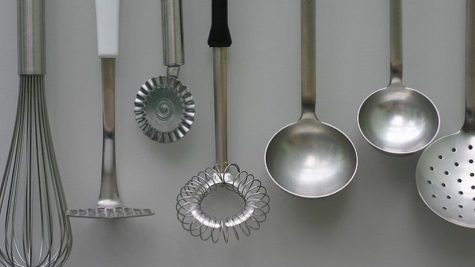
- Three decent knives, sharpener for two of them
If we were crazed minimalists, we’d say you only truly need an eight-inch, plastic-handled stainless alloy chef’s knife, one you can find at a restaurant supply store for $10 (more on that later). You should test out any chef’s knife you’re looking at, and consider santoku-shaped blades if you do a lot of mincing or fine chopping. The key is making sure any knife feels right in your hand. The handle and weight in your hand are just as important as the blade, since proper use and sharpening should take care of that. Other than that, a sharp, sturdy paring knife and a cheap-as-you-can-get serrated bread knife have you covered for everything else. Skip the boning/fileting and utility knives, because you definitely don’t filet fish or slice giant mozzarella wheels that often.
How do you keep your knife sharp? Popular Mechanics has a good two-paragraph primer. Using a two-sided sharpening stone:
Lubricate the coarse side of the stone with mineral oil or water; then push the blade (at a 22- to 25-degree angle) across in a sweeping motion, like you’re cutting a thin slice off the stone. “Flip the knife and work the other side until a slight burr forms along the edge,” Montagno says. “Switch to the fine side of the stone, lift the blade to a slightly higher angle and hone off the burr to create a razor-sharp micro bevel.”
Obviously you can skip this process with the serrated bread knife, which can probably cut through loaves of bread long after you’re dead.
- Five pots and pans
How you save money here depends on how you cook. Unless you make a lot of meat dishes with reduction sauces containing browned bits, you really need just one cheap medium-sized nonstick skillet for your day-to-day cooking, small and larger-sized metal saucepan, a pasta-sized pot with a lid, and one serious, large (12- or 14-inch) steel pan with steep sides for your grander culinary ambitions, stir-frys, and bigger meat meals. We’re serious on the nonstick skillet being cheap, if safe-looking, because even the most expensive kind inevitably flake off, chip, and lose their egg-repelling properties over time.
Note: We don’t intend to imply you should completely cheap out on your pots and pans. Good cast iron pans, treated well, can last a lifetime. We’re just suggesting the multi-piece sets with every single size of pan, pot, and boiler, with three different lids, aren’t really necessary for cooking.
Everything else? That’s where it gets discretionary. One doesn’t spend three months’ salary at Sears to make sure they’ve got every tool for any imaginable home project, but instead builds a tool set over time. Roasting pans, springform cake pans, loaf pans, double boilers—try to borrow them for rare occasions, make do with makeshift versions, or possibly get lucky at your local Goodwill. Otherwise, another trip to the restaurant supply store is in your future.
- A restaurant supply store, or an Asian market
If you’re thinking about buying your cookware from a store in a mall, strip or otherwise, don’t do it. Similarly, don’t buy multi-pot sets, especially the kind signed by a chef you’ve seen on television. The best value for your dollar is found at your local or regional restaurant supply store. That’s where the restaurants you recommend to friends buy their stuff, and they make their money on volume. For certain kinds of cooking hardware, Asian food markets and “trading companies” often stock a lot of really cheap goods. For recipes that require random equipment you’re not sure you might use again, they’re often the smart buy.
- Serious instant read thermometer
You don’t have to spend a lot on this, but it’s crucial to buy quality instead of cheap. That’s spoken as someone who loves to grill, and whose wife does not like to eat on the bleeding edge of food safety. Go too cheap and you end up with unreadable LCD screens, melted plastic, and seriously slow updates that leave your food overcooked and the chef overworked.
- Reliable, small kitchen scale
When you’re new to stove-top cooking, you’ll want to get precise with your meat, vegetable, and starch measurements to ensure everything stays flavored in proportion. When you start dipping your toes into baking, that’s when you’ll really be glad you have a scale. The way you pack flour, the moisture in the air, and the random sizes of ingredients like eggs or fruits can seriously impact the outcome of a baking recipe—unless you’re weighing things in proportion. You don’t have to spend a lot, but you do want something digital, that holds up to 10 pounds, and which can “tare,” or set itself to zero, when you’ve got a container on it that doesn’t count in the measurement.
Sources:
Luxuriously Delicious Ideas For The Bath
In yesterday’s post, we learned that Flower cleansing baths purify and uplift. So, I thought it might be luxuriously fun and interesting to explore the world of do it yourself bath products.
Some of the oldest beauty treatments in the world incorporate flower petals and oils. Flowers not only enhance the fragrance of DIY recipes and can be used for aroma therapy, but they also have chemical properties that can be used to benefit your skin and hair. On this page, you’ll find different ways to add some flower power to your DIY beauty routine.
Some of these recipes use oils, fresh petals and dried flowers. Regardless of whether you’re picking your own flowers or buying them, it’s important to avoid blooms that have been treated with pesticides. Look for organic ingredients whenever possible, because commercial flowers can be subjected to particularly heavy pesticide treatment.
A Floral Facial
Facial steams can help improve circulation to the face and open pores, while this blend can help soothe skin. Plus, treating yourself to a facial steam can be incredibly relaxing. The petals of the calendula flower, also commonly called marigold or pot marigold, are anti-inflammatory. The chamomile has been shown to have calming properties.
Ingredients:
- 1/4 cup dried calendula petals
- 1/4 cup dried chamomile flowers
Instructions:
Boil 2 quarts of water and remove from heat. Add the flowers and let them steep for two minutes. Then, place your face at least 12 inches over the pot (getting too close can burn), and drape a towel over your head to create a tent over the pot.
For an even more relaxing experience, you can add a few drops of lavender or peppermint essential oil. Allow the steam to bathe your skin for a minute and then come out for a few breaths of fresh air. You can repeat this process about five times.
After the steam, you can rinse your face with cool (not cold) water or a mild cleanser, and follow with a moisturizer.
Oatmeal Almond Facial Scrub
“If you wouldn’t eat it, then don’t put it on your face.” Skin is porous, and everything that goes onto it eventually makes its way inside. Since all conventional facial cleansers, scrubs, and moisturizers are full of toxic chemicals, it’s best to avoid them completely. By sticking with edible ingredients – items that you already have in your kitchen, or can buy easily – you’ll rest assured knowing that you are not harming your body over the long term.
Best of all, there are no nasty plastic microbeads to contaminate the local water supply.
This homemade facial scrub leaves your skin feeling refreshed and silky smooth. The oatmeal exfoliates, the almonds moisturize, and the lavender-chamomile combination is soothing.
Homemade Oatmeal Scrub with Almonds, Lavender, and Chamomile
- 1/4 cup raw almonds (or 2 tbsp almond flour)
- 4 tbsp oatmeal
- 1 tbsp cornstarch
- 1 tbsp chamomile flowers (I used the contents of chamomile tea packets)
- 2 tsp sweet almond oil + 5 drops lavender extract — OR — 2 tsp lavender oil
Chop raw almonds in a spice grinder or food processor until they are a fine meal. Skip this step if using almond flour. Add remaining ingredients and blend well until mixture is a soft granular powder. To use each morning, put half a tablespoon of this mixture in your palm and add just a couple of drops of water. Rub hands together to make a paste. Gently rub and massage it onto damp skin in circular motions to exfoliate. Wash off with warm water and a warm, damp washcloth; end with a splash of cold. Keep the scrub in a well-sealed glass jar and it will stay fresh for months.
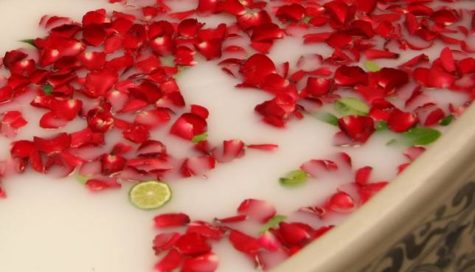
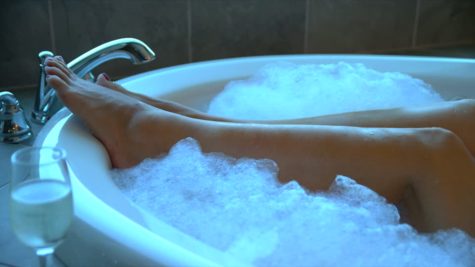
Luxurious Baths
People have been bathing in various things for years; Cleopatra bathed in asses’ milk while Mary queen of Scots preferred to soak in a tub of hot wine.
Even today most of us won’t even contemplate getting in the tub without adding a little something to it! Unfortunately, most of us end up adding a few cheap bubbles that have absolutely no value to our skin what so ever, and why when we can transform our bath into a heavenly therapeutic experience.
A Delicious Milk Bath
A milk bath is a bath taken in milk instead of water. Often other scents such as lavender, honey, and essential oils are added. Cleopatra, Elizabeth I of England, Elisabeth of Bavaria, and others have historically acclaimed the beautifying benefits of these baths.
Cleopatra was definitely onto something when she indulged in daily beauty treatment milk baths. It turns out the natural lactic acid found in milk is a form of alpha-hydroxy-acid (an ingredient which can be found in some of the most expensive exfoliating products). This type of acid gently dissolves proteins to exfoliate dead skin cells, which reveal fresh, younger looking skin underneath.
The lactic acid found in milk is extremely mild, so don’t worry, it won’t strip or irritate the skin. In fact, milk is quite soothing on dry skin.
Milk is also rich in vitamins and minerals — most notably Vitamin E and zinc — which help slow the process of aging and retain skin’s natural elasticity.
Milk baths seem to be making a comeback in modern times as well. Many upscale spas in major cities offer a number of milk treatments such as hot milk and almond pedicures! That sounds divine!
But you don’t have to spend a lot of money at a fancy spa (or travel back in time) to reap the benefits of milk in your beauty routine. Milk bath recipes are some of the quickest, easiest homemade bath products you can make.
A Simple Scented Milk Bath
Here is a simple recipe that you can mix up in minutes and add your own scent to as well.
Ingredients
- 2 cups whole powdered milk
- 1/2 cup cornstarch (soothes and relieves dry, itchy skin)
- 1/2 cup baking soda (skin softener)
- Essential oil of your choice (I put in about 10 drops of lavender)
Directions
Combine the powdered milk, cornstarch and baking soda in a large glass container. Put the lid on and shake the jar until the powders are completely mixed.
Remove the cap and add the essential oil. Re-cap the jar and shake to combine. Let sit for 24 hours before using, to let the ingredients and the essential oil completely combine. Store in a cool, dark place.
To use, pour 1 to 2 cups of your milk bath under hot running water. Lie back and relax!
A couple of tips:
- This is one time when lowfat is NOT your best bet. The higher the fat content of the milk, the more nourishing it is for you skin.
- Goat’s milk and cow’s milk have higher amounts of fat which provides more conditioning, but you can also use rice, soy or coconut milk (great alternatives for vegans.)
- Also, lactose intolerant folks don’t have to worry about bathing in milk. The milk isn’t being drunk, so there won’t be any digestion problems.
Make up your own recipe:
It’s very simple to experiment with your own recipe, all you need is powdered or fresh milk. You could even experiment with a can or two of goats milk. From this base, you can branch out and add one or more of the following:
- Honey
- Oatmeal
- Essential Oils
- Herbs – fresh or dried
- Spices – nutmeg, allspice, etc
- Flowers – fresh or dried
- Seaweed
- Sea salt
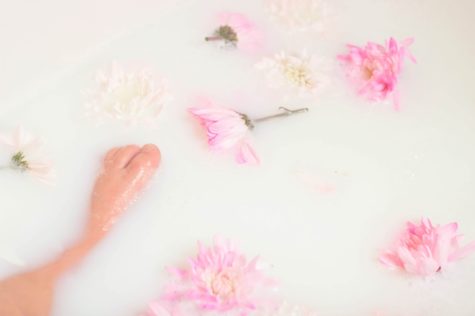
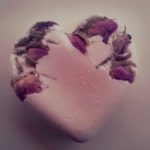
A Floral Feng Shui Bath
To create essential yang chi and clear your mind and rejuvenate your body, simply bathe in a bathtub that has been sprinkled with the petals of at least five different flowers in the five colors of the five elements. There should be pink, yellow, white, blue, and green petals from flowers or herbs, like rosemary, in your bath. You may also wish to include Bach flower essential oils in your bathe to help create a beautiful aroma as well, or use fragrant flowers such as lavender, jasmine or gardenia to perfume your water. This uplifting ritual will help to infuse your body with beautiful yang energy and soothe your mind.
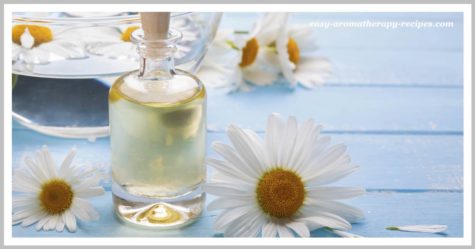
Luxuriously Aromatic Bath Oils
Adding essential oils to your bath water is one of the best aromatherapy treatments there is, more aroma molecules are released from the oils whilst in the bath than during a massage. As you soak in the bath the hot water softens the skin which in turn speeds up oil absorption, this allows the essential oils to become more effective and potent on both the mind and body.
They are not just a simple and easy way to add a touch of luxury to your bath; they will moisten and nourish your skin, along with treating the everyday ailments that you may be suffering with.
You will also notice the aroma of the oils is so much stronger in the warm water; it’s almost like sniffing a bunch of flowers. So the next time your thinking of having a bath add a few drops of your homemade bath oil, lie back, close your eyes and enjoy.
The basic principle in making bath oils is to select essential oils for their properties and fragrance, then add them to 4 tablespoons of base carrier oil.
The easiest base oils to use in your homemade bath oils are the light base oils such as Castor Oil, Almond Oil, Jojoba Oil or even simple Sunflower Oil.
Pour your base oil into a dark or clear glass bottle or jar. If using a clear glass jar you will need to protect the oils from waning by storing the finished oils in a dark place, a bathroom cupboard is perfect for this.
Add about 20 drops of your chosen essential oils cover and shake well.
Leave the homemade bath oil to blend and mature for about 2 weeks before using.
How To Use Your Bath Oils
- Simply add 1 tablespoon of scented oil to the bath and swish around to disburse. Once in the bath use a sponge to massage the oil into the skin.
- For an extra beauty treatment whilst soaking in the bath, mixing a few elderflowers with some live yogurt will make a great little face pack that can clear the skin and help prevent wrinkles.
Bath Oil Recipes
Happiness Bath Oil
This homemade bath oil leaves you feeling warm and happy inside!
- 4 tablespoons of base carrier oil combined with:
- 10 drops Sandalwood
- 5 drops Jasmine
- 5 drops Rose
- 5 drops Bergamot
This bath oil has a wonderfully rich and floral fragrance. A simple combination that will leave you feeling very calm and relaxed.
- 4 tablespoons of base carrier oil combined with:
- 20 drops Jasmine
- 8 drops Orange
Revitalising Oil
All of the essential oils in this recipe have been chosen to help relieve stress and depression. This uplifting oil will defiantly to put a spring back in your step.
- 4 tablespoons of base carrier oil combined with:
- 12 drops Geranium
- 6 drops Sandalwood
- 6 drops Lemon
- 2 drops Clary Sage
Relaxing Oil
Very Sweet, very fresh and very relaxing, what more can I say!
- 4 tablespoons of base carrier oil combined with:
- 12 drops Sandalwood
- 8 drops Orange
- 4 drops Rose
- 2 drops Pine
- 2 drops Lemon
Alcohol Based Bath Oil
Adding a small amount of spirits will help to distribute the oil in the bath more evenly. You will need to combine;
- 3 fl oz (100ml) Castor Oil
- 4 tablespoons vodka or brandy
- 10 drops essential oil(s) of your choice.
As with the other bath oil recipes, pour into a dark or clear glass jar or bottle (protecting the oils from daylight if using clear glass) shake well and leave to mature for 2 weeks.
Add 2 tablespoons to each bath and swish it about.
Shampoo Based Bath Oil
Baby shampoo is another very efficient carrier of oils, again helping the oils to disburse quickly and evenly in water.
- 4 fl oz (125ml) base oil (Almond Oil or Sunflower Oil
- 4 tablespoons mild baby shampoo
- 10 drops essential oil(s) of your choice
Pour the base oil into a glass bottle or jar, add the shampoo and give it a good shake.
Add the essential oil, shake again then leave to mature for 2 weeks, not forgetting to protect the oils from daylight. Add 2 tablespoons to each bath and swish it about.
Singular Bath Oils
Adding oils to a bath really doesn’t need to be completed, you can start by adding a single essential oil to your bath water. Essential oils normally last about 2 years if kept in a cool dark place and you literally only need a few drops so they are very cost effective.
I’ve listed below those that I would recommend as the best singular all rounders that can be used and enjoyed at any time of the year.
Tips
- Before adding any oils to the bath make sure you close the bathroom door so that you can keep as much of the scent in the room as possible.
- Add the oils drop by drop and don’t be tempted to add more, working on the theory that adding twice as much will get rid of a headache quicker doesn’t work and may just end up irritating the skin.
- On average you will need about 10 drops per bath, but with some of the stronger smelling oils you will only need 5 drops. Stronger smelling oils include; eucalyptus, peppermint, bay, basil, lime, lemon, thyme, rosemary.
10 Best Essential Oils for the Bath
- Bergamot for depression – 5 drops
- Chamomile for insomnia or itchy skin – 7 drops
- Frankincense for sedative, calming and mood sweetening – 8 drops
- Geranium for relaxing yet uplifting and energizing – 10 drops
- Jasmine for apathy, stress or fatigue – 8 drops
- Lavender positive, soothing and relaxing – 10 drops
- Neroli for hypnotic with antidepressant properties – 8 drops
- Patchouli for energizing and invigorating – 5 drops
- Rose for happiness and pleasure very romantic – 10 drops
- Sandalwood for sensual and mellowing a good aphrodisiac – 8 drops
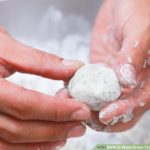
How to Make Bath Oil Beads
Bath oil beads are easy to make at home using a few specialty ingredients that you can find at natural health stores and drug stores. They can be used to promote relaxation, and healing essential oils can be used for various skin types and conditions. This recipe for bath oil beads yields approximately 10-20 beads, depending on their size.
- Step 1
Grind 2 teaspoons Epsom salts and 1 teaspoon sea salt in a clean coffee grinder or spice mill until a fine consistency is reached.
- Step 2
Combine 3 teaspoons baking soda, 1 teaspoon citric acid, 2 teaspoons corn starch, 1 ½ teaspoons goat milk powder, and the ground-up salts in a small mixing bowl. Mix thoroughly.
- Step 3
Combine 1 ½ tablespoons cocoa butter with ½ tablespoons virgin coconut oil in a small saucepan. Heat the mixture over low heat until completely melted, stirring occasionally.
- Step 4
Add 6 tablespoons of the dry ingredient mixture to a small mixing bowl, and stir in the melted cocoa butter mixture slowly. Add 20-25 drops of essential oil of your choice, or a combination of essential oils, and then mix thoroughly.
- Step 5
Form the resulting mixture into several small, round bath oil beads with your hands. These can be any size you like, but the smaller you make them, the more you’ll have to use per bath.
- Step 6
Add a handful of bath oil beads directly to your warm or hot bathwater, and soak in the tub to enjoy. Store the bath oil beads in a glass jar with a tightly-fitting lid and keep it in a cool, dry place.
Bath Salts Basics
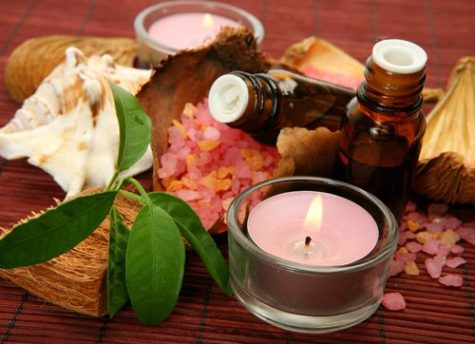
Bath salts are easily prepared, and are much preferable to the commercial mixtures, which tend to be irritating to the skin. They are also an easy alternative to using herbs in the bath, as this tends to be messy. The basic ingredients are table salt, baking soda (sodium bicarbonate) and Epsom salts (magnesium sulfate). Some herbalists also use borax. Add the ingredients to a large bowl or plastic bag in these proportions:
Basic Recipe For Bath Salts
- 3 parts Epsom salts*
- 2 parts baking soda
- 1 part table salt (or Borax)
Mix thoroughly. From this base, you can create any fragrance bath salts you desire. You can make up a large quantity of your favorite bath salt, or two or three fragrances, if you prefer. Simply divide the above mixture and set aside those portions to be separately mixed with the fragrance and colors of your choice.
It’s wise to add the power of colors to bath salts. Use plain food coloring for this purpose, letting it fall drop by drop onto the salt base. If two or more colors are required to mix an exotic hue (such as purple), mix these in a spoon first and then add to the salts to avoid creating a two-toned product.
Recommended colors for bath salt mixtures are included in many of the recipes. For those who read “Color: White,” you can simply leave them untinted. Add many drops for a darker colored bath salts; fewer for a lightly hued bath salts. Mix the color into the salts with a spoon until it is evenly distributed. Or, if you are using a plastic bag, you can shake and work the bag until you are satisfied with the color.
Now add the essential oils drop by drop, one ingredient at a time, until the scent seems right. Mix with a spoon (or shake) until all salt particles are moistened. Be prepared to spend some time doing this, perhaps a half hour or so. Here is where the plastic bag comes in handy!
If the Bath Salts are mixed for a ritual purpose, visualize the energies within the oils merging with each other and with the salt as you mix. Keep the salt’s goal in mind while you stir. Use or store until needed.
You can make your own bath salts blends using essential oils and oil blends for specific purposes, or you can follow this tag for specific bath salts recipes: Bath Salts

Golden Buddha Bath Salts
Lightly mix the ingredients together and place them in a jar for storage. A great prosperity blend.
- 1 cup salt
- 8 drops lotus oil
- 2 drops cinnamon oil
- 8 drops sandalwood oil
- 3 drops myrrh oil
- 2 drops allspice oil
Prosperity Dragon Smoke Bath Salts
Lightly mix the ingredients together and place them in a jar for storage.
- 1 cup salt
- 5 drops cherry oil
- 2 drops anise oil
Lavender Mineral Bath
Mix all ingredients well (adding the essential oil last) store in a glass jar or tin and use ¼ cup per bath.
- ½ cup solar dried sea salts
- ¼ cup Epsom salts
- ¼ cup dead sea mineral salts
- 40 drops lavender essential oil
Magickal Uses: clairvoyance, cleansing, consecration, happiness, healing, love, passion, peace, peace of mind, protection, psychic protection, purification, tranquility.
NOTE: Epsom Salts should not be used by diabetics or any other person with circulatory problems.
Bubble Baths
Bubble baths are simple to make. All you need is a bottle of clear organic shampoo, essential oils, and a handful of fresh or dried herbs (optional). Here’s an easy recipe:
Lavender Bubble Bath
- 1 bunch Lavender
- 1 large bottle clear organic shampoo
- 5 drops Lavender essential oil
- Clean wide-neck jar with screw top
Place Lavender head down in the jar. Cut down to fit. Add shampoo and Lavender oil. Close and place in sunny window. Strain and re-bottle. Use 1 tbsp. in a bath.
Magickal Uses: clairvoyance, cleansing, consecration, happiness, healing, peace, peace of mind, protection, psychic protection, purification, tranquility.
Bath Bombs
When I was younger, I loved bath bombs, but avoided them as I’ve gotten older because store bought versions typically contain artificial ingredients such as dyes and fragrances.
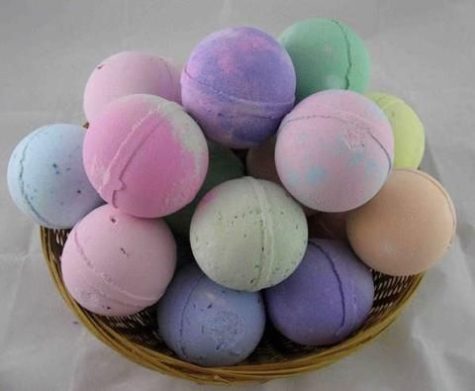
These homemade bath fizzies are a great solution! Made from nourishing sea salt or epsom salts, alkalizing baking soda and fizzing citric acid with a nourishing oil and vanilla base.
These can be packaged for a great gift or made countless ways for relaxing baths anytime! They are simple to make with kid-safe ingredients and are completely versatile. Let the kids think of ways to mix up the scents, colors, and other customizations.
Bath bombs only take seconds to make, so it is important to have the ingredients on hand and measured before you start. Most of the ingredients are pantry staples in many homes, but make sure you have these on hand:
- Baking Soda
The backbone of this recipe is alkalizing baking soda. It is a necessary complement to the acidic citric acid and part of the fizzing reaction. Food-grade aluminum free baking soda is best.
- Citric Acid
The more obscure ingredient in this recipe that a lot of people don’t have on hand is citric acid. It is necessary for the fizzing reaction that makes bath bombs feel like bathing in champagne. You can find citric acid on amazon, here’s a link: Citric Acid
- Corn Starch or Arrowroot
Corn starch provides the silky feel that we all love from bath bombs. I usually use organic corn starch powder in this recipe. Arrowroot also works but doesn’t provide quite as silky of a finished product.
- Salt, Oil and Liquid
These are all very versatile and you can pick any combination that you have on hand. You’ll need some kind of:
Oil: Pick a simple oil like olive oil, almond oil or coconut oil or get more fancy with sea buckthorn oil, argan oil or apricot oil.
Salt: Stick to basic salt or take it up a notch with epsom salt or another favorite salt option.
Liquid: Basic water works, but I also love using organic witch hazel for some extra skin soothing.
- Scents and Colors
This is where the options get endless. Use your favorite essential oils, add dried herbs or make them scent free. You can even add some natural dyes to change the color.
- Other Equipment
These are easy to make with measuring cups and your hands, but for a fancier and more uniform product, it helps to also have a digital scale to get the proportions exactly right.
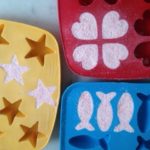
- Molds
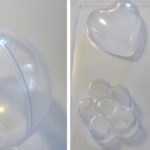
For the easiest version, just form these into balls with your hands, but if you are making as gifts or just want fancier shapes, molds are the way to go. You can buy actual bath bomb molds at amazon if you’d like. But you could also use those plastic holiday ornaments that come apart or Easter eggs for the molds if you already have either of those on hand. Some tutorials recommend greased muffin tins. I think those silicone ice cube and candy molds would also work just fine.
Here are a bunch of different ideas for molding your bath bombs:


- Added bonus
It seriously makes your whole room smell amazing while you make these!
Bath Bomb Basic Recipes
I found two basic recipes and am including them both here:
Bath Bomb Recipe 1
- 8 ounces Baking Soda (about 1 cup)
- 4 ounces Citric Acid (1/2 cup)
- 1/2 cup (4 ounces) Sea Salt or Epsom Salt
- 4 ounces Cornstarch (about 3/4 cup)
- 2 tablespoons oil of choice (this is my personal favorite but any liquid oil will work)
- 2 teaspoons witch hazel (or water) plus a little more if needed
- 1 teaspoon vanilla extract (or more water)
- 30-40 drops of Essential oils or powdered dried herbs (ginger is great)
Bath Bomb Recipe 2
- 4 oz. baking soda
- 2 oz. corn starch
- 2 oz. citric acid
- 2 oz. Epsom salt
- 1 to 1 1/2 teaspoons water
- 1 teaspoon essential oil
- 1 1/4 teaspoon oil (I like coconut or olive oil here)
- 1-2 drops food coloring (optional)
Makes two bombs (you can easily double or triple this recipe).
Instructions:
In a bowl combine the dry ingredients. Whisk to remove any clumps, corn starch tends to be clumpy. In a small glass jar stir together the wet ingredients. If you’re using coconut oil, give it a quick melt in the microwave or stove top first so it will more easily combine with the other ingredients.
Slowly pour the liquid mixture in with the dry mixture, whisking as you go. If you see the mixture fizz or foam, you may be adding the liquid too quickly. Once all the wet ingredients are combined with the dry, take a small amount in your hand and squeeze it together.
Mixture should hold together when squeezed without crumbling. It should stick together fairly well in one or two big chunks.
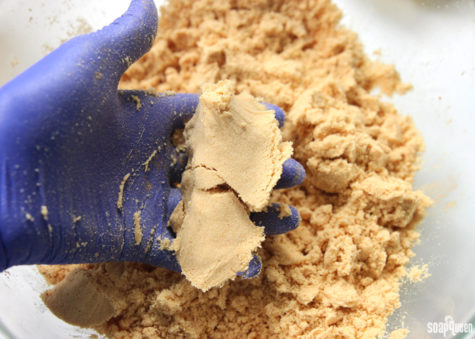
If it’s still too powdery to hold together, just add a tiny bit more water (or witch hazel) and mix until it does hold together.
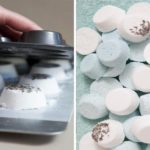
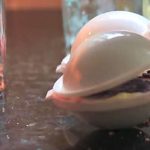
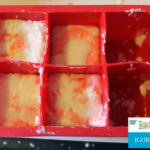
If you are using a mold that makes a ball, fill each half of your bath bomb mold with the mixture until it’s just overflowing a little. Press together, then gently remove one side of the mold. Place the bath bomb on a tray and allow to dry out just a little (10-12 minutes) before removing the other side. Once you are ready to remove the other side, gently invert the bath bomb so the uncovered side is facing down, then gently remove the other half of the mold from the top. The key word, if you haven’t noticed, is gently. These can fall apart on you very easily if you’re not careful. If a bath bomb does crack in half while you’re removing it, you can gently press it back on top of the other half, or remove all the mixture back to the mixing bowl and start the molding process again. I had this happen to a few, so don’t fret, it’s easy to fix.
If you are using tins or trays, quickly push mixture into the greased muffin tins or any other greased container. Press in firmly and leave at least 24 hours (48 is better) or until hardened. It will expand some and this is normal. You can push it down into the mold several times while it is drying to keep it from expanding to much. Using the metal molds will create a stronger and more effective final bath bomb.
Note: I have seen some reports of the bath bomb sticking to these type of molds and refusing to come out., so be sure it is well greased.
Once they are completely out of the mold, allow them to dry out for 8 hours or overnight. Once very dry, you can wrap them in plastic wrap and store in a dry place until you’re ready to use them, or you can gift them to friends.
Tips and Variations:
You can add dried flower buds, like lavender buds, to these pretty easily. Just remember to use food grade dried flowers to avoid flowers that might have been grown with pesticides as you don’t want to soak in a bath with that. No thanks! Do keep in mind that after using a bath bomb with dried petals, you will have to remove these from your tub. So if that bothers you, then leave the buds out.
If you want to create two tone bath bombs, just mix up your batter in two separate bowls and only add the food coloring to one. Easy!
Here’s a YouTube tutorial:
Bath bombs are a great way to relax in the tub after a long day of dealing with kids, cooking, and all the other activities that motherhood entails. If you’ve never tried them, I highly encourage it, as it’s one of my favorite things to do at the end of the day.
Fool proof homemade bath bombs These turned out to be a lot of fun to make, and they are even more fun to use! I highly recommend giving them a try, or you could make a batch to give away to friends or family. Enjoy!
Sugar Scrubs
Those expensive sugar scrubs you see in department stores and spas… they cost pennies to make! Sugar scrubs are a simple beauty recipe with countless variations, and they can be incredibly moisturizing and exfoliating to the skin.

They can be used on face, body, and (especially) feet, for silky skin. You can add endless ingredients for your desired outcome, and they take under ten minutes to make.
Ingredients
- 1/2 cup sugar (white or brown sugar- preferably organic)
- 1/2 cup oil (olive oil and coconut oil work great)
- Optional: essential oils of your preference
Instructions
- Mix all ingredients and store in an air tight jar.
- Use 1 tablespoon as needed in the shower. Scrub skin with the mixture and rinse will. it will leave your skin feeling like silk.
Sound simple? It is!
Variations
- Pumpkin Pie Scrub: 1 cup of brown sugar, 1/2 cup coconut oil, 1/2 tsp vitamin E oil and 1/2 tsp pumpkin pie spices (or just 1/2 tsp cinnamon)
- Vanilla Brown Sugar Scrub: 1 cup brown sugar, 1/2 cup almond oil, 1/2 tsp Vitamin E oil and 1 tsp real vanilla extract
- Lemon Hand Scrub (for after washing dishes): 1 cup white sugar, 1/2 cup olive oil, 1/2 tsp vitamin E oil, 15-20 drops (or more) of lemon or orange essential oil
- Vanilla Lavender Relaxing Facial Scrub: 1 cup white sugar, 1/2 cup almond oil, 1/2 tsp Vitamin E oil, 1/2 tsp real vanilla extract and 15 drops lavender essential oil
These last on the counter for up to 2 months (or more) and smell good enough to eat… Actually, they are good enough to eat, but don’t… sugar is bad for your intestines!
Salt Scrub
As an alternative to the sugar scrub, here’s a recipe for a salt scrub:
Pink Himalayan Salt Scrub
- 1 cup of Salt (your choice)
- ¼ to ⅔ cup of Oil (again, your choice, for this scrub I used equal parts of jojoba, avocado and coconut)
- 1 T Glycerin
- ½ t Vitamin E
- Approx 20 drops of essential oils (or more depending on oil and strength desired)
Instructions:
- Add ingredients to the bowl and mix well.
- Scoop into your jars and enjoy!
Variations:
For a grapefruit and ginger scrub, add the following ingredients to the basic recipe:
- 1 tsp grated fresh ginger,
- 1 tsp ground Frankincense
- zest of grapefruit
For a citrus and poppyseed scrub, add the following ingredients to the basic recipe:
- 1 tbsp poppyseeds
- zest of citrus fruit
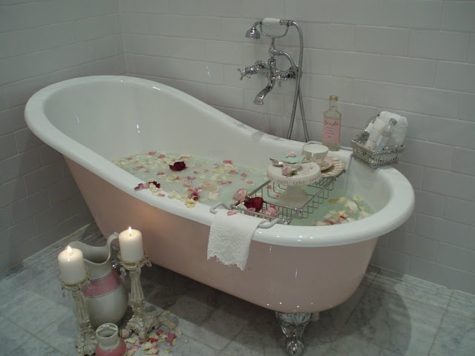
10 Steps to Your Most Heavenly Bath Ever
- Find the Quiet
The most essential factor for total decompression? Silence. Leave your phone in the other room. Tune out the noisiness of the world. Breathe.
- Dim the Lighting
Turn down the lights for a soothing ambiance, then burn a candle (or three). The warm, flickering light and aromatic scent will make your bathroom feel much more spa-like.
- Set the Temperature
Run the water hot, but not too hot. Select your preference to the touch, but bare in mind that water temp should be no more than 95 to 101°F. Any hotter will actually irritate your nervous system and make it harder to relax.
- Add Some Salt
Sprinkle Epsom salts into your tub as it begins to fill. These small miracles dissolve in water to soothe aching muscles, ease cramping, relieve stress, increase circulation and even detoxify your skin. Trust us, you’ll feel the difference.
- Add Some Suds
Next, pour some grown-up bubble bath in right where the faucet stream meets bath water. Not only will this pamper your skin, the scent and comforting bubbles will help you reach a deeper state of relaxation.
- Sip and Soak
This is a time to sit back and fully indulge. Our indulgences of choice? A crisp glass of white wine or soothing herbal tea to drink at leisure, depending on the mood.
- Lather Up
Clean skin is healthy skin. Work a rich, moisturizing bar soap into a foamy lather and cleanse from head to toe.
- Exfoliate Well
Before bath time is over, use a soft bristle body brush or loofah to gently buff, rid dead cells and reveal your softest skin.
- Dry Off
Getting out of the bath is never easy. But it will be light years better if you’re wrapping up in a plush, cozy robe afterward.
- Seal the Deal
Once you’ve properly dried, treat your skin to one last layer of pampering: A restorative body oil to lock in moisture…then promptly crawl into bed silky smooth and squeaky clean.
My Sources:
I pretty much looted the internet for all this cool info. Here’s a list of links to all the places I found cool stuff. If I missed a few, well… I’m sorry!
Sources:
In The Closet

Now that we’ve cleaned up our act, it’s time to take a quick look into our closets. If your life seems unbalanced or chaotic, your closets may be to blame. Think of the state of your closets as a feng shui test of your self-esteem. In feng shui closets, are connected to your innermost, your deepest, and often hidden feelings about yourself. Think of the state of your closets as a feng shui test of your self-esteem.
- How healthy is your self-esteem?
- How clean, peaceful and beautiful is your inner world?
Here is the thing about closets – most people think of closets as an “out of sight, out of mind” deal. Not true. Especially in feng shui terms, where we know that everything is energy. It is important to understand that with the feng shui energy, the “out of sight” strategy does not work. You cannot cover, conceal or pretend not to see low energy, because, in the world of feng shui energy, there are no boundaries.
Unfortunately, most homes have busy, cluttered and just plain ugly closets. This always puzzles me; if you just take a moment to think about it, once you open an ugly and messy closet and put your clothes on, you start carrying this ugly, messy energy with you! Please understand I do not mean this as a metaphor, but as an actual experience.
So, if you are working on improving the feng shui energy in your home, do not neglect your closets, put them high on your feng shui to-do list. For optimal feng shui or energy flow, take a look at your closets’ contents and doors, which may be keeping you awake or causing unnecessary grief. Explore relatively simple ways to redirect the room’s flow and help you get back on track.
Open your closets and take a look. No worries, nobody is looking, it is just you and your closet.
- What is it telling you?
If your closet is asking for some loving care, here are some easy feng shui tips:
Reflecting on Energy
Mirrors on the outside of bedroom closet doors are a feng shui no-no, reflecting yang energy, which affects relationship, intimacy and sleep, explains Ann Bingley Gallops, a New York city feng-shui consultant. Rather than replacing the closet doors, simply hang curtains in front of them. That way you can close the curtains before climbing into bed, and open them when you get up. If you prefer, cover the mirror with peel-and-stick frosted paper or with wallpaper. Pink, blue and green offer ideal feng-shui curtain or wallpaper colors, representing multiple emotions, including love and tranquility.
Color and Light
If you have a walk-in closet, be sure the lighting is friendly and warm. Good quality lighting is extremely important for your well-being, be sure to pay attention to its quality in your walk-in closets.
No matter big or small, walk-in or not, if your closet has not been given any attention for years, be sure to refresh your closet with a fresh coat of paint.
Yes, I do mean it and I am not crazy. Unless you plan to call California Closets for a complete makeover, you owe your closet space a fresh coat of paint. Plus, you get to take all your clothes out of your closet before painting, which should make the next step much easier!
Clean and Paint
Start by taking everything out of your closet completely. Take a bucket with 1 gallon hot water mixed with ½ cup vinegar and 1 tbsp of tea tree oil. After vacuuming the closet thoroughly, wipe clean the whole closet starting from top to bottom, including the walls and baseboards.
A fresh coat of paint will work wonders at this point. Leave the door open so the paint dries well, it should take 2 to 3 days. If in a hurry, a hand held fan will speed the drying process.
Clear the Clutter
If you open the closet door and don’t know where to begin, it’s best to remove everything. As you do this, sort each item into piles or boxes, such as what you’ll keep, what you no longer want or need, what you plan to donate to charity or sell, and items you plan to throw away.
Before you can apply the principles of feng shui, you need to make sure you absolutely love everything in your closet. The average person only wears 20 percent of his or her wardrobe, meaning that there are likely quite a few pieces in your closet that you could donate or re-sell without ever missing them. Plus, when you look and feel great in your clothes, this has a significant effect on your positive energy and how you see yourself.
To separate what stays and what goes, take everything out of your closet, then try everything on. Each item that fits, looks amazing on you, and makes you feel fabulous, goes back in. Anything that’s dated, worn, stained, unflattering or doesn’t fit stays out — for good. Decide which discarded pieces you could sell on consignment, if you’d like, then bag up the rest for donation.
- Note: Tomorrow we will be exploring some great ways to use these items to beautify other areas of our home, so before you make a trip the Planet Aid bin, stay tuned for what’s on tap bright and early tomorrow morning.
Organize
As you return items to the closet, do so orderly, using woven bins to keep small clutter items neatly out of direct sight. A quick trip to IKEA will arm you with all you need for an organized closet. From baskets to boxes and everything in between, you need to have a clear system as to what goes where. And for how long. Keep your closet up with the seasons and have a clear system of dealing with seasonal clothing.
The Fifty Percent Clearance Rule
This rule means that try to have your closet clear of fifty percent of the stuff so it is clear. There should be enough space in your closet so that you can see what is there without unsettling everything. If there are shoes on the floor of the closet, they should not be touching the stuff hanging in the closet. Try to give away all that you don’t need, doesn’t fit or you haven’t worn in more than a year. When you get rid of old, unworn clothes, you make up more space for fresh new clothes in your closet.
A full length mirror at the back of the closet will give the feeling of space and also help you locate items that are in the back.
Hanger Hangups and Solutions
Something as seemingly insignificant as closet hangers can improve feng shui flow. Match the hanger with its clothing. For example, use durable wood hangers for heavy coats or suits, and satin-covers hangers for lightweight dresses or lingerie. Rather than using hangers, use hooks to create space and improve closet organization. To help closet clutter, add a closet organizer system to help keep your wardrobe orderly and accessible.
Give Your Closet A Cohesive Look
Once you’ve properly aligned your clothes, you’ll want to make sure your entire closet space looks uniform. Simple changes, such as having matching hangers, making sure all hangers face the same way and placing items you can’t hang up in identical, labeled bins can bring unity to your closet. Doing this creates a harmonious flow by ensuring each component is standardized and easy for you to locate.
Beautify
Yes, beautify. This means treating yourself nicely and respectfully and creating a sense of beauty in your closets. Be it a small photo that brings happy memories, some feng shui crystals or well-displayed pieces of jewelry, beauty is the most healing energy and should be everywhere around you.
Easy, isn’t it? Easy and simple. Watch for profound changes coming along as you start treating your home, especially your closets, with proper respect. Ultimately, the respect you show your home speaks of the respect you have for yourself.
7 Closet Makeover Tips
How organized (or disorganized) your closets are can set the tone for your whole day.
If you can pick the perfect outfit with ease, and it emerges from the closet unwrinkled, ready-to-wear and with the right accessories standing by, you’ll begin your day in a more positive mindset. It’s a small thing that, 365 days a year, really adds up.
Whether you have a large walk-in or a small close in a New York City apartment, some of these 7 closet makeover tips are sure to give you better organization and more space.
1. Customize –
Customized solutions, such as clear plastic bins you can stack however you like, wire drawers, or hanging canvas shelves for shoes or sweaters, give you the storage solutions you need. Double hung rods can make the most of a small space, especially if the bulk of your wardrobe is pants and shirts (rather than dresses). Best of all, these do-it-yourself customizations don’t cost a lot.
2. Roll underwear –
Rolling underwear in plastic bins with drawers of different sizes helps you easily sort by style or color. Plus, rolled clothing takes up less space and stays neater.
3. Select the right hangers –
Fine lingerie and evening dresses should be hung on satin hangers. Hang coats on heavy wood hangers. Whatever hangers you select, make sure clothes stay on them, because there’s nothing zen about shirts on the closet floor. Short on space? Select slim profile hangers which can double or triple available hanging space.
4. Store clothes the right way –
In addition to getting the right hanger for each job, fold items that can stretch easily, such as t-shirts and sweaters, and stack on shelves.
5. Think outside of hangers and shelves –
Hang belts, ties, and even jewelry and scarves on pegboard lining the back or sides of the closet walls. A door with pegboard on the inside adds space to a small closet. Use hooks that hang on the closet rod for bags that might lose shape if they get stuffed inside a drawer or tucked on a shelf.
6. Shoe solutions: Bins or board? –
A diagonal plywood board takes up space but displays shoes conveniently and fashionably. Clear plastic bins or hanging canvas shoe shelves are good solutions for a smaller space.
7. Color-coordinate –
Once your closet is organized, you can go the next step by color-coordinating items of the same type (i.e., shirts, tank tops, skirts, pants, etc.) This gives a cohesive, professionally organized look to any closet. It’s easiest to organize items in the order of the colors of a rainbow: Red, Orange, Yellow, Green, Blue, Indigo, Violet, and then black and white.
The biggest challenge to organize is having items with no set space. Keeping an uncluttered home is really easy. Create a place for everything and, when you’re done using it, the item goes back in that place. This is especially true for closets.
You’ll reduce the amount of time you spend putting away laundry, because it will be a no-brainer every time. You’ll also reduce morning stress. You might even spend less money because you’ll know exactly what you have to wear; you won’t fight those “nothing-to-wear-blues” that lead to shopping sprees.
You might not believe that an organized closet can change your life, but you’ll see that it can.
Extreme Closet Reorganization
When it comes to closets, we could all use good chi. Classic feng shui strategies can be integrated into your space so that every time you open those closet doors you experience serenity and calm, rather than disorder and chaos.
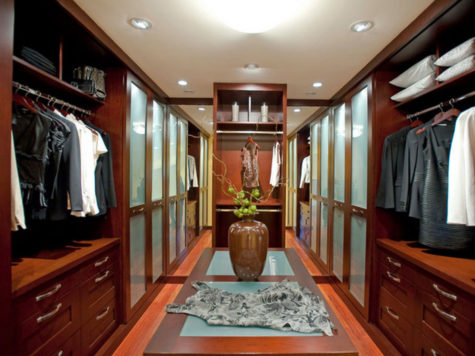
If you want to go to extremes, with your feng shui closet reorganization, or if you love to be thorough, you can create a positive energy flow with your pared-down wardrobe. by doing the following:
Place your clothes in this order, going from left to right, for each category:
- Your work clothes: these represent prosperity.
- Your casual wear: the clothes you wear on the weekends or when you’re hanging out with your family and friends represent your relationships with loved ones.
- Your creative wear: anything in your wardrobe that you wear when you’re crafting, gardening, baking and so on — these represent inspiration and your artistic side.
- Your formal wear: these items represent success.
- Your love life items: clothing you wear on date night, and your lingerie, represent love.
Color plays an important role in feng shui, even inside the closet. Once you have your clothes in the right categories, arrange them in the following color order, from left to right within each section: black, brown, blue, green, purple, red, orange, pink, yellow, white, metallic and grey.
Alternatively, rainbows symbolize blessing, hope, and a good future. Rather than opening your closet doors to a chaotic mix of colors, organize your clothes, use the rainbow as a guide — red, orange, yellow, green, blue, indigo and purple, and then black and white — to improve your home’s energy.
Arrange Clothes by Function
Organize your clothes in such a way that there is a system to them. Hang your shirts together, pants, skirts and dresses together. Then hang t-shirts together, tang tops and long sleeves shirts together. Finally arrange each piece of clothing by color. Hang all white dress shirts in one part, blank tank tops in another and so on. The same rule applies to your shoes at the bottom shelf of the closet. Make sure the shoes all point in one direction, facing the door. It’s a good idea to buy new hangers so your closet wears a new and neat look.
To the left of the closet, put your work or business clothes. That’s where your knowledge and prosperity are. In the middle of the closet place your casual, formal and weekend wear for your health, fame and career. Finally put your intimate clothes on the right of the closet to promote creativity.
Organize clothing by type
After you’ve organized by color, arrange your clothing by type within each hue. Place items from long sleeve to short sleeve and long dresses to short dresses (or vice versa). It doesn’t matter how you order your clothing types, just that you stay consistent in each section.
Here are a variety of simple inexpensive ideas for extreme organization. Note the heavy reliance on hangers and shower curtain clips:


Oh my! Does anyone actually have this many clothes? That they love, wear, and must keep?
Sources:
Deliciously Aromatic Cleaning Products
Here is a collection of recipes for some deliciously decadent wonderfully aromatic cleaning products that you can make yourself.

White vinegar is something of a super tool when it comes to cleaning. It’s non-toxic, inexpensive, easy to find, and cleans, oh, just about everything: It brightens windows, freshens laundry, banishes spots on carpeting, and much more. A spray-bottle of a vinegar solution is great to have around for pesky cleaning tasks (though, avoid using it on marble countertops and hardwood floors, since the acidity could damage them).
The most effective cleaning mixture is 50% white vinegar, 50% water, but you can also add fruit peels, herbs or essential oil to the bottle so your house will smell great, too. Just give it a shake and let it infuse for at least a week.
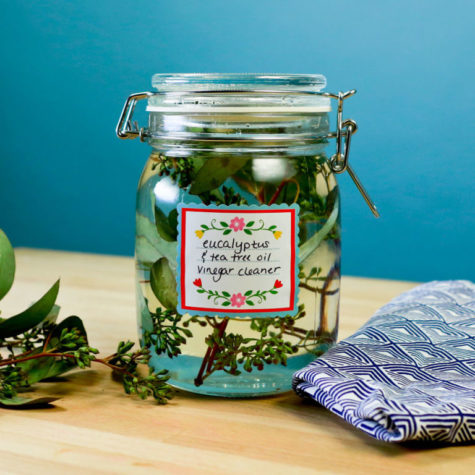
Here’s an all purpose recipe:
Get a spray bottle and fill it up. If you’re recycling a bottle from a previous cleaner make sure you rinse it out well before mixing your ingredients (duh).
You’ll need:
- Warm Water
- White Vinegar
- Isopropyl Alcohol
- Dish Soap (a drop)
- Fresh aromatic herbs and/or your favorite essential oil.
Put your leaves in the bottle and bruise them with a wooden spoon handle. You can also just twist them up or squeeze them in your hand. This activates the leaves to produce their natural oils. Make sure your herbs are very fresh so you get as much scent as possible from them. It’s really hard to completely mask the smell of vinegar but that’s just the price we pay for DIYing it. The smell quickly dissipates when it dries so it’s fiiiiine.
The mixture is easy:
- 1 part warm water,
- 1 part vinegar,
- 1/2 part alcohol.
- Add a DROP of dish soap and shake it up.
The herbs will permeate the mixture with their natural essential oils. Not only does it help cut the alcohol and vinegar scent some but herbs and essential oils also act as a natural antibacterial component.
There you go!
In summer I like to add orange or lemon peels. You can easily use essential oils to scent your spray as little or as much as you’d like. They work a little better since the scent is concentrated.
Note: You can refresh the scent with essential oils if and when your mixture begins to smell too much like vinegar.
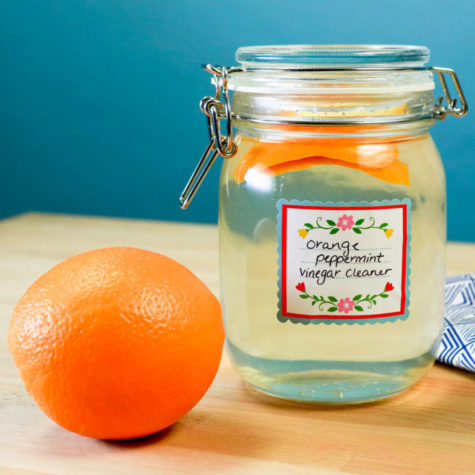
Variations
1. A Balanced Blend: Two or three pieces of lemon rind and a few springs of rosemary blend together to create a clean, fresh scent. Plus, the fruit’s acid adds extra cleaning properties — perfect for stubborn stains.
2. A Hint of Citrus: A little bit of essential oil goes a long way, and 2-3 drops of peppermint are just enough to lend an energizing burst to the summery scent of orange rinds.
3. A Cool Burst: A few sprigs of eucalyptus and 2-3 drops of tea tree oil create a stench-absorbing powerhouse — and some people believe tea tree fights bacteria, too. Whether that’s true or not, this combination is incredibly invigorating.
4. An Earthy Option: Infuse your solution with fresh sage leaves.
5. Spicy and Sweet: This recipe adds interest with orange peels, cinnamon sticks and vanilla beans. You could also add cloves, allspice, and nutmeg for something a little more seasonal.
6. A Relaxing Aroma: Infuse your vinegar solution with fresh lavender, lemon balm, or even delightful spicy scented geranium leaves.
7. Play with Oils: Essential oils come in many fun scents (and some will kill bacteria and mold). Just be sure to shake to combine before using. Add about 10 drops of a pure essential oil (no synthetic fragrances or you’re defeating the purpose of non-toxic cleaning) to your half vinegar-half water spray bottle. Of all the essential oils I’ve tried, peppermint is one of the few that actually masks the odor of the acetic acid in vinegar. Not a mint fan, try clove or eucalyptus which are also strong oils.
Sources: Good Housekeeping and Melodrama
- Radical Self Care Project Overview by shirleytwofeathers - No Comment
- Radical Self Care Image Gallery by shirleytwofeathers - No Comment
- It’s A Wrap by shirleytwofeathers - 3 Comments
- Something To Consider by shirleytwofeathers - 1 Comment
- Nurturing Your Precious Self by shirleytwofeathers - 3 Comments
Liana: A Prosperity Prayer
B. Joy Barrett: beautiful-turquoise-upholstered-accent-chair-for-living-room-with-within-colorful-accent-chairs-colorful-accent-chairs-transforms-the-look-of-a-room
Claudette Losier: Why Does It Work?
me: Make Your Own Violet Fire
Abdulrahman: Money Chant – Very Fast
Our current project began on July 4. We are exploring the concept and practice of Radical Self Care . Feel free to join in at any time!

Interested? You can visit our current project page, or you can take a look at the About The Project page if you are curious about the concept.
.
Please feel free to join in at any time! No experience necessary.
- Money Chant - Fast
- Money Chant - Slow
- Prosperity Plan
- Amazing Creator
- Cause and Effect
- I Am That I Am
- Spirit Rap
- Lakshmi Spirit Rap
- PowWow Spirit Rap
 Enter your question and receive the wisdom of the Occulatum. You may pose your question in any way that feels appropriate. The answer will come in the form of a small pop up. Try it - your life just might change for the better!


I think it's time to go shopping... maybe even buy some really cool stuff at my online shops!!