Seasonal Recipes
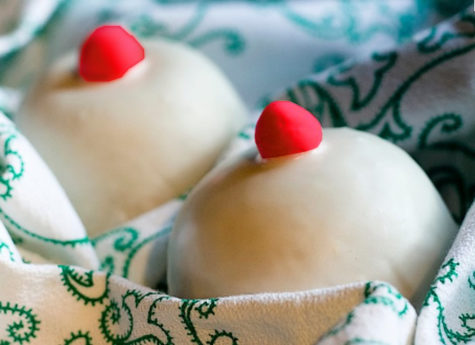
These baked “breasts” are one of many different versions of pastries made in honor of St. Agatha, the patron saint for breast cancer. St. Agatha was tortured and martyred in 251 A.D. In addition to many other tortures, her breasts were cut off. In Catania, Sicily, and other places around the world, her feast day (Saint Agatha’s Day) is celebrated with masses in her honor, large processions and symbolic foods, such as le minni di Sant’Agata (breasts of St. Agatha) or le minni di virgini (breasts of the virgin).
Traditionally, the breasts of Saint Agatha pastries consist of a delicate outer layer of pasta frolla (shortbread dough) in the shape of a breast, stuffed with custard, zuccata, chopped almond or pistachio, covered with pink icing and topped with a half candied cherry; another version is filled with ricotta and covered with white icing and topped with a chocolate chip.
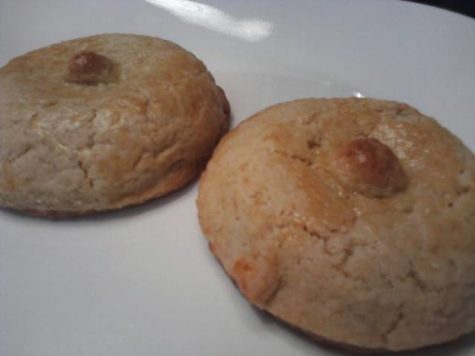
Personally, I prefer an unfrosted version (shown above) as it looks more realistic. My daughter and I actually made these, and they were delicious! We couldn’t decide which filling was better, so I’ve included both recipes. One is for a yummy orange flavored ricotta cream filling that stood up quite well to the molding process. The other is for a pastry cream that was also really yummy, but a little more difficult to work with when molding the breasts because it was so soft.
Ricotta Cream Filling – Make in advance and chill.
- 1 lb Ricotta (drained overnight)
- 2 tbsp Mascarpone
- 1/2 cup sugar
- zest of 1 orange
- 1 tbsp Grand Marnier
Cream together the ricotta, mascarpone and suger. When it is smooth and fluffy add in the orange zest and Grand Marnier. Mix well and chill until ready to use.
Pastry Cream Filling – Make in advance and chill
- 1 1/4 cups milk (whole or 2%)
- 1/2 vanilla bean, split lengthwise or 1 teaspoon pure vanilla extract or vanilla bean paste
- 3 large egg yolks
- 1/4 cup granulated white sugar
- 2 tablespoons all-purpose flour
- 2 tablespoons cornstarch
- 1/2 tablespoon liqueur (Grand Marnier, Brandy, Kirsch)
Dried Cherry, dried apricots, chocolate chips, or almonds (your choice) are used for the “nipple” of the breast shaped pastry.
In a medium-sized heatproof bowl, mix the sugar and egg yolks together. (Do let the mixture sit too long or you will get pieces of egg forming.) Sift the flour and cornstarch (corn flour) together and then add to the egg mixture, mixing until you get a smooth paste.
Meanwhile, in a saucepan bring the milk and vanilla bean just to boiling (just until milk starts to foam up.) Remove from heat and add slowly to egg mixture, whisking constantly to prevent curdling. (If you get a few pieces of egg (curdling) in the mixture, pour through a strainer.) Remove vanilla bean, scrape out seeds, and add the seeds to the egg mixture. (The vanilla bean can be washed and dried and placed in your sugar bowl to give the sugar a vanilla flavor.) Then pour the egg mixture into a medium saucepan and cook over medium heat until boiling, whisking constantly.
When it boils, whisk mixture constantly for another 30 – 60 seconds until it becomes thick. Remove from heat and immediately whisk in the liqueur (if using). (Stir in vanilla extract if using instead of a vanilla bean.) Pour into a clean bowl and immediately cover the surface with plastic wrap to prevent a crust from forming. Cool to room temperature. If not using right away refrigerate until needed, up to 3 days. Whisk or stir before using to get rid of any lumps that may have formed.
- You will also need:
Egg wash – We beat up an egg and added a small amount of water to it. You could also use the egg whites left over from the pasta frolla.
And to decide what you want to use for the “nipple” of these breast shaped pastries. We used semisweet chocolate pieces in some and raisins in others, but dried cherries, dried apricots, or almonds would work equally well.
Pasta Frolla for the Shells
- 4 cups sifted all purpose flour
- 1 cup granulated sugar
- 1/2 lb (2 sticks) salted butter
- 1 tbsp Agave Nectar
- 5 medium egg yolks, lightly beaten
- zest from 1 lemon
- 1/2 teaspoon baking powder
- 1 tablespoon Cognac
Mound flour on a flat surface and form a well or place into a bowl. Add the rest of the ingredients. Use your hands and mix it until it will shape into coarse crumbs of diverse sizes. Knead and bring the mixture together to form a ball. Fold and press with the palm of your hands; if dough is sticky, add some more flour, if it is too dry add a few tablespoons of water, to moisten it.
Do not over mix. Do not handle dough more than necessary. Form dough into a single mass and cover with a clean kitchen rag or with plastic wrap. Refrigerate dough from 30 minutes to 1 hour.
Preheat oven to 375 degrees and grease a baking sheet or line it with parchment paper.
Divide dough into 2 pieces and knead each piece briefly to compact; on a floured working surface, roll out one piece to 3/8 of an inch thick. Using a round cutter (or the rim of a glass) 3 inches across, cut 10 to 12 circles and place them 1 to 2 inches apart.on your greased baking sheet.
Knead the other piece of dough, adding in the scraps from the first. Compact it and roll it out 3/8 of an inch thick. Using a round cutter cut 10 to 12 circles slightly larger than the first set, and set aside.
Brush the first set of disks with the egg wash; place approximately 2 tablespoons of filling in the center of each one. Mound it up, but leave room around the edges. Put a chocolate chip or whatever you’ve decided to use for the “nipple” in the center on the top of the mound of filling.
Gently cover each with your second pastry circle. Carefully press it around the edges to seal it, as you do this, try to create a ‘breast-like: shape, pinching up on the pastry in the center to form a “nipple.” When it is pressed and sealed, use your round cutter to re-cut the edges. This will give your breast a nice round shape and help seal the edges even more. Remove the excess pastry dough.
Brush the formed pastries with egg wash. Bake the pastries for 15 or 20 minutes, or until they are a golden color. Place the pastries on a rack and allow them to cool before eating.
Credits:
Recipes for the Ricotta filling and the Pasta Frolla are by Sky Buletti. The pastry cream recipe was adapted from the Joy of Baking. Other fillings can be found at Sicilian Cooking Plus, and a nice tutorial on shaping the breasts can be found at Hi Cookery.

When you read the ancient and scholarly texts having to do with ancient Hellas, you will often come upon references to ‘honey cakes’ or ‘cakes’ in general. We might be tempted to interpret these to mean modern day cakes, but the ancient Hellenes would have most likely used flat cracker-type ‘cakes’, made from barley meal and honey. They were shaped to resemble animal or objects when the occasion called for it. unfortunately, no ancient recipe from Hellas has survived; perhaps because these cakes were known to all and passed down from mother to daughter from an early age. There was perhaps no need to write the recipe down at all.
The following recipe comes from an Alexandrian professor, Julius Pollux, who lived in the 2nd century CE. This is a simple, very basic recipe that may well have been used by the ancient Greeks and Romans.
Ingredients
- 200 g barley flour
- 100 ml water
- 3 tbsp clear honey
- 2 tbsp olive oil
These measurements will make enough cakes to sacrifice to the entire pantheon; I used half of these measurements (but see notes below) and ended up with five large cakes; far more than any sacrifice might call for. A quarter, or even an eighth, of the ingredients will make enough for an entire Noumenia sacrifice.
Preparation
Place the flour in a bowl, add the honey and olive oil and mix. Pour in the water little by little and continue mixing until a good dough is formed. Cool this in the fridge for about then minutes. I have found that using a quarter less water makes a better dough.
Tip the ball of dough onto a floured surface and roll out as thinly as possible. Use a pastry cutter to cut the dough and place the rounds on a greased baking tray.
The original recipe says to bake the cakes in an oven pre-heated to 200°C for about 15 minutes. I would suggest no more than twelve minutes, and will follow my own advice next time.
Transfer the cakes to a wire rack, cool and sacrifice. If you have made too many, save them in an air-tight container. The advantage of honey is not just its sweet taste, but its ability to keep pastry fresh for a long time, as it is an excellent liquid absorbent.
Source: Baring The Aegis
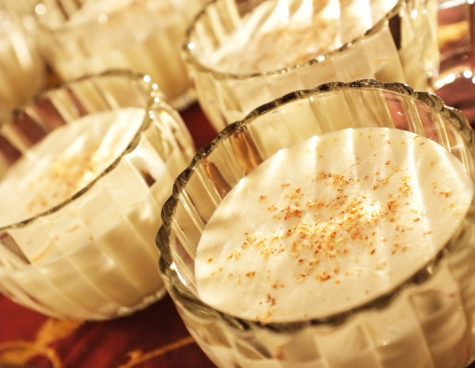
While culinary historians debate its exact lineage, most agree eggnog originated from the early medieval Britain “posset,” a hot, milky, ale-like drink. By the 13th century, monks were known to drink a posset with eggs and figs. Milk, eggs, and sherry were foods of the wealthy, so eggnog was often used in toasts to prosperity and good health.
Eggnog became tied to the holidays when the drink hopped the pond in the 1700s. American colonies were full of farms—and chickens and cows—and cheaper rum, a soon-signature ingredient. Mexico adopted the very eggnog varietal “rompope,” and Puerto Rico enjoys the “coquito,” which adds coconut milk. The English name’s etymology however remains a mystery. Some say “nog” comes from “noggin,” meaning a wooden cup, or “grog,” a strong beer. By the late 18th century, the combined term “eggnog” stuck.
Eggnog purists argue that those who don’t like the Yuletide drink have simply never tasted the real thing. Sugar-laced supermarket versions can’t hold a candle to the homemade goodness, especially since the US Food and Drug Administration permits that the drink can be made from as little as 1% egg yolk. That often borders on “milknog” or egg flavoring.
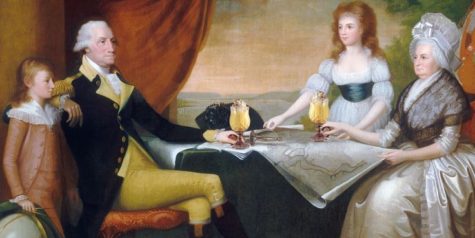
Our founders would have had none of that. George Washington even penned his own famous heavy-on-the-alcohol eggnog recipe. Only one problem: he forgot to record the exact number of eggs. Cooks in his era estimated a dozen would do:
One quart cream, one quart milk, one dozen tablespoons sugar, one pint brandy, 1/2 pint rye whiskey, 1/2 pint Jamaica rum, 1/4 pint sherry—mix liquor first, then separate yolks and whites of eggs, add sugar to beaten yolks, mix well. Add milk and cream, slowly beating. Beat whites of eggs until stiff and fold slowly into mixture. Let set in cool place for several days. Taste frequently.
Here’s another recipe:
Ingredients:
- 12 eggs
- 1 1/2 cups sugar
- 1/4 tsp salt
- 1 qt heavy cream
- 1 qt milk
- 1 qt bourbon whiskey
- 1 cup rum
- nutmeg
Separate the eggs. Beat the egg whites together until stiff, then beat in a 1/2 cup of sugar. Beat the egg yolks until pale and light. Add the remaining cup of sugar and a 1/4 tsp of salt.
Combine the egg mixture with the milk and the bourbon. Beat well, then add the cup of rum. Pour into a jug and store in a cool place. Shake or stir thoroughly before serving. Ladle into small cups and sprinkle with nutmeg. Serves 30.
Note:
Make this about a week before serving to allow it to mellow. Scotch whiskey or rum may be substituted for the bourbon.
Death By Eggnog
And as you enjoy your holiday cheer, please drink responsibly. As you can see in the following report about Death By Eggnog, too much of a good thing can be … well… deadly!
The testimony and investigation into the death of Addison Williams, dated 18 January 1873, can be found in the Bedford County Coroners’ Inquisitions, 1813-1899. The collection is open for research and available at the Library of Virginia.
On 25 December 1872 in Bedford County, VA, Williams paid a visit to the home of Cornelia and Charles Abram. He arrived “about light” and was given a dram of whiskey by William Ogden. Ogden then made a gallon of eggnog, and Williams “drank a glass and repeated several times.” Everyone present “drank eggnog freely,” but Williams enjoyed it most of all, drinking more than the rest of the party.
He “left the house and threw up,” only to come back and take another drink. Afterwards, Williams “left in a run, as in a prank,” never to be seen again. Williams “had commenced showing he was under the influence of liquor,” but no one at the party thought him too drunk to make it home. As one party goer put it, “…as I thought he was going so well it was useless for me to go with him.”
Unfortunately, Williams could have used a little assistance. He was found on Christmas morning “dead and frozen” mere yards from his house. The resulting coroner’s inquisition determined Williams came to his death as a result of “being exposed to the cold after drinking a large quantity of mean whiskey.”
Sources:

For the Wassail’s Baked Apples:
- 1 dozen cooking apples
- 1 cup brown sugar
- 3 tablespoons cinnamon
- butter or margarine
- 3/4 cup boiling water
- 2 tablespoons sugar
Core apples and place in an 8 X 8 inch baking pan. Mix sugar and cinnamon, fill apples with mixture, dot tops with butter. Add boiling water and sugar to pan and bake at 375 degrees Fahrenheit for 40 to 60 minutes.
For the Wassail:
- 1 cup water
- 4 cups sugar
- 1 tablespoon nutmeg, grated (for luck)
- 1/2 teaspoon mace
- 2 teaspoons ginger (to prevent arguments)
- 6 whole cloves (to influence people in high places, and for luck)
- 1 stick cinnamon (same as cloves)
- 6 whole allspice
- 1 dozen eggs, separated
- 4 bottles sherry
- 2 cups brandy
Combine first eight ingredients in a saucepan and boil for 5 minutes. Beat egg whites until stiff. In a separate bowl, beat egg yolks. Fold whites into yolks. Strain spice mixture into egg mixture and stir. Combine sherry and brandy and bring almost to a boil. Gradually add liquor to spice and egg mixture, stirring rapidly as you do so.
Before serving, add baked apples to foaming liquid. Serve in a large cauldron.
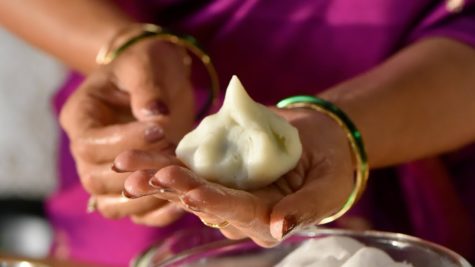
The following recipe will make approximately 20 lime-sized modakas, a treat for the children, and a traditional offering to Lord Ganesha. It takes about two hours to make them.
Ingredients and Utensils:
- 1 lb rice flour
- 2 cups jaggery (or 2 cups brown sugar with 4 tbsp dark molasses added)
- 2 cups raw sesame seeds
- 2 grated coconuts (optional)
- 2 cups melted ghee (melted butter will also work)
- 1 tsp salt
- Banana leaf or waxed paper
- A flour sifter or fine sieve
- An iddli or vegetable steamer
Directions:
Roast the sesame seeds in a pan, without oil, until golden brown (5 to 10 minutes). Crack the seeds by rolling with a rolling pin or pounding. Add 4 tbsp ghee to the jaggery to soften it, and then mix in the sesame seeds and coconut thoroughly. (This mix may be refrigerated in jars for making quick sweets simply by adding a bit of ghee and shaping the dough into balls).
Next sift the rice flour and toast it without oil until it browns slightly – about 5 to 7 minutes. Spread it out on a tray or table top when done, and allow cooling completely.
While the rice flour is cooling, bring approximately a half-gallon of water, with a tsp of salt, to a rolling boil. Put the cooled, toasted rice flour in a bow. And make a well in the middle. Slowly pour a small amount of the hot water into the well and begin working it into the rice flour with your hands.
Keep adding small amounts of the hot water, and work the flour into a ball of dough. It should be moist but not wet when you put it out on the table or breadboard. Knead the dough thoroughly so it is even in moisture and texture.
Next, place water in the bottom of the steamer and bring to a full boil. Spread a thin coating of ghee or oil on a piece of banana leaf or waxed paper. Take a lump of dough half the size of a lime and work it in your hands for a moment to remove the air and then pat it out flat and round on the leaf, about as wide across as your palm. Make it a uniform thickness so it will cook evenly.
Place a lump of the sesame-jaggery-coconut mixture into the center and wrap the dough up around the mixture. Pinch the dough into a cone-shape over the stuffing and wrap the leaf or paper up around it. (The modakas can also be round if desired.) Repeat until you have enough to fill your steamer.
Place the assembled modakas in the steamer, spaced so as to not touch one another. Cover and steam until done (15 to 20 minutes). While they cook you can prepare the next batch. When cool enough to handle, dip the modakas in melted ghee. Now they are ready to offer.
from Loving Ganesa
by Satguru Sivaya Subramuniyaswam
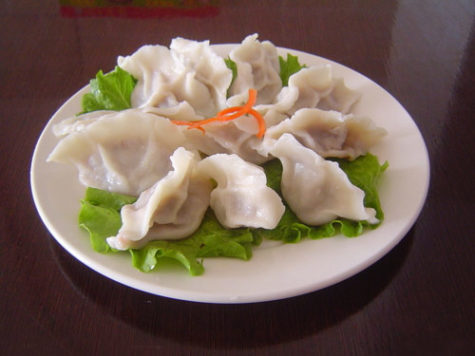
In northern China, people eat lamb dumplings for the Dōngzhì Festival, a tribute to the Han Dynasty physician, Zhang Zhongjing, who served this warming food to poor farmers suffering from frostbite during one particularly cold winter.
Celebrating the Dōngzhì Festival is all about understanding the simple enjoyment of a warm, fortifying meal on a cold winter night in ancient China. It’s that same feeling you had as a child when you came in from a day of playing in the snow to a cup of hot cocoa or a bowl of steaming soup.
Against that backdrop, this lamb dumpling recipe is the perfect match. The rustic taste of lamb, combined with a black vinegar and chili dipping sauce, gives these dumplings a distinctly northern Chinese flavor. A perfect meal to serve during the depths of winter.
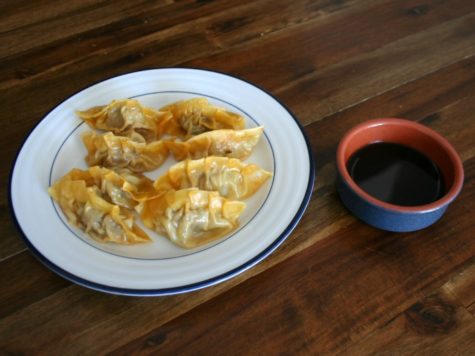
In contrast to traditional pork dumplings, which can be fried as potstickers, these lamb dumplings are either steamed or boiled in thin gow gee dumpling wrappers. The boiled dumplings are soft and slippery, while the steamed dumplings are more elastic, but both versions produce a satisfying broth that makes the dumplings feel like xiao long bao.
If your Chinese market is in a predominantly Cantonese neighborhood, you may find that it doesn’t carry lamb. In that case, a halal market will probably be your next best bet. Make sure to pick a relatively fatty ground lamb mix, so that your dumplings produce a rich broth.
Lamb Dumplings Recipe
Ingredients
- 10 ounces Chinese cabbage
- 1/2 teaspoon salt
- 1 pound ground lamb
- 4 tablespoons Shaoxing rice wine
- 4 tablespoons dark soy sauce
- 1 tablespoon dark soy sauce
- 1 tablespoon ginger
- 4 green onions
- 1 teaspoon cumin
- 80 gow gee dumpling wrappers
Directions
1. Finely mince the cabbage in a food processor. Place in a large bowl, sprinkle with the salt and set aside for 10 minutes.
2. Add the lamb, ginger, green onion, soy sauce, rice wine and cumin to the food processor. Pulse 5 times until the ingredients are combined well. Set aside.
3. Place the cabbage on a kitchen cloth, twist the top and squeeze out as much liquid as you can. Add the dry cabbage to your pork mixture and combine in the food processor with another 5 pulses.
4. Spoon 1 rounded teaspoon of the filling mixture in the center of each dumpling wrapper. To wrap a dumpling, dab water along the inside edge of the wrapper, fold in half to form a semicircle enclosing the filling, then seal the edges together to stick. Finally, fold 5-6 small pleats around the top edge of the dumpling. Repeat until all of your dumplings are done.
5. Separate the dumplings you’ll need for your meal and then freeze the rest in a heavy plastic bag for later.
6. There are two easy ways to cook dumplings.
– To boil: Bring a large pot of water to a boil. Add 15 dumplings to the pot and boil for 9 minutes, stirring occasionally to prevent them from sticking to the bottom of the pot. Remove the dumplings from the heat and drain, repeating with any remaining dumplings.
– To steam: Place a bamboo steamer in a large pot or wok and heat water to a boil. Place 15 dumplings in a single layer in the bamboo steamer, cover and steam for 9 minutes. Remove the dumplings from the heat.
7. Serve immediately with chili sauce, black vinegar or soy sauce for dipping.
Makes: 70-80 Dumplings | Prep Time: 1 Hour | Cook Time: 10 Minutes
Source: Chinese American Family
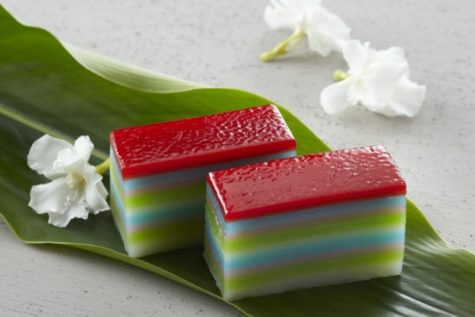
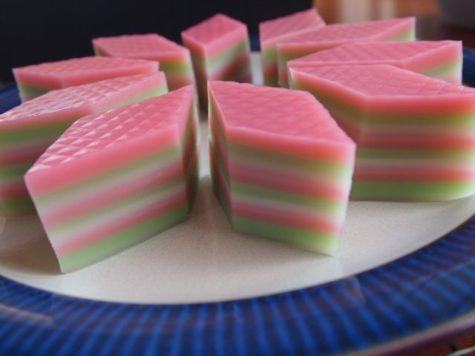
Nine Layer Cake, also known as 九层糕 in Chinese, or Kueh Lapis in Malay, is a well-loved Singaporean tea-time treat, famous for its nine distinctive colors. This cake is traditionally eaten during the Double Ninth festival, it is also a popular choice for breakfast or dessert.
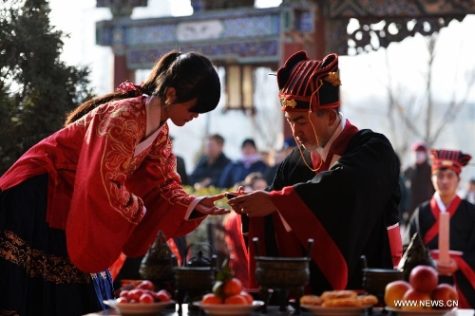
During the Winter Solstice, the people of Taiwan have their own unique custom of offering nine-layer cakes as a ceremonial sacrifice to worship their ancestors. These cakes are made using glutinous rice flour in the shape of a chicken, duck, tortoise, pig, cow or sheep, and then steamed in different layers of a pot. These animals all signify auspiciousness in Chinese tradition.
“The making of this Kueh is a carefully handcrafted process, which requires patience, dedication and love; each layer must be treated with delicacy.”
Ingredients
- 400g tapioca flour, sieved
- 80g rice flour, sieved
- 1kg coconut milk
- 6 ½ cups water
- 400g white sugar
- ¾ tsp salt
- Pandan leaves
- 5 different food coloring, depending on personal preference
Directions
Boil the sugar and pandan leaves in a pot of water. Add a pinch of salt. Boil till the sugar dissolves completely. Set aside to cool completely. Strain to remove the leaves.
Mix tapioca flour and rice flour together in a mixing bowl. Add the pandan leaves-sugar mixture to the flour mixture. Mix well until a smooth consistency is achieved.
Sieve the coconut milk and add into the dough mixture. Mix well until a smooth and silky consistency is achieved.
Divide the mixture equally into 5 bowls. Add a different food coloring to each bowl.
Brush a tray with oil that has been cooked with pandan leaves. Put the tray in a steamer, be careful not to drip water vapor into the tray. Steam each colored layer for about 5 minutes, starting with the white layer and ending with the brightest color.
Repeat the process until the mixture is used up.
Remove the tray from the steamer and set aside to cool completely. Remove Kueh from the tray and cut into serving portions.
Tips
- Strain the coconut milk and sieve the flour to achieve a smooth consistency.
- Breaking up the veins of the pandan leaves help the aromatic fragrance to be extracted more easily. If you prefer, you can also cut the pandan leaves into small pieces instead. However we prefer to tie the leaves together so they can be easily removed.
- Always stir the batter before pouring in each layer to ensure a uniform consistency.
- Always check that the previous layer has completely set before adding the next layer.
- Ensure that the Kueh Lapis is completely cool before attempting to remove it from the tray, otherwise it may stick to the pan and be very difficult to cut.
- You can wrap any leftover Kueh Lapis in plastic to prevent them from sticking together, then store in the fridge.
Source: My Singapore Food

Wassailing means “to wish health to” one’s apple trees, in the hope that they will bear well. In addition, drums, bells, whistles etc. were used either to scare off evil spirits, or to wake the tree up; a libation of cider or ale was poured over the roots, and bread that had soaked in the ‘wassailing’ bowl was placed in the branches – an offering back to the tree.
Note:
Recipes for wassail are numerous and varied. Some call for the use of apple cider, some for wine. The basic idea is that you are making a hot spiced drink and serving it in a bowl amidst love and laughter. Here is a simple recipe that calls for cranberry and orange juice. Feel free to experiment and substitute.
Ingredients:
- 4 cups cranberry juice
- 1/2 cup grenadine
- 2 cups orange juice
- 1/2 cup rum (optional)
- Sugar or honey – to taste
Directions:
Put everything into a large soup or stock pot and bring to a low simmer. If you added honey or sugar, mix gently until it dissolves. Lower the heat and very low simmer the mixture for 2 hours before serving. Keep it on low or use a crockpot on low if serving over hours. The longer you heat, the more infused the flavors will be.
Orange slices or orange wedges studded with cloves, cinnamon sticks, and cranberries can be floated in the pot and simmered along with the rest of the ingredients.
When you are ready to serve your Christmas Wassail, just ladle into your favorite mug and enjoy. This delicious and warm drink is a holiday treat! Garnish with a cinnamon stick if you like.
Source: Earthwitchery
Figgy pudding is a pudding resembling something like a white Christmas pudding containing figs. The pudding may be baked, steamed in the oven, boiled or fried. The history of figgy pudding dates back to 16th century England. Its possible ancestors include savory puddings such as crustades, fygeye or figge (a potage of mashed figs thickened with bread), creme boiled (a kind of stirred custard), and sippets. In any case, its methods and ingredients appear in diverse older recipes.

Today, the term figgy pudding is popularized mainly by the Christmas carol “We Wish You A Merry Christmas,” which includes the line, “Now bring us some figgy pudding” in the chorus.
And here it is (from Food.com) a recipe for Figgy Pudding. This is not a traditional pudding, it’s actually more bread or cake-like. The taste may be a little strange to some, but it smells and tastes like Christmas. The figgy pudding should always be served warm. If you can’t serve it fresh out of the oven, it will taste just fine to warm it in the microwave for a few seconds.
Ingredients:
- 16 ounces dried figs
- 1 3/4 cups milk
- 1 1/2 cups all-purpose flour
- 1 cup sugar
- 2 1/2 teaspoons baking powder
- 1 teaspoon ground nutmeg
- 1 teaspoon ground cinnamon
- 1 teaspoon salt
- 3 eggs
- 1/2 cup melted butter
- 1 1/2 cups breadcrumbs
- 1 tablespoon grated orange peel
Directions:
Preheat oven to 350 degrees F. In a a medium saucepan, heat milk and chopped figs over medium-low heat but do NOT bring to a boil. Cook for 10-15 minutes stirring occasionally. The the milk will soften the figs.
In a medium bowl mix flour, sugar, baking powder, nutmeg, cinnamon, and salt. In a large bowl, beat eggs one minute on high. Reduce speed to low and add butter, bread crumbs, orange peel, and warm fig mixture. Slowly incorporate flour mixture. Beat until just blended.
Pour the mix into the greased bundt pan. Level top as much as possible. Cover the mold with a piece of aluminum foil greased on one side, greased side down. Place the mold in a roasting pan and place on oven rack. fill with hot tap water 2 inches up the side of the mold. Bake for 2 hours or until the pudding is firm and it is pulling away from the side of the bundt pan.
Remove the pudding from the water bath. Remove the foil and cool on a wire rack for 10 minutes before unmolding. Invert bundt pan onto a serving plate and remove mold. It should come away easily.
Serve with a hard sauce.
 Ingredients:
- 2 cups powdered sugar
- 1 egg white
- 1 TBSP. corn syrup
- 1/2 tsp. vanilla
- 1/3 cup cornstarch
- colored icing
- 1 fine paintbrush
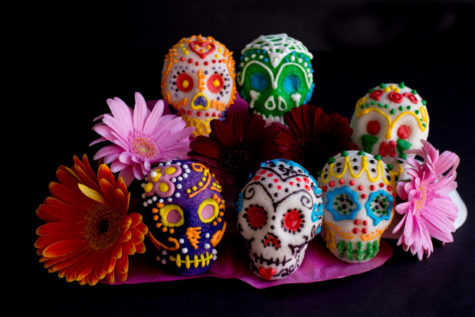
Sift powdered sugar. Mix the egg white, corn syrup, and vanilla in a very clean bowl, then add the powdered sugar with a wooden spoon. When almost incorporated, start kneading with the tip of your fingers until you can form a small ball. Dust with cornstarch on board. Keep on kneading until smooth, then form into skull shapes. Let dry completely, then paint with colored icing, including the names of the people you are giving them to.


I think it's time to go shopping... maybe even buy some really cool stuff at my online shops!!