Science Projects
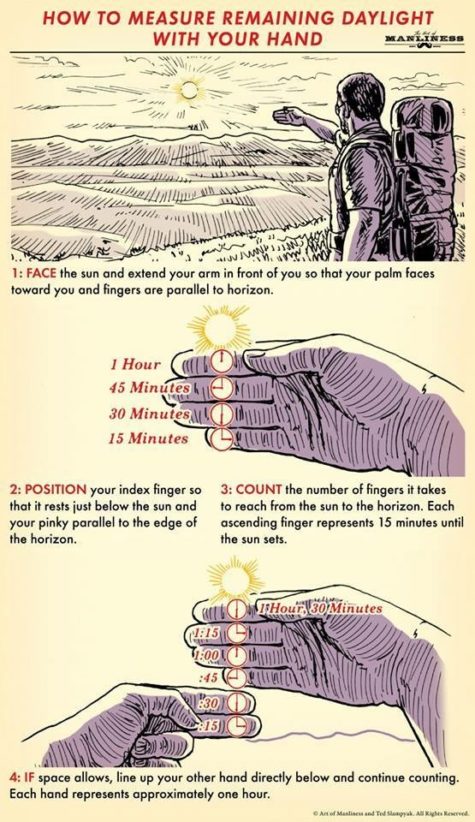
This nifty infographic shows you how to measure remaining daylight with your hand! Here’s how it works:
- 1. Face The Sun
Face the sun and extend your arm in front of you so that your palm faces toward you and your fingers are parallel to the horizon.
- 2. Position Your Index Finger
Position your index finger so that it rests just below the sun, and your pinky finger is parallel to the horizon.
- 3. Count The Number
Count the number of fingers it takes to reach the sun from the horizon. Each ascending finger represents 15 minutes until the sun sets.
- 4. If Space Allows
If space allows, line up your other hand directly below and continue counting. Each hand represents approximately one hour.
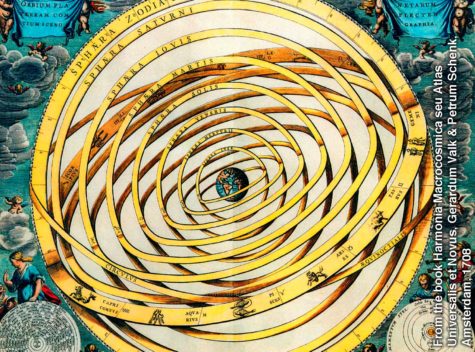
What follows is a cool explanation of what Eudoxus and Aristotle thought about planetary motion.
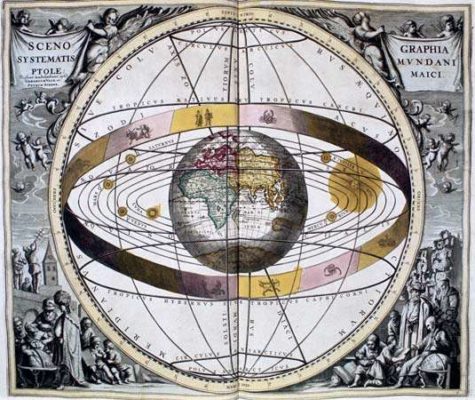
The ancient Greeks used various Earth-centered models to describe the motions of the heavenly bodies (stars, Sun, Moon, and planets). One of these models is based on the idea that the heavenly bodies are attached to a bunch of nested spheres. The outermost sphere rotates at a steady rate. The next sphere is attached to the first one, forcing it to rotate along with it, but in addition it has its own rotation. The result is that this sphere undergoes a more complicated “double rotation.” By nesting multiple spheres together in this way, it is possible to build up complicated motions that mimic the apparent motions of the heavenly bodies.
You’d think there would be nice animated illustrations of this stuff on the Web somewhere, but I didn’t manage to find any, so I made my own.
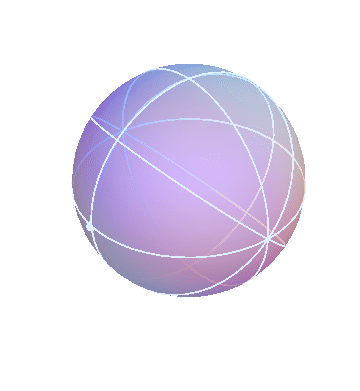
The motion of the stars
The apparent motion of the stars across the sky is relatively simple. The stars appear to lie on a spherical surface surrounding us, and to rotate about the north-south axis once per day (or rather, once per sidereal day). In the homocentric sphere model, we just need one sphere to explain this motion:
The stars are all attached to this sphere, which rotates once per sidereal day. The Earth (and you, the observer) are located right at the center.
By the way, this sphere, like all the spheres I’m going to show you, is marked with latitude and longitude lines, and also with one dot on the equator, just to make it easier to see when one complete rotation has occurred.
- One additional note:
If you know about procession of the equinoxes, which is the very slow shift in the axis about which the stars seem to rotate, you might wonder how to account for it in this model. The answer is that you attach this sphere to another, slightly large one, and have the larger one rotate very slowly.
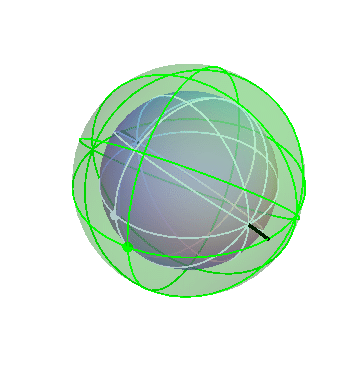
The Sun and Moon
The Sun rotates around the north-south axis once per day (like the stars), but in addition it gradually drifts from west to east, taking one year to go all the way around. The homocentric sphere model can account for that by using two spheres:
The outer (red) sphere rotates once per sidereal day. The inner (blue) sphere is attached to the red sphere, so it “inherits” that sphere’s daily motion. But in addition the blue sphere turns slowly in the opposite direction, about a tilted axis. In the picture above I made the blue sphere turn one-tenth as fast as the red sphere. Really it should be 1/365th as fast, so that one blue-sphere-cyle lasts a year, but I think it’s easier to see what’s going on this way.
In this picture, the Sun is the big dot on the blue sphere. (The dot on the red sphere doesn’t correspond to anything in particular; it’s just there for reference.) Note how, during each cycle of the red sphere (that is, each day), the Sun goes around the sky once, but comes back slightly shifted. It’s easiest to see this during the times when the dots on the two spheres are near each other.
You can use exactly the same setup to get a pretty good explanation of the Moon’s motion. The main difference is that the Moon takes a (sidereal) month to drift all the way around the sky, rather than a year. So the Moon gets two spheres, like the Sun, with the outer one turning once per day and the inner one turning once per month.
That picture doesn’t actually get the Moon’s motion quite right: the Moon wobbles up and down with respect to the ecliptic, with a period that is slightly different from its orbital period. (The time for one such wobble is called the “draconitic period,” if you must know.) It turns out that the nice way to account for that is to use three spheres rather than two to describe the Moon’s motion. The third sphere, which goes in between the others, rotates very slowly, causing the plane in which the Moon seems to move to wobble around at the right rate.
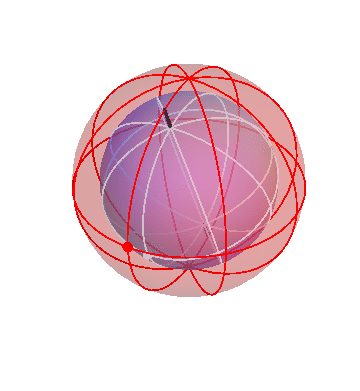
The planets
The apparent motion of the planets is more complicated than the Sun and Moon: the planets drift across the sky with respect to the Sun at varying speeds, and even turn around and undergo retrograde motion at quasi-regular intervals.
Of course, we now know that this is caused by the fact that we are observing the planets from the Earth, which is itself moving, but before people figured that out, they accounted for it by giving the planets complicated combinations of motions of their own. In particular, in the homocentric sphere model, we need more spheres to explain the motion of the planets than we do for the stars, Sun, and Moon.
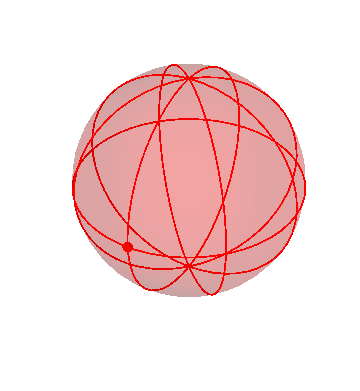
Let’s put together a model for planetary motion piece by piece. First, suppose that I have just two spheres, which rotate at the same rate, but about two different axis:
The outer (green) sphere is just turning at a steady rate. It carries the inner sphere around with it, while the inner sphere itself rotates in the opposite direction about its own axis (the black lines).
Suppose that a particular planet, say Mars, is located on the inner sphere at the location of the dot. If you observed this planet from the Earth (located at the center of the spheres), you would see it wobble back and forth. (The dot on the outer sphere doesn’t correspond to any actual object; it’s just there as a reference point.)
In fact, though, that’s not what the planets do! They mostly drift around one way, namely from West to East, but occasionally turn around and go backwards. We can make that happen by nesting this pair of spheres inside a third sphere, which slowly carries the other two around:
If you stand at the center of these spheres and watch the white dot, you’d see it move in pretty much the way the planets actually do move: gradual drifts from west to east, punctuated by periods of retrograde motion.
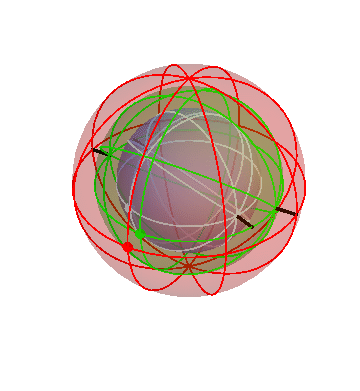
Actually, there’s one important thing I’ve left off here! The above picture just shows the slow drift of the planet with respect to the stars. To be specific, when you look at this animation, you have to imagine that the time period it shows is of the order of years, not days. In addition to this slow motion, the planets, like everything else in the sky, swing around the north-south axis once per (sidereal) day. So to account properly for a planet’s motion, we need to embed this whole combination inside of yet another fast-rotating sphere, which carries the whole thing around once per day. I think that this picture with three spheres is confusing enough, so I’m not going to show you the four-sphere version.
It’s kind of hard to see what’s going on in that three-sphere picture. It might help to “zoom in” gradually on the inner sphere, just to get a clearer view.
Here’s the three-sphere picture again (exactly the same as the one above):
Now I’ll make the outermost sphere invisible, to make it easier to see the inner ones:
Finally, I’ll make the second sphere invisible:
Here you can see the complicated motion of that inner sphere, caused by the combination of the motions of all three spheres.
Source: facultystaff.richmond.edu
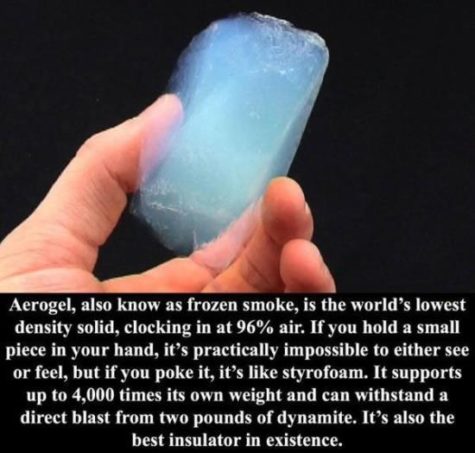
Aerogel is made from Silicon Dioxide, the same material as ordinary glass, only 1,000 times less dense.
Developed by NASA, Aerogel is the lightest and lowest-density solid known to exist. A truly remarkable material, Aerogel holds an unbelievable 15 entries in the Guinness Book of World Records, including best insulator and lowest density solid.
Aerogel is composed of amorphous Silicon Dioxide, and 99.8% Air. Its melting point is 2,200 degrees F (1,200 degrees C). Being the world’s lightest known solid, it weighs only three times that of air (with a density of just 3 milligrams per cubic centimeter).
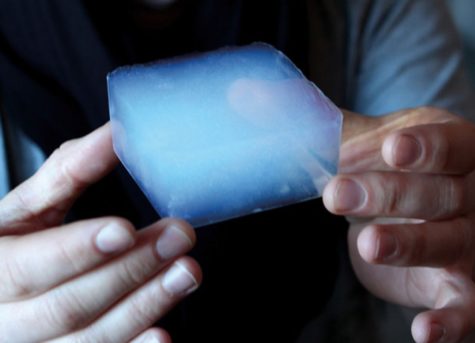
When handled, Aerogel feels like a very light, hard foam. Being chemically similar to glass, it also happens to shatter like glass, yet is incredibly strong structurally, and can support thousands of times its own weight. Theoretically, a block weighing less than a pound could support a weight of half a ton.
Due to its microstructure, Aerogel is a powerful desiccant, rapidly absorbing any moisture in your fingertips when held. This usually leaves some dry spots on the skin that disappear in a short time.
Aerogel’s true strength is its incredible insulating properties. It negates just about any kind of energy transfer – thermal, electrical or acoustic. A one-inch thick Aerogel window has the same insulation value as 15 panes of glass and trapped air – which means a conventional window would have to be ten-inches thick to equal a one-inch thick Aerogel window.
But Wait! There’s More!
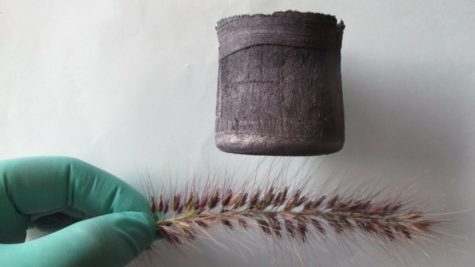
Chinese material scientists have created the world’s lightest material: A graphene aerogel that is seven times lighter than air, and 12% lighter than the previous record holder (aerographite). A cubic centimeter of the graphene aerogel weighs just 0.16 milligrams — or, if you’re having a problem conceptualizing that, a cubic meter weighs just 160 grams (5.6 ounces). The graphene aerogel is so light that an cube inch of the stuff can be balanced on a blade of grass, the stamen of a flower, or the fluffy seed head of a dandelion.

Most aerogels are produced using a sol-gel process, where a gel is dehydrated until only the aerogel remains. Some aerogels are also produced using the template method — aerographite, for example, is created by growing carbon on a lattice (template) of zinc oxide crystals — and then the zinc oxide is removed in an oven, leaving just the carbon aerogel.
To create the graphene aerogel, however, researchers at Zhejiang University use a novel freeze-drying method. Basically, it seems like the researchers create a solution of graphene and carbon nanotubes, pour it into a mold, and then freeze dry it. Freeze drying dehydrates the solution, leaving single-atom-thick layers of graphene, supported by carbon nanotubes. The researchers say that there’s no limit to the size of the container: You could make a mini graphene aerogel using this process, or a meter-cubed aerogel if you wish.
Sources: Extreme Tech and Facebook 🙂
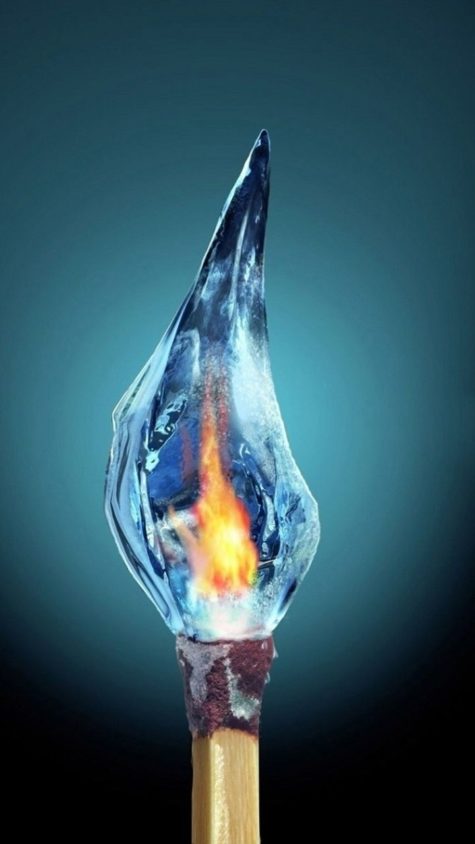
Have you ever wondered whether you could set ice on fire? These are instructions for how to make ice appear to burn and also instructions so that you can actually set it on fire.
Looking as if ice is on fire:
Most of the photos you might see of burning ice were probably made using Photoshop, but you can get the appearance of burning ice very easily without resorting to image processing tricks. Get some glass cubes (craft stores carry them), set them on a surface that can withstand fire (metal pan, pyrex, stoneware), pour something flammable over the ‘ice’, and set it alight.
You can use 151 rum (ethanol), rubbing alcohol (try for 90% isopropyl alcohol, not the 70% alcohol stuff), or methanol (Heet™ fuel treatment from the automotive section of a store). These easy-to-obtain fuels burn cleanly, so they won’t set off your smoke alarm (I know… I tried).
If you want colored flames, you can add any of the usual flame colorants to the ethanol or rubbing alcohol. If you use methanol, try adding a little boric acid for a brilliant green flame. Use caution with methanol, since it burns very hot.
One little display tip: You can give glass cubes the imperfect, crackled appearance of water ice by setting one on fire and then tossing it (with tongs) into water after the fire goes out. The glass may shatter, but if you have the temperature just right you’ll just create internal fractures that look very pretty in photographs.

Flaming ice
High-proof ethanol (like 151 rum) or 90% isopropyl alcohol will float on the surface of water and mix with it so that as long as there is fuel, your ice will appear to burn. Don’t use methanol… as the ice melts, it will extinguish the flame (methanol is highly toxic too). You can use ethanol on ice used for human consumption (or flaming ice cream drinks).
Note: Rubbing alcohol is toxic and should only be used for decorative purposes.
Really Burning The Ice
You may be thinking it is impossible to burn ice. Strictly speaking, that is not true. You can burn ice, just not water ice. If you make ice cubes from any of the alcohols I have listed, you can burn them. For pure alcohol ice cubes, you’ll need a way to freeze the liquid down to about -100°C, give or take a few degrees depending on the specific alcohol.
You don’t need to get quite that cold for 75% alcohol/25% water ice, which will burn if you spritz it with a little liquid alcohol to get flammable vapor over the ice. You may be able to freeze the 75% solution over dry ice.
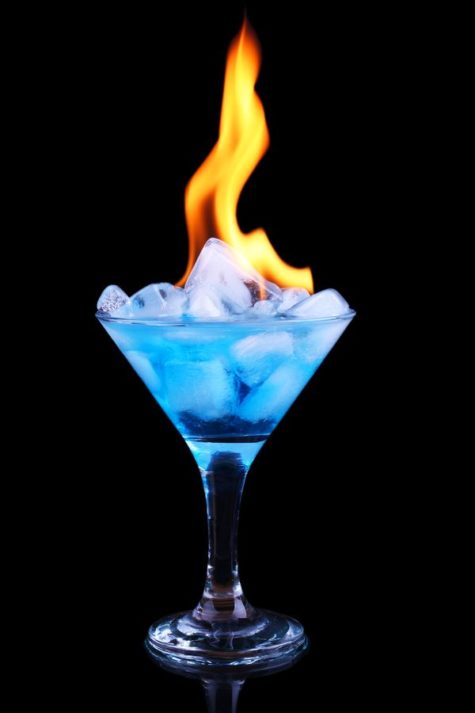
Flaming Ice Safety
Just remember two things:
- If you want to ingest the flaming ice, only use food-grade ethanol, not some other fuel.
- Methanol burns very, very hot! You can get away with using almost any surface if you use ethanol or isopropanol (hey… you can even touch the flame briefly). The uncontrolled-fire and burn risks are much higher using methanol because it produces so much heat.

Because we like to look at the numbers!