shirleytwofeathers
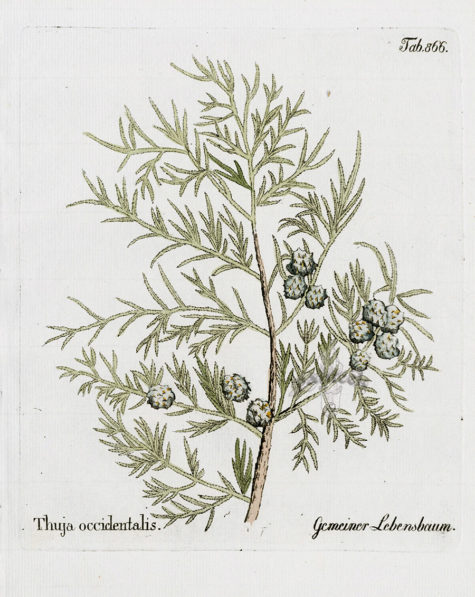
Thuja aka Arborvitae
- Parts Used: Young twigs
- Constituents: 1% volatile oil including thujone, flavonoid glyoside, musilage, tannin.
- Actions: Expectorant, Stimulant to smooth muscles, Diuretic, Astringent, Alterative, Anthelmintic, Diaphoretic, Emmenagogue
- Cautions: Avoid during pregnancy. Taken in excess the essential oil can produce unpleasant results; it was officially listed as an abortifacient and convulsant in overdose.
Thuja is a genus of coniferous trees in the Cupressaceae (cypress family). There are five species in the genus, two native to North America and three native to eastern Asia.
- White Cedar – Thuja occidentalis
- Western Red Cedar – Thuja plicata
- Korean Thuja – Thuja koraiensis
- Japanese Thuja – Thuja standishii
- Sichuan Thuja – Thuja sutchuenensis
Members are commonly known as arborvitaes, (from Latin for tree of life) Thujas or Cedars. The name Thuja is a latinized form of a Greek word meaning ‘to fumigate,’ or thuo (‘to sacrifice’), for the fragrant wood was burnt by the ancients with sacrifices. The tree was described as ‘arbor vita ‘ by Clusius, who saw it in the royal garden of Fontainebleau after its importation from Canada.

The Basics
Most of the herbal information I found on Thuja refers specifically to Thuja occidentalis – White Cedar, or Arborvitae – but it is possible that the other varieties share similar characteristics and qualities.
- It is important not to confuse the Western Red Cedar (Thuja plicata) with the Eastern Red Cedar (Juniperus virginiana) as the two are quite different.
The name arborvitae is particularly used in the horticultural trade in the United States. It is Latin for “tree of life” – due to the medicinal properties of the sap, bark, and twigs. Despite its common names, it is not a true cedar in the genus Cedrus, nor is it related to the Australian white cedar, Melia azedarach.
Thuja is used for respiratory tract infections such as bronchitis, bacterial skin infections, and cold sores. It is also used for painful conditions including osteoarthritis and a nerve disorder that affects the face called trigeminal neuralgia.
Some people use Thuja to loosen phlegm (as an expectorant), to boost the immune system (as an immunostimulant), and to increase urine flow (as a diuretic). It has also been used to cause abortions.
Thuja is sometimes applied directly to the skin for joint pain, ostearthritis, and muscle pain. Thuja oil is also used for skin diseases, warts, and cancer; and as an insect repellent.
In foods and beverages, Thuja is used as a flavoring agent. In manufacturing, Thuja is used as a fragrance in cosmetics and soaps.
According to WebMD, Thuja contains chemicals that might fight viruses. It also contains a chemical called thujone that can cause brain problems.
Angelica
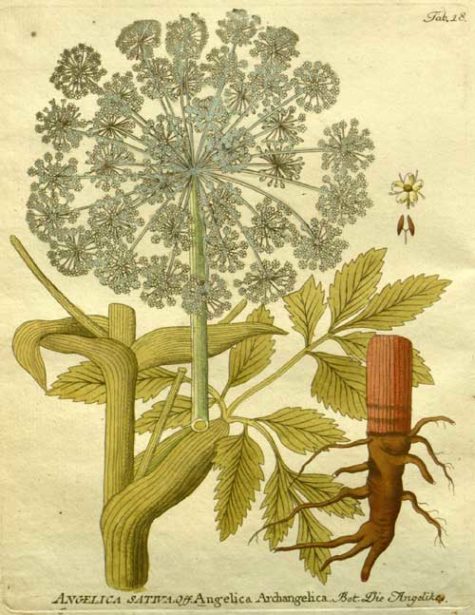
- Scientific Name: Angelica archangelica
- Plant Family: Umbelliferae
- Parts Used: Root, seed, stems
- Actions: Alterative, Antimicrobial, Aromatic, Bitter, Carminative, Circulatory Stimulant, Diaphoretic, Diffusive, Emmenagogue, Expectorant, Grounding, Nervine
Notes: Angelica archangelica is not the same plant as Chinese Angelica (A. sinesis), often referred to as dong quai or dang gui. There are about 30 varieties of Angelica, but Angelica archangelica is the only one officially employed in medicine.
Cautions: Use care when wildcrafting, as it resembles both Queen Anne’s Lace (a benign wild carrot) and Water Hemlock (a poisonous plant).
The Basics:
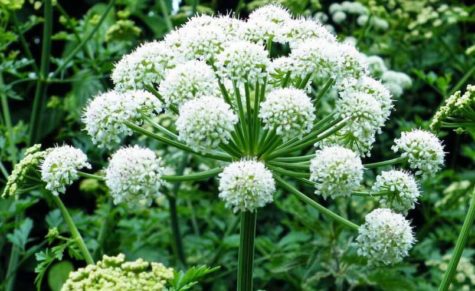
Angelica is a stunning white flower that looks like a white starburst exploding across the green hillsides. One of Iceland’s most cherished herbs, it is not only beautiful, but also appreciated as a nutritious food, a liqueur and an herbal remedy. The roots and stems can be boiled or pickled and are considered a delicacy in all of Scandinavia. The stems were used to make a musical flute, as well as flavor reindeer milk or be crystallized in sugar for desserts.
Angelica is a veritable giant in the herb world. The towering plant is widely traveled and has a background rich in herbal lore. Use has been made of leaves, stems, roots, and seeds in cooking and in medicine.
Angelica is used for heartburn (dyspepsia), intestinal gas (flatulence), loss of appetite (anorexia), overnight urination (nocturia), arthritis, stroke, dementia, circulation problems, “runny nose” (respiratory catarrh), nervousness and anxiety, fever, plague, and trouble sleeping (insomnia).
According to WebMD, Angelica contains chemicals that might kill cancer cells and fungus, reduce anxiety, and settle the stomach.
Some women use Angelica to start their menstrual periods. Sometimes this is done in hopes of causing an abortion. Angelica is also used to increase urine production, improve sex drive, stimulate the production and secretion of phlegm, and kill germs.
Some people apply Angelica directly to the skin for nerve pain (neuralgia), joint pain (rheumatism), and skin disorders. In combination with other herbs, Angelica is also applied to the skin for treating premature ejaculation.
Angelica is also used as a smell in aromatherapy to reduce symptoms associated with quitting tobacco (nicotine withdrawal).
It should be noted that Angelica has a tendency to increase the sugar in the urine, so those with a tendency to diabetes should avoid it.
A strong volatile oil is present in all parts of the plant, but especially in the root, and Angelica is effective as a general tonic. Eating Angelica stalks is said to relieve flatulence and soothe “a feeble stomach.”
Drinking Angelica tea is said to promote urine and perspiration. It is also reputed to cause a strong dislike for alcohol and is sometimes used as a treatment for alcoholics.
Strain the tea to make a cool bath for tired eyes or a wash to cleanse the skin. The scented leaves are an ingredient in potpourri. Bees and wasps are attracted by the abundant nectar on Angelica flowers.
Continue reading
Horseradish
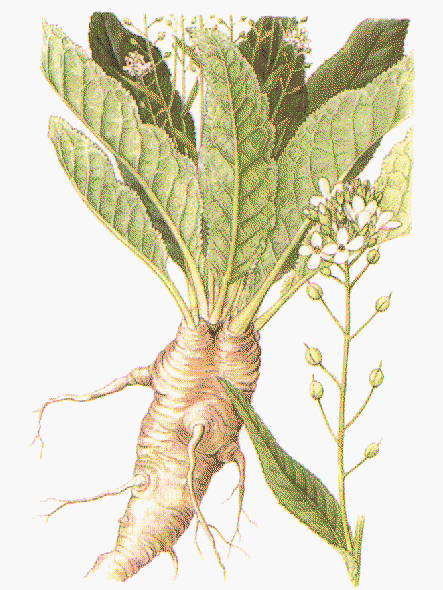
- Scientific name: Armoracia rusticana
- Family: Cruciferae
- Parts Used: Tap root, leaves (occasionally)
- Actions: Stimulant, Carminative, Rubefacient, mild Laxative, Diuretic, Hepatic, Vermicide
The Egyptians knew about horseradish as far back as 1500 B.C. Early Greeks used it as a rub for lower back pain and an aphrodisiac. Jews still use it during Passover seders as one of the bitter herbs. Some used horseradish syrup as an expectorant cough medicine; others were convinced it cured everything from rheumatism to tuberculosis. Legend has it the Delphic oracle told Apollo, “The radish is worth its weight in lead, the beet its weight in silver, the horseradish its weight in gold.”
Horseradish is an old household remedy useful wherever a stimulating herb is called for. It can be used in influenza and fevers as a rough equivalent to Cayenne Pepper. It stimulates the digestive process whilst easing wind and griping pains. It has been used in cases of urinary infection. Externally it has a stimulating action similar to Mustard Seed. It can be used for rheumatism and as a poultice in bronchitis.
Fresh horseradish root contains calcium, magnesium, sodium, vitamin C, and has antibiotic qualities. According to WebMD, Horseradish might help fight bacteria and stop spasms.
A tea or decoction of horseradish is antiseptic, stimulant, laxative and strongly diuretic, but as it becomes a purgative when taken in large doses it is best to be cautious. It is often best used when applied externally. Apply grated fresh root to aching joints and chilblains, or infuse it in milk as a skin tonic. Traditionally taken to expel worms, horseradish has only been used as a food during the last two or three hundred years.
This plant has been in cultivation from the earliest times, but its exact place of origin seems to be obscure. It is probably the plant mentioned by Pliny under the name of Amoracia, and recommended by him for its medicinal qualities, being then apparently employed exclusively in physic, not as food or condiment. Both the root and the leaves of Horseradish were universally used as a medicine during the middle ages.
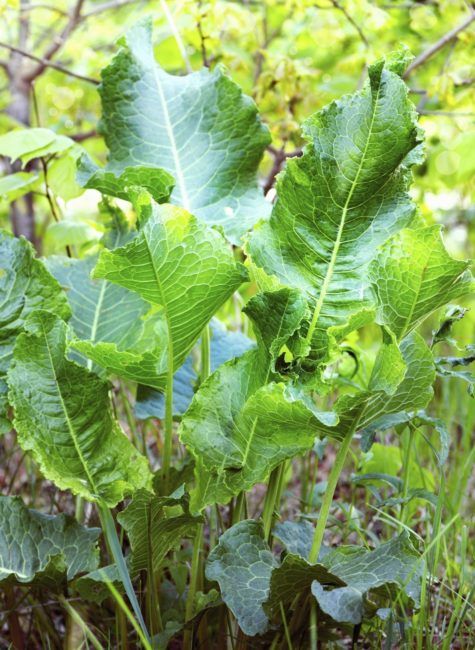
Description
Horseradish is a perennial with large, narrow, sometimes deeply cut leaves and a thick, tapering, fleshy root. In temperate climates long, loose panicles of white, four-petaled flowers occasionally appear in midsummer, but the seeds seldom ripen.
Mastic Thyme aka Spanish Marjoram

- Scientific Name: Thymus mastichina
- Common Name: Spanish Marjoram
- Plant Family: Lamiaceae or Labiatae
- Parts Used: Leaves, Flowers, Essential Oil
- Actions: Antiseptic, Deodorant, Disinfectant, Analgesic, Anti-inflammatory, Antibacterial
General Overview
Thymus mastichina is a very special thyme, native in the mountains of the Iberian Peninsula, Central Spain and Portugal. It is known by a number of different common names including Spanish Marjoram, Spanish Wood Marjoram, White Thyme, Wild Marjoram or Mastic Thyme. The leaves, and especially the essential oil contained in them, are strongly antiseptic, deodorant and disinfectant.
Thymus mastichina should not be confused with Marjoram also known as sweet Marjoram, knotted Marjoram and previously classed as Marjorana hortensis (Origanum majorana). Nor should it be confused with the Mastic Tree (Pistacia lentiscus).
As the name implies it grows primarily in Spain. Thymus mastichina produces tiny, oval-shaped, green leaves, which have an intense flavor. In its Spanish homeland it is used as a culinary herb for meat dishes, stews and sauces and because of its strong aroma has been commonly used in Andalucía to season and preserve olives.
Despite this fact, it is prized more for its essential oils than for its herbal properties. The plant has an herbaceous scent with eucalyptus-like overtones with a hint of a vanilla note, which, in aromatherapy, is used for its soothing, relaxing effect. It’s oil is pale orange to amber in color and has a distinctive eucalyptus like aroma. It is also considered to be especially beneficial in relaxing muscles.
Used fresh or in dried form, its leaves are used to make an herbal tea that is considered useful in treating sore throats, catarrh and colds. If preferred, the tea can be used to gargle with rather than ingested. Infusions are attributed curative or palliative properties of arthritis and rheumatism. Mastic Thyme, may be effective in protecting against colon cancer.
The Basics
The species name mastichina and the common name of Mastic Thyme derive from the Greek word massein, meaning ‘to chew’, or the verb mastichein meaning ‘to gnash the teeth’. It is the origin of the English word masticate.
Interestingly, the Mastic Tree is a small Mediterranean evergreen tree (Pistacia lentiscus) of the cashew family. The tree produces an aromatic, ivory-coloured resin, also known as mastic, is harvested as a spice from the cultivated mastic trees grown in the south of the Greek island of Chios in the Aegean Sea. Mastic resin is a relatively expensive kind of spice that has been used principally as a chewing gum. The flavor can be described as a strong, slightly smoky, resiny aroma.
Mastic Thyme produces tiny, oval-shaped, green leaves, which have an intense flavor. In its Spanish homeland it is used as a culinary herb for meat dishes, stews and sauces and because of its strong aroma has been commonly used in Andalucía to season and preserve olives.
Despite this fact, it is prized more for its essential oils than for its herbal properties. The plant has an herbaceous scent with eucalyptus-like overtones with a hint of a vanilla note, which, in aromatherapy, is used for its soothing, relaxing effect. It is also considered to be especially beneficial in relaxing muscles. The essential oil is most often found under the name: Spanish Marjoram.
Used fresh or in dried form, its leaves are used to make an herbal tea that is considered useful in treating sore throats, catarrh and colds. If preferred, the tea can be used to gargle with rather than ingested. Infusions are attributed curative or palliative properties of arthritis and rheumatism.
The leaves are used as a seasoning. They have a pungent eucalyptus-like aroma. If the leaves are to be dried, the plants should be harvested in early and late summer just before the flowers open and the leaves should be dried quickly. The plant is also the source of an essential oil, called “oil of marjoram” or “Spanish Marjoram”, that is used extensively as a flavoring for soups etc.
The essential oil obtained from the leaves is also used in perfumery, as a mouth wash, medicinally etc.
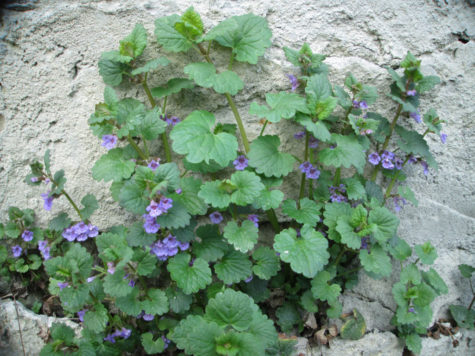
Ground Ivy
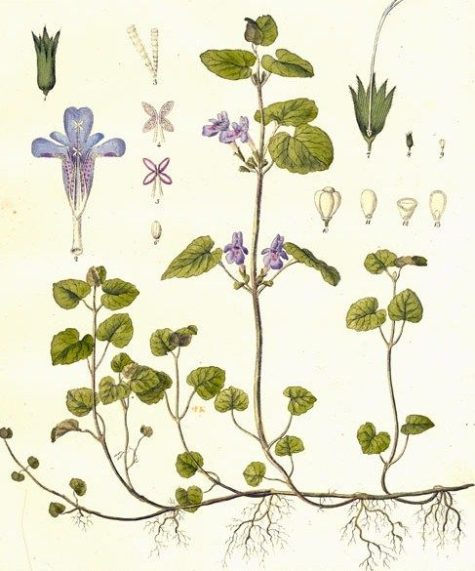
- Scientific Name: Glechoma hederacea
- Plant Family: Lamiaceae
- Parts Used: Leaves, stems, and flowers
- Actions: Expectorant, Astringent, Diuretic, Tonic, a gentle Stimulant, Anti-catarrhal, Vulnerary
General Overview:
Ground Ivy is an aromatic, perennial, evergreen creeper of the mint family. This little plant grows on waste ground and in hedgerows everywhere, the leaves are dark and kidney shaped and the flowers bright dark blue. The Romanies made a tea from Ground Ivy flowers and wood sage as a cure for fevers and colds. The herb is used by herbalists in the treatment of blood and kidney disorders.
The leaves are downy, dark green and kidney-shaped, with glands that contain an aromatic, bitter oil. The tiny deep-throated flowers are purple or blue.
Some people consider Ground Ivy to be an attractive garden plant, and it is grown in pots and occasionally as a groundcover. Easily cultivated, it grows well in shaded places. A variegated variety is commercially available; in many areas this is the dominant form which has escaped cultivation and become established as an aggressive, adventitious groundcover.
Note:
Ground Ivy is sometimes confused with common mallow (Malva neglecta), which also has round, lobed leaves; but mallow leaves are attached to the stem at the back of a rounded leaf, where Ground Ivy has square stems and leaves which are attached in the center of the leaf, more prominent rounded lobes on their edges, attach to the stems in an opposite arrangement, and have a hairy upper surface.
In addition, mallow and other creeping plants sometimes confused with Ground Ivy do not spread from nodes on stems. In addition, Ground Ivy emits a distinctive odor when damaged, being a member of the mint family.
The Basics:
Ground Ivy has been used in the traditional medicine of Europe going back thousands of years: Galen recommends the plant to treat inflammation of the eyes. John Gerard, an English herbalist, recommended it to treat tinnitus, as well as a “diuretic, astringent, tonic and gentle stimulant. Useful in kidney diseases and for indigestion.” It has also been used as a “lung herb.”
Its presence as an invasive weed in North America is the result of the value placed on it by European settlers as a medicinal herb and ale preservative; the species was imported and widely cultivated in herb and kitchen gardens.
Other traditional uses include as an expectorant, astringent, and to treat bronchitis. In the traditional Austrian medicine the herb has been prescribed for internal application as salad or tea for the treatment of a variety of different conditions including disorders associated with the liver and bile, gastrointestinal tract, respiratory tract, kidneys and urinary tract, fever, and flu.
An ancient ale herb, bitter Ground Ivy was used to clear and flavor ale before the introduction of hops.
Continue reading
Making Honey Powder Pastes
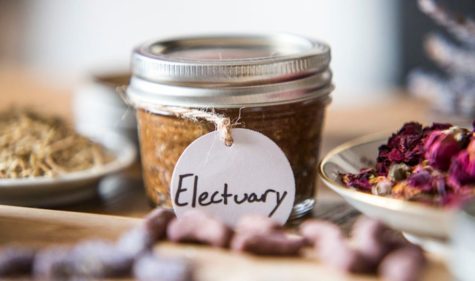
Aside from capsules, there are other ways to take powdered herbs. A honey powder paste, or electuary, is a particularly nice way to take them, and it preserves the herb material very well, too.
Administration and Dosage Guidelines
You can stir the honey powder paste into tea or hot cereal, or just eat it off the spoon. For medicinal effects, take 1 to 3 teaspoons 2 or 3 times per day.
Shelf Life and Storage Guidelines
You can store honey powder paste in a glass jar for a year or more. As with other herbal medicines, it is best to keep it away from heat and light.
Necessary Tools, Equipment, or Ingredients
- Powdered herbs
- Honey
- Small, wide-mouth jars
- Small pot
- Water
- Stove or hot plate
- Labels
Preparing Remedies – Step by Step
Use a ratio of 1 part powdered herbs to 5 parts honey. For example 2 1/2 tablespoons powdered herbs to 3/4 cup honey. You can grind your own, but store-bought powdered herbs will make for a less gritty and smoother texture.
Measure the honey and place it in a jar. It’s best to use a squat, wide-mouth jar as this will also be the container for your finished honey powder paste.
Warm the honey gently by placing the jar in a small pot of hot (not boiling) water on the stove or on a hot plate. Do not let water get into the jar – keep the water level in the pot 1 to 2 inches below the jar’s mouth.
As the honey warms, it will transition suddenly to a thin, watery consistency. When this happens, remove it from the heat and stir the powdered herbs into the honey.
Stir very, very well, making sure to break up any clumps of powder. Continue stirring for a few more minutes after you think it’s all stirred in, so it will not separate or clump up. The paste will thicken as it cools and even more over time.
Close the jar and label it with the ingredients used and the date it was made.
Pros
- Long shelf life. When suspended in honey, the herb material is protected from oxidation and breakdown. Even powdered herbs will maintain their potency for years when they’re preserved in honey.
- Full spectrum. With any powder-based preparation, you get all the water, alcohol, and fat soluble constituents the herb has to offer.
- Delicious. While some don’t like the grittiness of honey paste, the sweetness is very popular.
Cons
- Sweet means sugar. Herbal honey powder pastes are not ideal for those with insulin resistance, diabetes, or other blood sugar regulation problems.
- Gritty. Especially if you grind your own herbs at home, your paste may have a gritty texture that some don’t enjoy. Commercially made herbal powders are much finer and more consistent in texture, and yield a smoother paste.
Additional Considerations
In the Ayurveda medical tradition of India, it’s common to make a similar preparation using ghee (clarified butter). It’s not as sweet, but it can be employed in the same way as a honey powder paste.
Source: Herbal Medicine for Beginners
How To Make A Healing Lotion
Lotions are what you get when oil and water mix. The trick is finding a way to keep them in suspension. Most instructions for making lotions call for water and herb-infused oils, but this yields a very thin, runny lotion that is more likely to separate. Working with salves instead of oils makes a thicker lotion ore likely to stay mixed.
If you prefer thick lotions, use salve. If you prefer thin lotions, use oil. If you prefer something in between, use half salve and half oil.
Administration and Dosage Guidelines
Lotions are used topically for dry conditions, such as eczema and dermatitis. You can use them any time as part of your daily skin care routine. Lotions are excellent for later-stage healing of burns.
Apply lotions frequently for best results – 2 to 4 times daily, depending on the issue.
Shelf Life and Storage Guidelines
Lotions should be used within 1 to 3 months. If you live in a warm climate, keep them refrigerated.
Necessary tools, Equipment, or Ingredients
- Rose water, water-based witch hazel extract, tea, or water
- Herbal salve or herb-infused oil
- Blender
- Storage container
- Labels
Preparing Remedies – Step by Step
In order to make a lotion, you will first need an herbal salve or herb infused oil. Instructions for how to make these can be found here:
Make sure all your ingredients are at room temperature. If any are warmer or cooler than the others, they may not emulsify.
Measure equal amounts of salve and water (plain water, tea, rose water, water-based witch hazel extract, etc). Use no more than 1 cup each. Most blenders can handle no more than 1 1/2 to 2 cups of lotion.
Put the water in the blender and blend for 1 to 2 minutes until frothy.
Use a fork to stir the salve to soften it. With the blender running, slowly add the salve, a forkful at a time. If you are using oil, slowly pour it into the blender. Continue to blend for a few minutes. It will form a suspension and your finished lotion.
Bottle the lotion. Cap the bottle and label it with all ingredients, the date it was made, and include “Shake well before each use.” If your lotion separates, shaking temporarily re-emulsifies it.
Pros
- Emollient. Soothing for dry skin conditions
- Can be applied to burns. Once the skin starts to itch, lotion can provide relief and can be made with herbs that speed new skin growth, such as calendula.
- Homemade is better. You can add any scent you like, and you know there are no preservatives or chemicals.
Cons
- Tricky to make. It may take a few tries to find the best ratio of water to salve or water to oil. If your lotion is too thick, next time add more water. If it is too thin, next time add more salve. It is okay to put a lotion back into the blender to add more water or salve/oil. Experiment until you get it the way you like it. Keep good notes so you can reproduce it next time.
- Short shelf life. Make lotion in small batches so you can use it all before it molds.
Additional Considerations
If you adjust the recipe to increase the yield, blend it in small batches so there is no more than 2 cups total in the blender at one time. Most blenders can’t emulsify more than 1 1/2 to 2 cups at a time.
Source: Herbal Medicine for Beginners
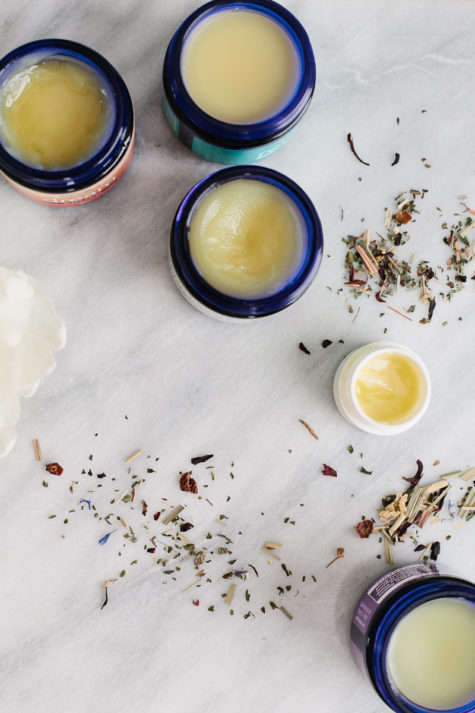
How To Make A Salve
A salve is an herb-infused oil with beeswax melted into it. Once cooled, it assumes a consistency somewhere between petroleum jelly and hard lip balm, depending on the amount of wax added and the ambient temperature.
Administration and Dosage Guidelines
Apply a liberal amount of salve to the affected area at least twice a day. Salves are best applied when the skin is hydrated and the pores are open, like after a shower or a soak.
Shelf Life and Storage Guidelines
Salves can be stored in glass jars, metal tins, or nonreactive plastic containers. Choose wide-mouth vessels that are not too deep, so you can reach to the bottom easily.
Salves are very stable, but should be used within 1 year for best potency.
Necessary Tools, Equipment, or Ingredients
- Herb-infused oil
- Beeswax, chopped, grated or pellets.
- Essential oil (optional)
- Small pot
- Shot glass
- Storage vessels
- Labels
Preparing Remedies – Step by Step
In a small pot over low heat, warm the oil gently and slowly. DO NOT boil.
Add the beeswax. Use approximately 1 ounce of wax for every 6 to 8 fluid ounces of oil. For a softer salve, use less wax. This is helpful when it will be applied to sensitive skin, or if used in cold climates. For a harder salve, use more wax. This is better if the salve will be used in hot climates or as lip balm.
Stir continuously until the wax melts.
Spoon some wax into a shot glass and freeze for a few minutes; it will set to its finished hardness. Take it out and test it with your finger to see if it is the consistency you want.
Add more wax to the pot if you want to harden the salve; add more oil if you want to soften it.
Add the essential oil:
- If you are pouring the hot salve into a single storage vessel, add the essential oil after doing so. Stir quickly and close the vessel so the essential oil does not evaporate.
- If you are pouring the hot salve into multiple small vessels, add the essential oil before pouring, stir quickly, pour, and close the vessels immediately.
Label each vessel with the ingredients used, and the date the salve was made.
Pros
- Portable. Salve is a good way to take a messy oil infusion and make it much more manageable.
Cons
- Not for use on wet or open wounds
Salves should not be used on a fresh burn, weeping rash, open lacerations, or puncture wounds. The oil and wax form a seal that prevents airflow and can allow bacteria to grow in the wound. In the case of a burn, that seal prevents heat from dispersing.
Use poultices or compresses until the wound closes up and dries out, and for a burn, until the skin begins to itch.
Additional Considerations
Clean your pot and utensils with paper towels, newsprint, or a dishrag while the salve is still hot and liquid. If it sets, use very hot water to melt it and wash it away.
You can buy empty tubes and pour hot salve directly into them to make your own lip balm.
Source: Herbal Medicine for Beginners
How To Make A Liniment
A good liniment can be made with a blend of herb-infused oil with tincture, and can also include essential oils. This combination of alcohol and oil allows you to get a full constituent extraction from the herbs, and it has both quick acting and slow-release qualities in one. It is intended for topical use only.
Administration and Dosage Guidelines
When applying a liniment, massage it in until your hands no longer feel oily. Work the liniment into the tissue; don’t just lightly rub it onto the surface.
Liniments should be applied 3 to 5 times per day, or ore as needed.
Shelf Life and Storage Guidelines
It’s better to store liniments in bottles with flat caps rather than dropper tops, as the oil can degrade the rubber on exposure. Simply tip a little into your palm when you want to use it.
Liniments are shelf stable and will retain potency for at least 1 year.
Necessary Tools, Equipment, or Ingredients
- Tinctures
- Infused oils
- Essential oil (optional)
- Funnels
- Bottles and caps
- Labels
Preparing Remedies – Step by Step
In order to make this type of liniment, you will first need a tincture and an infused oil. Instructions on how to make them can be found here:
In your storage bottle, combine the tincture and the infused oil. Cap the bottle, shake well, and label with the ingredients used and the finish date. Store in a cool dark place.
You can use equal parts tincture and oil, or experiment with ratios such as those used in an oxymel or elixir. Instructions for those can be found here: Making Oxymels and Elixirs. If you are using essential oils, add at a ratio of 10 to 30 drops of essential oil per ounce of liniment.
Shake well before each use.
Pros
- Double action. The tincture is rapidly absorbed and begins to work quickly, while the oil is absorbed more slowly and releases its medicine over time.
- Safe essential oil use. Essential oils disperse nicely in a liniment, making this a safe way to work with them for topical purposes.
Cons
- Messy. While not quite as troublesome as simple infused oils, liniments have a tendency to leak from their bottles. If you travel with a liniment, enclose the bottle in a resealable plastic bag.
Additional Considerations
Some herbalists define a liniment as a tincture made in rubbing alcohol or another substance that cannot be consumed, intended for topical use only.
Source: Herbal Medicine for Beginners
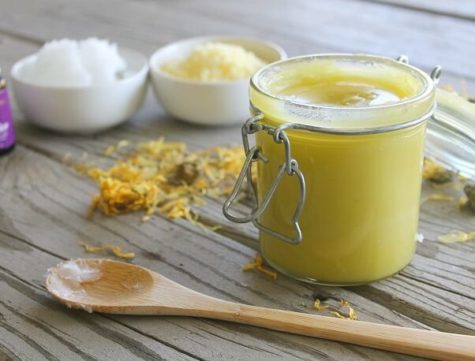
Making Herb-Infused Oils
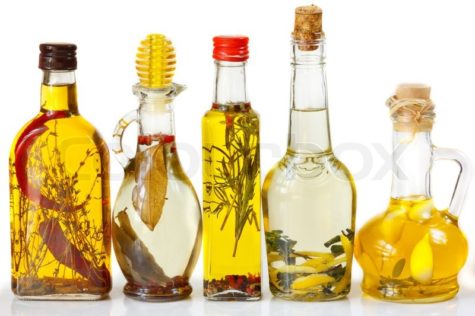
Oils extract a very different set of chemical constituents from herbs than do water or alcohol. Infused oils can be consumed – think of a nice rosemary-infused olive oil with vinegar on a salad – though most often herbalists work with them in topical preparations.
Administration and Dosage Guidelines
Infused oils may be employed directly as massage oil, conveying their effects into the skin and underlying tissues, or mixed with other ingredients to make a liniment or lotion. If you melt wax into an oil and let it cool and harden, you’ve made a salve.
For most purposes, apply the infused oil liberally to the affected area 1 to 5 times per day. massage it into the tissue as much as possible; don’t just wipe it over the surface. Work it in for a few solid minutes to encourage absorption and get the best effects.
Shelf Life and Storage Guidelines
Herb-infused oils should be stored in dark, light-blocking bottles in a cool, dry place. They will retain their potency for about 1 year if stored well.
Necessary Tools, Equipment, or Ingredients
- Herbs, fresh or dried
- Oil: olive, coconut, grapeseed, almond, etc
- Oven-safe dish
- Mason jars, various sizes, for maceration
- Wire mesh strainers
- Cheesecloth
- Funnels
- Storage bottles
Preparing Remedies – Step by Step
When working with fresh herbs, a heat method is recommended. This allows the water to evaporate and helps prevent mold.
- Chop the herbs coarsely and place in an oven-safe dish. Pour in enough oil so the herbs are submerged.
- Put the dish in the oven and turn it to its lowest setting – ideally, 180° or lower.
- Note: If your oven doesn’t go that low, here are some other options: set up a double boiler on the stove, use a simmer burner or hot plate, or use the “warm” (not low) setting on a slow cooker.
- Leave the herbs and oil exposed to heat for 8 to 12 hours. This doesn’t have to be consecutive – you can turn the oven on for a few hours, then turn it off, as long as the total heating time is completed within 3 days.
- Strain the oil and wrap the herbal residue (marc) in cheesecloth. Squeeze out the last drops of oil from the residue, much as you would squeeze out a tea bag when making tea.
- Bottle in light-blocking (colored) glass and label with ingredients used and the finish date.
- Use within one year.
When working with dried herbs, you may use the same heat method as above, or this no-heat method.
- Fill a mason jar half to three-fourths full with the herbs you want to infuse.
- Pour in enough oil to fill the jar.
- Close securely and label the jar with the ingredients used, along with the date you started.
- Macerate (allow the herbs to infuse in the oil) for 4 weeks.
- Shake the bottle every day or so to encourage maximum constituent release. Otherwise, keep in a cool, dark place.
- Strain the oil and wrap the herbal residue (marc) in cheesecloth. Squeeze out the last drops of oil from the residue, much as you would squeeze out a tea bag when making tea.
- Bottle in light-blocking (colored) glass and label with ingredients used and the finish date.
- Use within one year.
Pros
- Great for topical needs. Herbal oils are soothing, restorative, and hydrating to the skin. They also help herbal constituents penetrate into the tissue to do their work.
- Innate benefits of oils. Each oil has its own beneficial qualities. Coconut oil is anti-fungal, olive oil is extra moistening and highly anti-inflammatory. Remember that the base oil matters at least as much as the herbs you put into it.
Cons
- Potential for mold.
Examine your oil at least once a day while infusing. If there’s any sign of mold growth on the surface, you can usually skim this off with a spoon without losing the entire batch. If there’s mold growth at the bottom of the jar, though, the batch is lost. This is primarily a problem when infusing oil with fresh herbs and is a good reason to use the heat method.
- Preparation time.
A heat infusion can be ready in 1 or 2 days, but a cold infusion takes at least 2 weeks.
- Messy.
Oils tend to leak out of their bottles no matter how securely they’re closed. If you keep some infused oil in a first aid kit or travel bag, enclose it in a resealable plastic bag as well.
Additional Considerations
Olive oil is the standard for infusions today, but only because it’s so widely available. In the past, animal oils such as lard, tallow, and lanolin were the go-tos for these preparations. They’re extremely well absorbed by human skin, and are worth consideration. For some purposes, it’s preferable to use a lighter oil, like grapeseed or almond; other times, you want a thicker oil like cocoa butter, shea butter, or castor oil.
Try different oils to see which you prefer. Whichever you choose, make sure it’s made by a cold-press process. Cold-pressed oils are better quality than solvent-extracted oils, which are more likely to be rancid, plus there is solvent left in the oil and many times those solvents are toxic.
- Note:
An herb-infused oil is not the same thing as an essential oil. Essential oils are created by a distillation process and are extremely concentrated and potent. Never apply them directly to the skin without diluting in a carrier oil first, and do not take internally.
Source: Herbal Medicine for Beginners
Bobdogstar: Lilac
Vincent: Mulberry
Rennie Luttrull: queen-annes-lace-seeds
Rosanna: Spignel aka Bald Money
Annamarie Squatrito: Fumitory

I think it's time to go shopping... maybe even buy some really cool stuff at my online shops!!