Making Herb-Infused Oils
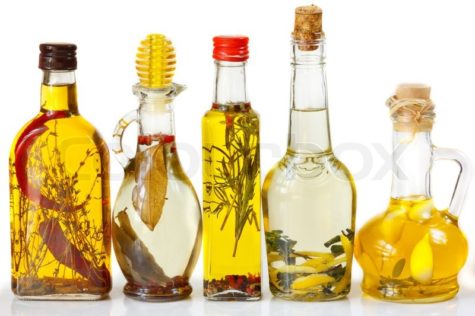
Oils extract a very different set of chemical constituents from herbs than do water or alcohol. Infused oils can be consumed – think of a nice rosemary-infused olive oil with vinegar on a salad – though most often herbalists work with them in topical preparations.
Administration and Dosage Guidelines
Infused oils may be employed directly as massage oil, conveying their effects into the skin and underlying tissues, or mixed with other ingredients to make a liniment or lotion. If you melt wax into an oil and let it cool and harden, you’ve made a salve.
For most purposes, apply the infused oil liberally to the affected area 1 to 5 times per day. massage it into the tissue as much as possible; don’t just wipe it over the surface. Work it in for a few solid minutes to encourage absorption and get the best effects.
Shelf Life and Storage Guidelines
Herb-infused oils should be stored in dark, light-blocking bottles in a cool, dry place. They will retain their potency for about 1 year if stored well.
Necessary Tools, Equipment, or Ingredients
- Herbs, fresh or dried
- Oil: olive, coconut, grapeseed, almond, etc
- Oven-safe dish
- Mason jars, various sizes, for maceration
- Wire mesh strainers
- Cheesecloth
- Funnels
- Storage bottles
Preparing Remedies – Step by Step
When working with fresh herbs, a heat method is recommended. This allows the water to evaporate and helps prevent mold.
- Chop the herbs coarsely and place in an oven-safe dish. Pour in enough oil so the herbs are submerged.
- Put the dish in the oven and turn it to its lowest setting – ideally, 180° or lower.
- Note: If your oven doesn’t go that low, here are some other options: set up a double boiler on the stove, use a simmer burner or hot plate, or use the “warm” (not low) setting on a slow cooker.
- Leave the herbs and oil exposed to heat for 8 to 12 hours. This doesn’t have to be consecutive – you can turn the oven on for a few hours, then turn it off, as long as the total heating time is completed within 3 days.
- Strain the oil and wrap the herbal residue (marc) in cheesecloth. Squeeze out the last drops of oil from the residue, much as you would squeeze out a tea bag when making tea.
- Bottle in light-blocking (colored) glass and label with ingredients used and the finish date.
- Use within one year.
When working with dried herbs, you may use the same heat method as above, or this no-heat method.
- Fill a mason jar half to three-fourths full with the herbs you want to infuse.
- Pour in enough oil to fill the jar.
- Close securely and label the jar with the ingredients used, along with the date you started.
- Macerate (allow the herbs to infuse in the oil) for 4 weeks.
- Shake the bottle every day or so to encourage maximum constituent release. Otherwise, keep in a cool, dark place.
- Strain the oil and wrap the herbal residue (marc) in cheesecloth. Squeeze out the last drops of oil from the residue, much as you would squeeze out a tea bag when making tea.
- Bottle in light-blocking (colored) glass and label with ingredients used and the finish date.
- Use within one year.
Pros
- Great for topical needs. Herbal oils are soothing, restorative, and hydrating to the skin. They also help herbal constituents penetrate into the tissue to do their work.
- Innate benefits of oils. Each oil has its own beneficial qualities. Coconut oil is anti-fungal, olive oil is extra moistening and highly anti-inflammatory. Remember that the base oil matters at least as much as the herbs you put into it.
Cons
- Potential for mold.
Examine your oil at least once a day while infusing. If there’s any sign of mold growth on the surface, you can usually skim this off with a spoon without losing the entire batch. If there’s mold growth at the bottom of the jar, though, the batch is lost. This is primarily a problem when infusing oil with fresh herbs and is a good reason to use the heat method.
- Preparation time.
A heat infusion can be ready in 1 or 2 days, but a cold infusion takes at least 2 weeks.
- Messy.
Oils tend to leak out of their bottles no matter how securely they’re closed. If you keep some infused oil in a first aid kit or travel bag, enclose it in a resealable plastic bag as well.
Additional Considerations
Olive oil is the standard for infusions today, but only because it’s so widely available. In the past, animal oils such as lard, tallow, and lanolin were the go-tos for these preparations. They’re extremely well absorbed by human skin, and are worth consideration. For some purposes, it’s preferable to use a lighter oil, like grapeseed or almond; other times, you want a thicker oil like cocoa butter, shea butter, or castor oil.
Try different oils to see which you prefer. Whichever you choose, make sure it’s made by a cold-press process. Cold-pressed oils are better quality than solvent-extracted oils, which are more likely to be rancid, plus there is solvent left in the oil and many times those solvents are toxic.
- Note:
An herb-infused oil is not the same thing as an essential oil. Essential oils are created by a distillation process and are extremely concentrated and potent. Never apply them directly to the skin without diluting in a carrier oil first, and do not take internally.
Source: Herbal Medicine for Beginners
Bobdogstar: Lilac
Vincent: Mulberry
Rennie Luttrull: queen-annes-lace-seeds
Rosanna: Spignel aka Bald Money
Annamarie Squatrito: Fumitory

I think it's time to go shopping... maybe even buy some really cool stuff at my online shops!!
Leave a Reply