Herbs
Bath Bombs DIY
When I was younger, I loved bath bombs, but avoided them as I’ve gotten older because store bought versions typically contain artificial ingredients such as dyes and fragrances.
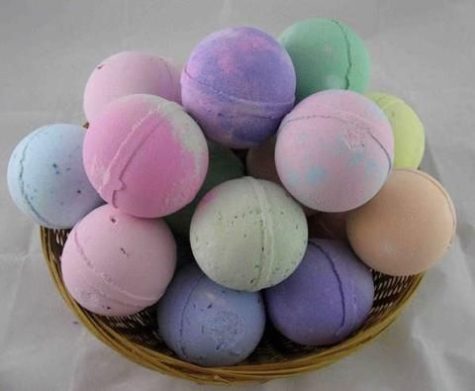
These homemade bath fizzies are a great solution! Made from nourishing sea salt or epsom salts, alkalizing baking soda and fizzing citric acid with a nourishing oil and vanilla base.
These can be packaged for a great gift or made countless ways for relaxing baths anytime! They are simple to make with kid-safe ingredients and are completely versatile. Let the kids think of ways to mix up the scents, colors, and other customizations.
Bath bombs only take seconds to make, so it is important to have the ingredients on hand and measured before you start. Most of the ingredients are pantry staples in many homes, but make sure you have these on hand:
- Baking Soda
The backbone of this recipe is alkalizing baking soda. It is a necessary complement to the acidic citric acid and part of the fizzing reaction. Food-grade aluminum free baking soda is best.
- Citric Acid
The more obscure ingredient in this recipe that a lot of people don’t have on hand is citric acid. It is necessary for the fizzing reaction that makes bath bombs feel like bathing in champagne. You can find citric acid on amazon, here’s a link: Citric Acid
- Corn Starch or Arrowroot
Corn starch provides the silky feel that we all love from bath bombs. I usually use organic corn starch powder in this recipe. Arrowroot also works but doesn’t provide quite as silky of a finished product.
- Salt, Oil and Liquid
These are all very versatile and you can pick any combination that you have on hand. You’ll need some kind of:
Oil: Pick a simple oil like olive oil, almond oil or coconut oil or get more fancy with sea buckthorn oil, argan oil or apricot oil.
Salt: Stick to basic salt or take it up a notch with epsom salt or another favorite salt option.
Liquid: Basic water works, but I also love using organic witch hazel for some extra skin soothing.
- Scents and Colors
This is where the options get endless. Use your favorite essential oils, add dried herbs or make them scent free. You can even add some natural dyes to change the color.
- Other Equipment
These are easy to make with measuring cups and your hands, but for a fancier and more uniform product, it helps to also have a digital scale to get the proportions exactly right.
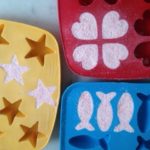
- Molds
For the easiest version, just form these into balls with your hands, but if you are making as gifts or just want fancier shapes, molds are the way to go. You can buy actual bath bomb molds at amazon if you’d like. But you could also use those plastic holiday ornaments that come apart or Easter eggs for the molds if you already have either of those on hand. Some tutorials recommend greased muffin tins. I think those silicone ice cube and candy molds would also work just fine.
Here are a bunch of different ideas for molding your bath bombs:


- Added bonus
It seriously makes your whole room smell amazing while you make these!
Bath Bomb Basic Recipes
I found two basic recipes and am including them both here:
Bath Bomb Recipe 1
- 8 ounces Baking Soda (about 1 cup)
- 4 ounces Citric Acid (1/2 cup)
- 1/2 cup (4 ounces) Sea Salt or Epsom Salt
- 4 ounces Cornstarch (about 3/4 cup)
- 2 tablespoons oil of choice (this is my personal favorite but any liquid oil will work)
- 2 teaspoons witch hazel (or water) plus a little more if needed
- 1 teaspoon vanilla extract (or more water)
- 30-40 drops of Essential oils or powdered dried herbs (ginger is great)
Bath Bomb Recipe 2
- 4 oz. baking soda
- 2 oz. corn starch
- 2 oz. citric acid
- 2 oz. Epsom salt
- 1 to 1 1/2 teaspoons water
- 1 teaspoon essential oil
- 1 1/4 teaspoon oil (I like coconut or olive oil here)
- 1-2 drops food coloring (optional)
Makes two bombs (you can easily double or triple this recipe).
Instructions:
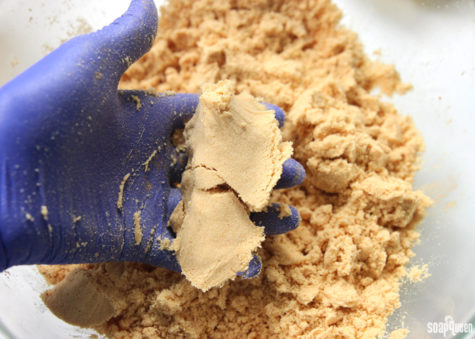
In a bowl combine the dry ingredients. Whisk to remove any clumps, corn starch tends to be clumpy. In a small glass jar stir together the wet ingredients. If you’re using coconut oil, give it a quick melt in the microwave or stove top first so it will more easily combine with the other ingredients.
Slowly pour the liquid mixture in with the dry mixture, whisking as you go. If you see the mixture fizz or foam, you may be adding the liquid too quickly. Once all the wet ingredients are combined with the dry, take a small amount in your hand and squeeze it together.
Mixture should hold together when squeezed without crumbling. It should stick together fairly well in one or two big chunks.
If it’s still too powdery to hold together, just add a tiny bit more water (or witch hazel) and mix until it does hold together.
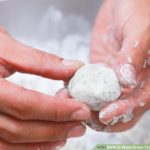
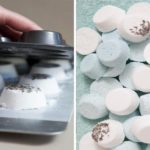
If you are using a mold that makes a ball, fill each half of your bath bomb mold with the mixture until it’s just overflowing a little. Press together, then gently remove one side of the mold. Place the bath bomb on a tray and allow to dry out just a little (10-12 minutes) before removing the other side. Once you are ready to remove the other side, gently invert the bath bomb so the uncovered side is facing down, then gently remove the other half of the mold from the top. The key word, if you haven’t noticed, is gently. These can fall apart on you very easily if you’re not careful. If a bath bomb does crack in half while you’re removing it, you can gently press it back on top of the other half, or remove all the mixture back to the mixing bowl and start the molding process again. I had this happen to a few, so don’t fret, it’s easy to fix.
If you are using tins or trays, quickly push mixture into the greased muffin tins or any other greased container. Press in firmly and leave at least 24 hours (48 is better) or until hardened. It will expand some and this is normal. You can push it down into the mold several times while it is drying to keep it from expanding to much. Using the metal molds will create a stronger and more effective final bath bomb.
Note: I have seen some reports of the bath bomb sticking to these type of molds and refusing to come out., so be sure it is well greased.
Once they are completely out of the mold, allow them to dry out for 8 hours or overnight. Once very dry, you can wrap them in plastic wrap and store in a dry place until you’re ready to use them, or you can gift them to friends.
Tips and Variations:
You can add dried flower buds, like lavender buds, to these pretty easily. Just remember to use food grade dried flowers to avoid flowers that might have been grown with pesticides as you don’t want to soak in a bath with that. No thanks! Do keep in mind that after using a bath bomb with dried petals, you will have to remove these from your tub. So if that bothers you, then leave the buds out.
If you want to create two tone bath bombs, just mix up your batter in two separate bowls and only add the food coloring to one. Easy!
Here’s a YouTube tutorial:
Bath bombs are a great way to relax in the tub after a long day of dealing with kids, cooking, and all the other activities that motherhood entails. If you’ve never tried them, I highly encourage it, as it’s one of my favorite things to do at the end of the day.
Fool proof homemade bath bombs These turned out to be a lot of fun to make, and they are even more fun to use! I highly recommend giving them a try, or you could make a batch to give away to friends or family. Enjoy!
Borrowed from: The Prosperity Project
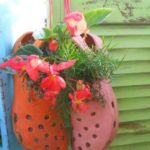
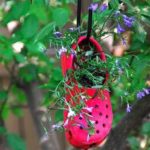
Cool Crock Planters
Got some crocks that you no longer wear or that have lost their tread?
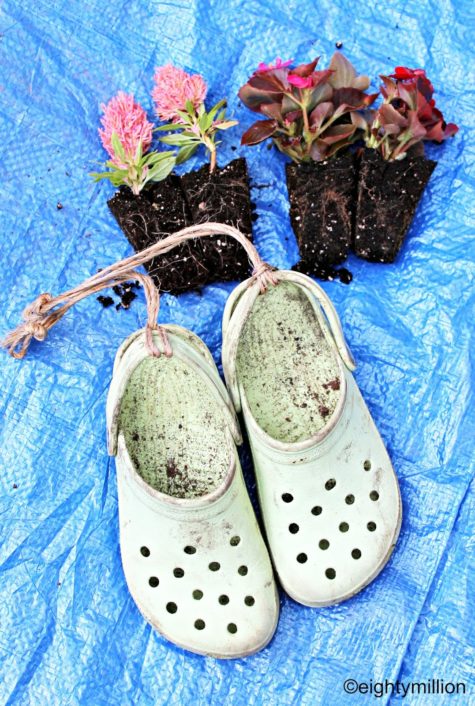
Crocs make great little planters. They have great drainage and they are easy to hang! Fill them with potting soil and plant flowers, hen and chicks or other sedums. If you are worried about the soil falling out through the holes, cover the inside with a piece of burlap. Keep them well watered and voila!
What a great way to grow a little mint garden, or maybe some small herbs like thyme…
Here are some more great ideas:


How fun! I wonder if I have crocks in my closet…
Borrowed from: The Prosperity Project
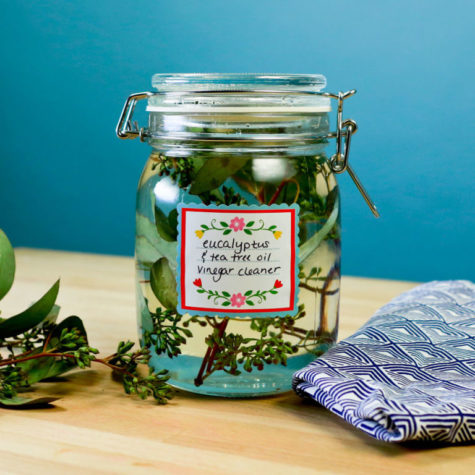
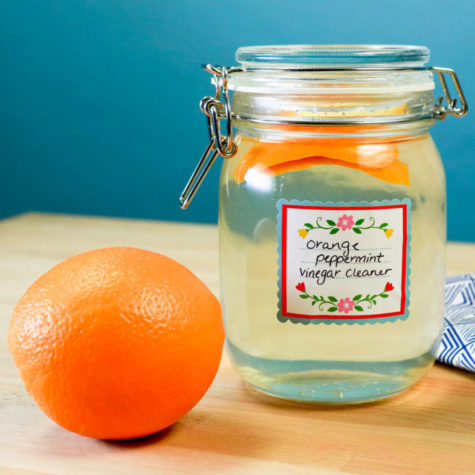
Delicious and Aromatic
Here is a collection of recipes for some deliciously decadent wonderfully aromatic cleaning products that you can make yourself.

White vinegar is something of a super tool when it comes to cleaning. It’s non-toxic, inexpensive, easy to find, and cleans, oh, just about everything: It brightens windows, freshens laundry, banishes spots on carpeting, and much more. A spray-bottle of a vinegar solution is great to have around for pesky cleaning tasks (though, avoid using it on marble countertops and hardwood floors, since the acidity could damage them).
The most effective cleaning mixture is 50% white vinegar, 50% water, but you can also add fruit peels, herbs or essential oil to the bottle so your house will smell great, too. Just give it a shake and let it infuse for at least a week.
Here’s an all purpose recipe:
Get a spray bottle and fill it up. If you’re recycling a bottle from a previous cleaner make sure you rinse it out well before mixing your ingredients (duh).
You’ll need:
- Warm Water
- White Vinegar
- Isopropyl Alcohol
- Dish Soap (a drop)
- Fresh aromatic herbs and/or your favorite essential oil.
Put your leaves in the bottle and bruise them with a wooden spoon handle. You can also just twist them up or squeeze them in your hand. This activates the leaves to produce their natural oils. Make sure your herbs are very fresh so you get as much scent as possible from them. It’s really hard to completely mask the smell of vinegar but that’s just the price we pay for DIYing it. The smell quickly dissipates when it dries so it’s fiiiiine.
The mixture is easy:
- 1 part warm water,
- 1 part vinegar,
- 1/2 part alcohol.
- Add a DROP of dish soap and shake it up.
The herbs will permeate the mixture with their natural essential oils. Not only does it help cut the alcohol and vinegar scent some but herbs and essential oils also act as a natural antibacterial component.
There you go!
In summer I like to add orange or lemon peels. You can easily use essential oils to scent your spray as little or as much as you’d like. They work a little better since the scent is concentrated.
Note: You can refresh the scent with essential oils if and when your mixture begins to smell too much like vinegar.
Variations
1. A Balanced Blend: Two or three pieces of lemon rind and a few springs of rosemary blend together to create a clean, fresh scent. Plus, the fruit’s acid adds extra cleaning properties — perfect for stubborn stains.
2. A Hint of Citrus: A little bit of essential oil goes a long way, and 2-3 drops of peppermint are just enough to lend an energizing burst to the summery scent of orange rinds.
3. A Cool Burst: A few sprigs of eucalyptus and 2-3 drops of tea tree oil create a stench-absorbing powerhouse — and some people believe tea tree fights bacteria, too. Whether that’s true or not, this combination is incredibly invigorating.
4. An Earthy Option: Infuse your solution with fresh sage leaves.
5. Spicy and Sweet: This recipe adds interest with orange peels, cinnamon sticks and vanilla beans. You could also add cloves, allspice, and nutmeg for something a little more seasonal.
6. A Relaxing Aroma: Infuse your vinegar solution with fresh lavender, lemon balm, or even delightful spicy scented geranium leaves.
7. Play with Oils: Essential oils come in many fun scents (and some will kill bacteria and mold). Just be sure to shake to combine before using. Add about 10 drops of a pure essential oil (no synthetic fragrances or you’re defeating the purpose of non-toxic cleaning) to your half vinegar-half water spray bottle. Of all the essential oils I’ve tried, peppermint is one of the few that actually masks the odor of the acetic acid in vinegar. Not a mint fan, try clove or eucalyptus which are also strong oils.
Borrowed from: The Prosperity Project


I think it's time to go shopping... maybe even buy some really cool stuff at my online shops!!
