No Sew
UpCycled Coasters
Most ideas for recycling jeans require a bit of skill, but these coasters looked pretty easy:
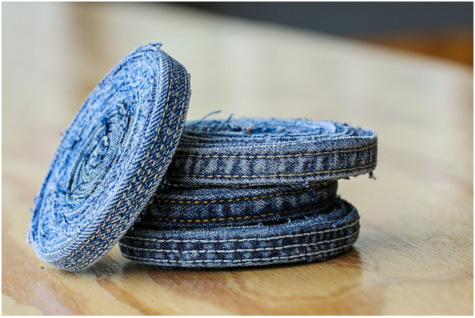
Cut out seams from the legs of old jeans and use them to create gorgeous looking coasters. All you need to do is tightly roll the seam into a spiral and keep gluing it on the inside to ensure it sticks well. Try and create a 3.5” spiral. If you do have a cork lying at home, cut it out and stick that to the bottom of your spiral seam coaster. This one’s just an addition; the coaster is good to be used without it too.
You could also use the jean pockets. Simply remove the pocket from the jean, and decorate the edges with lace, sequins, colorful buttons or anything else you fancy!
I’d recommend a good fabric glue, but hot glue will probably also work.
Borrowed from: The Prosperity Project
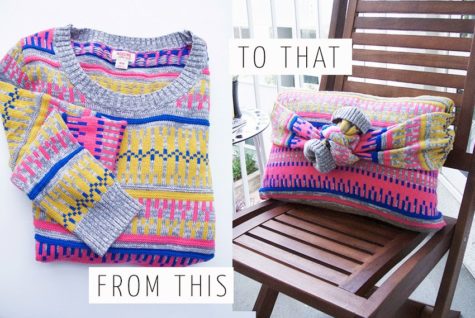
A Sweater Pillow Cover
I found a tutorial at Creme de la Craft for turning old sweaters into cool pillow covers. No sewing, no cutting. Here it is:
You don’t need to toss out your favorite sweater just because it’s got a hole! Instead, you can upcycle old or damaged sweaters into cozy pillows. This no-sew tutorial is so easy that it’ll take you less than five minutes to complete. Plus, it doesn’t require any cutting so you can use your sweaters as pillow covers during the summer and wear them again in the winter!
Steps:
- Stuff the pillow inside the sweater, stopping an inch below the underarm seam.
- Pull the sleeves from the back of the pillow and wrap them around the front of the pillow, knotting them together in the center. Fold back the cuffs if desired.
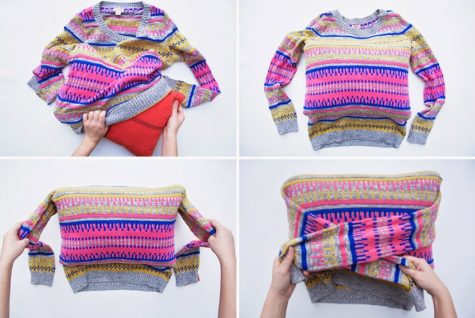
- Turn the pillow upside down to expose the bottom hem of the sweater.
- Tuck in one side of the bottom hem. Tuck in the other side to form a little pocket.
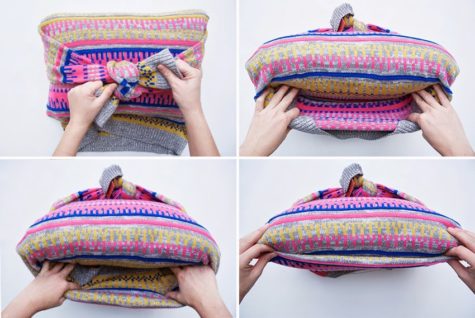
- Turn the pillow on its opposite side to expose the neckline of the sweater.
- There should be a little pocket that was formed on the back of the pillow after you knotted the sleeves in the front. Tuck the neckline of the sweater inside this little pocket so that it is hidden.
This technique can be used with any long sleeved shirt. I’m not sure if the knot on the back would bother me, and I am also unsure how well it holds up to continued use.

Borrowed from: The Prosperity Project
Make A Cool Pillow
Because T shirt material doesn’t fray or unravel, it makes a for a very easy customized throw pillow. Old fleece blankets make a nice pillow as well. These pillows are so easy to make that I don’t think we even need an extensive step by step tutorial.

Simply cut the T shirt into as large of a square or rectangle as possible, then cut fringe around the edges. Tie the fringe together, and when you have 3 sides finished, stuff it with batting or insert a plain pillow. Then tie the last side up.
Here’s a series of pics that show how it works:

If you prefer a finished edge, you’ll need to do some sewing. Button down shirts can be made into pillow covers, and then unbuttoned and tossed into the washing machine. Simply button the shirt, turn it inside out and lay it on a flat surface. Smooth out the wrinkles and pin it together. Then cut it into whatever shape you like. Once it’s cut, sew the edges, flip it right side out… and Voila!!
Borrowed from: The Prosperity Project
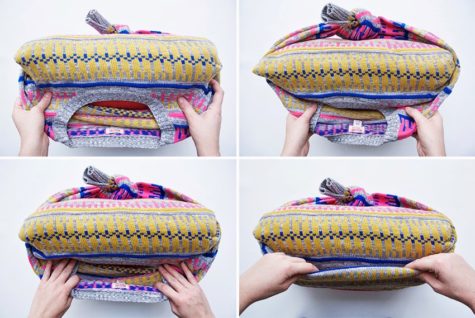
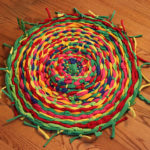
Weave A Round Rug
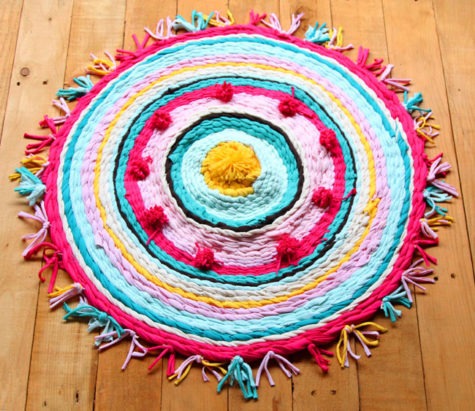
Pretty cute, huh? It’s not hard to make. Here are some pics that show how rugs like this can be made. It looks like a hula hoop is used as the frame. The fabric strips are cut from old T-shirts, but any fabric can be used.
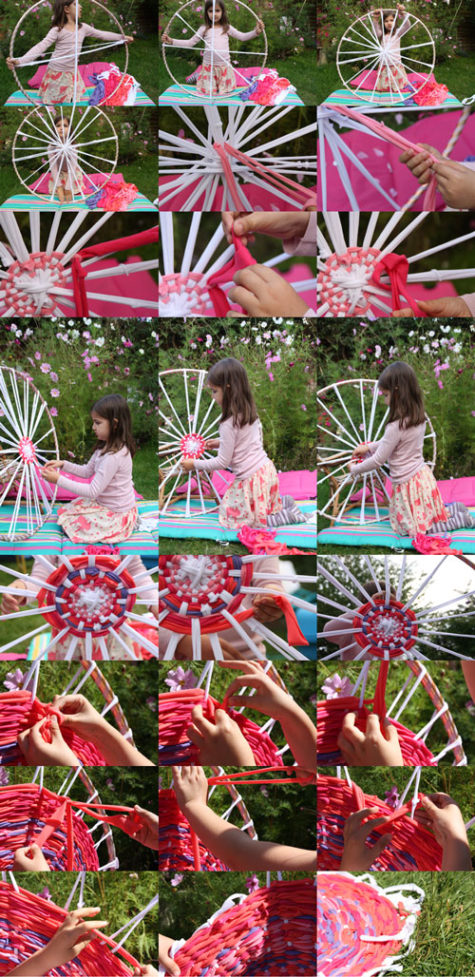
This may not be as easy as it looks. If you weave it too tightly, or if you use stretchy fabrics in strips that are too narrow, you may end up with a sort of limp basket. I found a post about this and a cute picture of a hula hoop rug fail. Here’s the link Project Hula Hoop Rug Fail and a pic:

I did find success story pics though, so I think it’s a matter of making sure that the weave isn’t too tight, and that the cross pieces are sturdy and thick. I think old towels might lend themselves to a project like this as well. Be interesting to try. Here are more pics:


Make A T-Shirt Tote
Here’s a clever idea for making bags from T shirts. It requires no sewing skills whatsoever. I found it at Mommypotamus
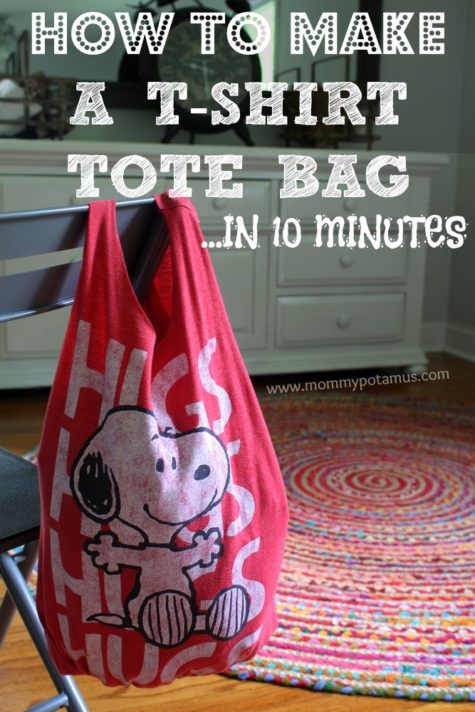
I’ve been looking for an easy-to-carry, washable alternative for the kids to use, and over the weekend I came across the perfect solution. My local thrift shop was selling cute t-shirts for 99 cents apiece that were practically begging to be upcycled into a farmer’s market tote. They’re 100% washable, and when they’re no longer useful as bags I can cut them into rags to clean with.
There was just one problem: I can’t sew. At all.
Fortunately, I came across some no-sew ideas that Katie and I adapted to fit our style (which, if you’re curious, generally favors the color red and anything Snoopy). The took no more than 10 minutes from start to finish, and I love how they turned out.
Supplies:
- Old t-shirt – The thicker the fabric, the sturdier the bag
- Sharp scissors, preferably fabric scissors
- Washable marker (optional)
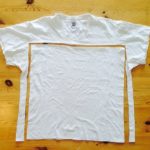
 Step 1: Cut the sleeves off
If you’d like to fold the t-shirt in half you can cut both sleeves at once so that they are identical.
Or, if your material is too thick to cut them both at once, you can cut one, then fold it in half and use the cut side as a guide for the next sleeve.
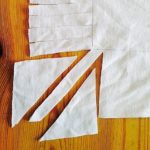
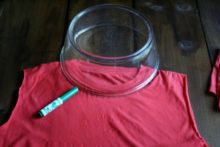 Step 2: Cut the neckline area
If you’d like, you can turn the shirt inside out and trace the outline of a bowl before cutting.
I used both methods and personally, I like free-hand cutting better because I prefer a slightly oval shape to a perfectly round one.
I ended up trimming this one a bit to make it more oval.
 Step 3: Determine how deep you want the bag to be
If you haven’t already turned your t-shirt inside out, do it now. Determine where you want the bottom of the bag to be and trace a line across.
Keep in mind that depending on the fabric used, your tote is likely stretch and become longer when it’s filled with stuff.
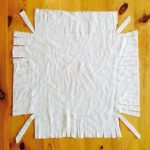
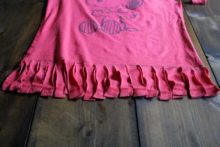 Step 4: Cut fringe
Now grab your scissors and cut slits from the bottom of the shirt up to the line marking the bottom of your bag.
You’ll want to cut both the front and back layers together because they need to match up for the next step.
I cut my slits about 3/4 to 1 inch apart.
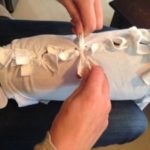
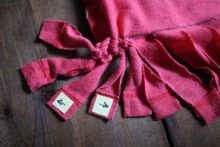 Step 5: Tie Fringe
Okay, this is going to sound really complicated, but it’s NOT, promise. Take your first pair of fringe and tie it into a knot, then tie two more pairs.
Now if you lift your bag you’ll see that although the pairs are pulling the bag together, there’s a hole between each pair. This next step will close those holes.
In the photo above you see three sets of fringe that have been tied in knots. What I do next is grab one strand from the middle set (the one with the arrow pointing left) and tie it in a knot with one of the strands on the left set. Then I take the other strand from the middle set (the one with the arrow pointing right) and tie it in a knot with one of the strands on the right set.
Then I take the remaining strand on the right set and tie it to the next set of strands, and so on and so forth until all the strands are tied. Now turn your t-shirt right side out again and voila, you’re done!
A Couple Of Fun Variations
- Turn the bag right side out when tying the fringe so that it hangs from the bottom.
- Tie the straps in knots, or tie bits of t-shirt scrap to the top as embellishments


I think it's time to go shopping... maybe even buy some really cool stuff at my online shops!!
